As someone who’s configured several proxy servers, I can tell you that Tinyproxy is a lightweight and efficient solution for your proxy needs.
No matter if you want to improve your online privacy or manage your Internet access, Tinyproxy is an excellent choice.
This guide will take you step-by-step through the process of setting up, using, and troubleshooting this proxy service.
Table of Contents
- What is Tinyproxy?
- Tinyproxy Pros and Cons
- How to Install Tinyproxy
- How to configure Tinyproxy
- How to Set Up a Browser to Use Tinyproxy
- How to Set Up a Mobile Device to Use Tinyproxy
- How to Test Your Proxy Configuration
- How to Monitor and Manage Tinyproxy
- How to Improve Tinyproxy’s Performance
- How to Troubleshoot Tinyproxy
- Final Words
1. What is Tinyproxy?
Tinyproxy is a small, fast, and versatile HTTP/HTTPS proxy server. It’s ideal for use cases where a full-featured proxy server like RapidSeedbox is overkill. The proxy is easy to configure and uses minimal system resources, making it perfect for embedded devices or small servers.

2. Tinyproxy Pros and Cons
Before diving into the setup and configuration, you need to know the advantages and potential drawbacks of using Tinyproxy. Based on my personal experience, here are the main pros and cons:
| Pros | Cons |
|---|---|
| Lightweight: Uses minimal resources, ideal for systems with limited hardware. | Limited features: Compared to more feature-rich proxy servers like RapidSeedbox, Tinyproxy is very basic. |
| Performance: Despite its small size, it can handle a significant amount of traffic without noticeable performance issues. | Basic access control: While it allows IP-based access control, it doesn’t allow for more advanced authentication mechanisms. |
| HTTPS support. | Basic logging: The logging capabilities are decent for beginners but won’t meet the needs of users requiring advanced logging and monitoring features. |
| Open source and free. | Small community: The support community is active but not as large as those for other proxy servers. This makes troubleshooting more challenging. |
| Small memory consumption. | No caching. |
| Quick setup. | No advanced content filtering. |
| Customizable. | Can’t scale: It’s not suitable for very large networks with high traffic volumes. |
| Complicated configuration: The configuration file requires some advanced technical knowledge, so it’s not suitable for everyday users. |
3. How to Install Tinyproxy
Setting up Tinyproxy is very easy. Here’s how you can do it on a Linux system.
- Update your package list: Open your terminal and run the following command to check if your package list is up to date.
sudo apt update - Install Tinyproxy: Use the following command to install it.
sudo apt install tinyproxy - Start the service: Once installed, start the service with:
sudo systemctl start tinyproxy - Enable Tinyproxy to start on boot: If you want the service to start automatically when your system boots, run:
sudo systemctl enable tinyproxy
4. How to configure Tinyproxy
After installing Tinyproxy, you’ll need to configure it depending on your needs. The configuration file, tinyproxy.conf, is located in the /etc/tinyproxy/ directory on most Linux systems. Here’s how to configure it properly:
a. Basic Configuration
- Open the configuration file: Use a text editor to open the Tinyproxy configuration file.
sudo nano /etc/tinyproxy/tinyproxy.conf - Set the port: Find the
Portdirective in the configuration file and set it to the desired port number. By default, Tinyproxy listens on port 8888.Port 8888 - Allow specific IP addresses: To restrict access to specific IP addresses or ranges, add them under the
Allowdirective. This is important for security, so make sure only trusted devices can use your proxy. For example:Allow 192.168.1.0/24 - Configure logging: Enable and specify the log file location for monitoring and troubleshooting purposes. Set the
LogFiledirective to your preferred log file path.LogFile "/var/log/tinyproxy/tinyproxy.log" - Set the log level: Use the
LogLeveldirective to specify how much detail you want in the logs. The available options areCritical,Error,Warning,Notice,Connect,Info, andDebug. For general use, I suggest usingInfoorNotice. For example:LogLevel Info - Specify max clients: Limit the number of simultaneous clients that can connect to Tinyproxy by setting the
MaxClientsdirective. This helps manage server load and helps maintain a stable performance. For example:MaxClients 100 - Timeout settings: Adjust the
Timeoutdirective to specify how long Tinyproxy should wait before closing an idle connection. For instance:Timeout 600 - Enable HTTPS: If you need to support HTTPS connections, make sure the
ConnectPortdirective includes port 443, the default port for HTTPS –ConnectPort 443 - Access control: Besides IP-based access control, you can also use the
Filterdirective to block specific URLs or domains. This is useful for content filtering. You can use it like this –Filter "/etc/tinyproxy/filter" - Anonymous mode: You can enable anonymous mode to hide your internal network information. This can be done by setting the
Anonymousdirective with this command –Anonymous "headers" - Basic authentication: If you need to secure your proxy with a username and password, you can configure basic authentication by setting the
BasicAuthdirective this way –BasicAuth username:password
b. Verification
- Save and exit: After making the necessary changes, save and exit the text editor. If you are using
nano, you can do this by pressingCTRL + X, thenY, andEnter. - Restart Tinyproxy: Apply the changes by restarting the Tinyproxy service with the following code –
sudo systemctl restart tinyproxy - Check status: Verify that Tinyproxy is running correctly by checking its status. You can do that via
sudo systemctl status tinyproxy - Test the proxy: Set your browser or device to use the proxy server and port you configured from the steps above. For example, if you set the port to 8888 and your server’s IP is 192.168.1.2, configure your browser to use
192.168.1.2:8888as the proxy server.
b. Advanced Configuration
#1. Filtering Content
You can block specific websites or types of content by using the Filter directive. Create a filter file with URLs or patterns to block.
- Create a filter file:
sudo nano /etc/tinyproxy/filter - Add block rules:
.example.com .badwebsite.com - Enable filtering: Make sure the
Filterdirective points to your filter file –Filter "/etc/tinyproxy/filter" - Restart Tinyproxy: Apply the changes and restart.
sudo systemctl restart tinyproxy
#2. Limiting Bandwidth
While Tinyproxy itself doesn’t handle bandwidth control, you can integrate it with tools like tc (traffic control) on Linux to manage bandwidth usage.
Once Tinyproxy is installed and configured, you can start using it to manage your Internet traffic. Let’s see how to set up our browser or device so you can use it.
5. How to Set Up a Browser to Use Tinyproxy
Configuring your web browser to use Tinyproxy is easy and helps you keep your online activities private and under your control. Just a heads-up: Tinyproxy is designed for Unix-like systems, but you can run it on Windows using the Windows Subsystem for Linux (WSL) or Cygwin. Here’s a step-by-step guide for setting up different browsers to use Tinyproxy.
a. Google Chrome
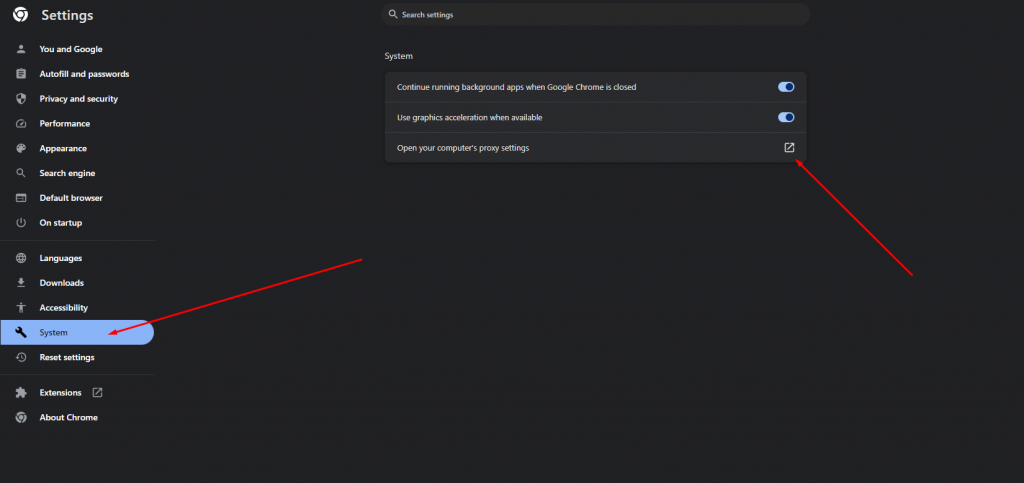
- Open Chrome settings: Click on the three vertical dots in the top-right corner of the browser and select “Settings” from the dropdown menu.
- Open System Proxy Settings: Under the “System” section, click on “Open your computer’s proxy settings.”

- Configure the proxy settings:
- For Windows: In the “Internet Properties” window, go to the “Connections” tab and click on “LAN settings.” Check the box for “Use a proxy server for your LAN,” then enter the IP address and port number of your Tinyproxy server. Click “OK” to save.
- For macOS: In the “Network” window, select your active network connection and click on “Advanced.” Go to the “Proxies” tab, check the “Web Proxy (HTTP)” and “Secure Web Proxy (HTTPS)” boxes, then enter the IP address and port number of your Tinyproxy server. Click “OK” and then “Apply.”
- For Linux: Depending on your desktop environment (GNOME, KDE, etc.), access the network settings and find the proxy configuration section. Enter the IP address and port number of your Tinyproxy server, then save the settings.
b. Mozilla Firefox
- Open Firefox Options: Click on the three horizontal lines in the top-right corner of the browser and select “Options” (or “Preferences” on macOS) from the dropdown menu.
- Open Network Settings: Scroll down to the “Network Settings” section and click on “Settings.”
- Configure your proxy: In the “Connection Settings” window, select “Manual proxy configuration.”
- Enter the proxy details: Enter the IP address and port number of your Tinyproxy server in the “HTTP Proxy” field and the corresponding port number. If you want all traffic (including HTTPS) to go through Tinyproxy, check the box for “Use this proxy server for all protocols.”
- Save settings: Click “OK” to save your proxy settings.
c. Microsoft Edge
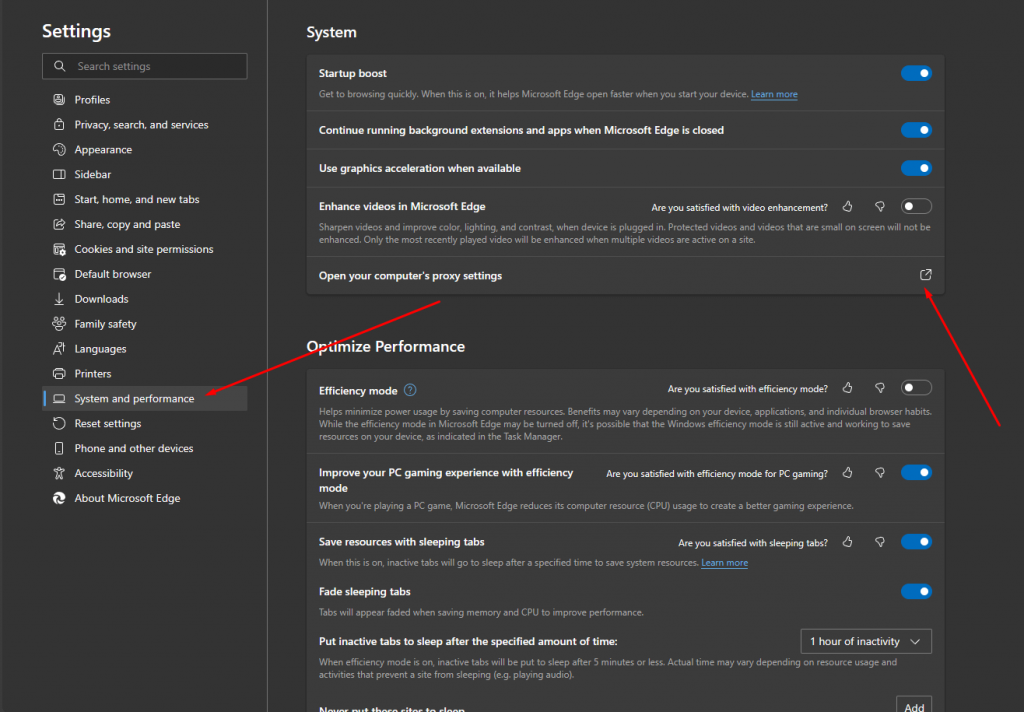
- Open Edge settings: Click on the three horizontal dots in the top-right corner of the browser and select “Settings” from the dropdown menu.
- Open the proxy settings: Scroll down and click on “System and performance.” Then, click on “Open your computer’s proxy settings” under “System.”

- Configure the proxy settings: In the “Internet Properties” window, go to the “Connections” tab and click on “LAN settings.” Check the box for “Use a proxy server for your LAN,” then enter the IP address and port number of your Tinyproxy server. Click “OK” to save.
d. Safari
- Open System Preferences: Click on the Apple menu and select “System Preferences.”
- Open the network settings: Click on “Network” and select your active network connection.
- Configure proxies: Click on “Advanced,” then go to the “Proxies” tab. Check the “Web Proxy (HTTP)” and “Secure Web Proxy (HTTPS)” boxes.
- Enter the proxy details: Enter the IP address and port number of your Tinyproxy server.
- Save settings: Click “OK” and then “Apply” to save the changes.
6. How to Set Up a Mobile Device to Use Tinyproxy
Setting Up an Android Device
- Open Wi-Fi settings: Go to “Settings” and tap on “Wi-Fi.”
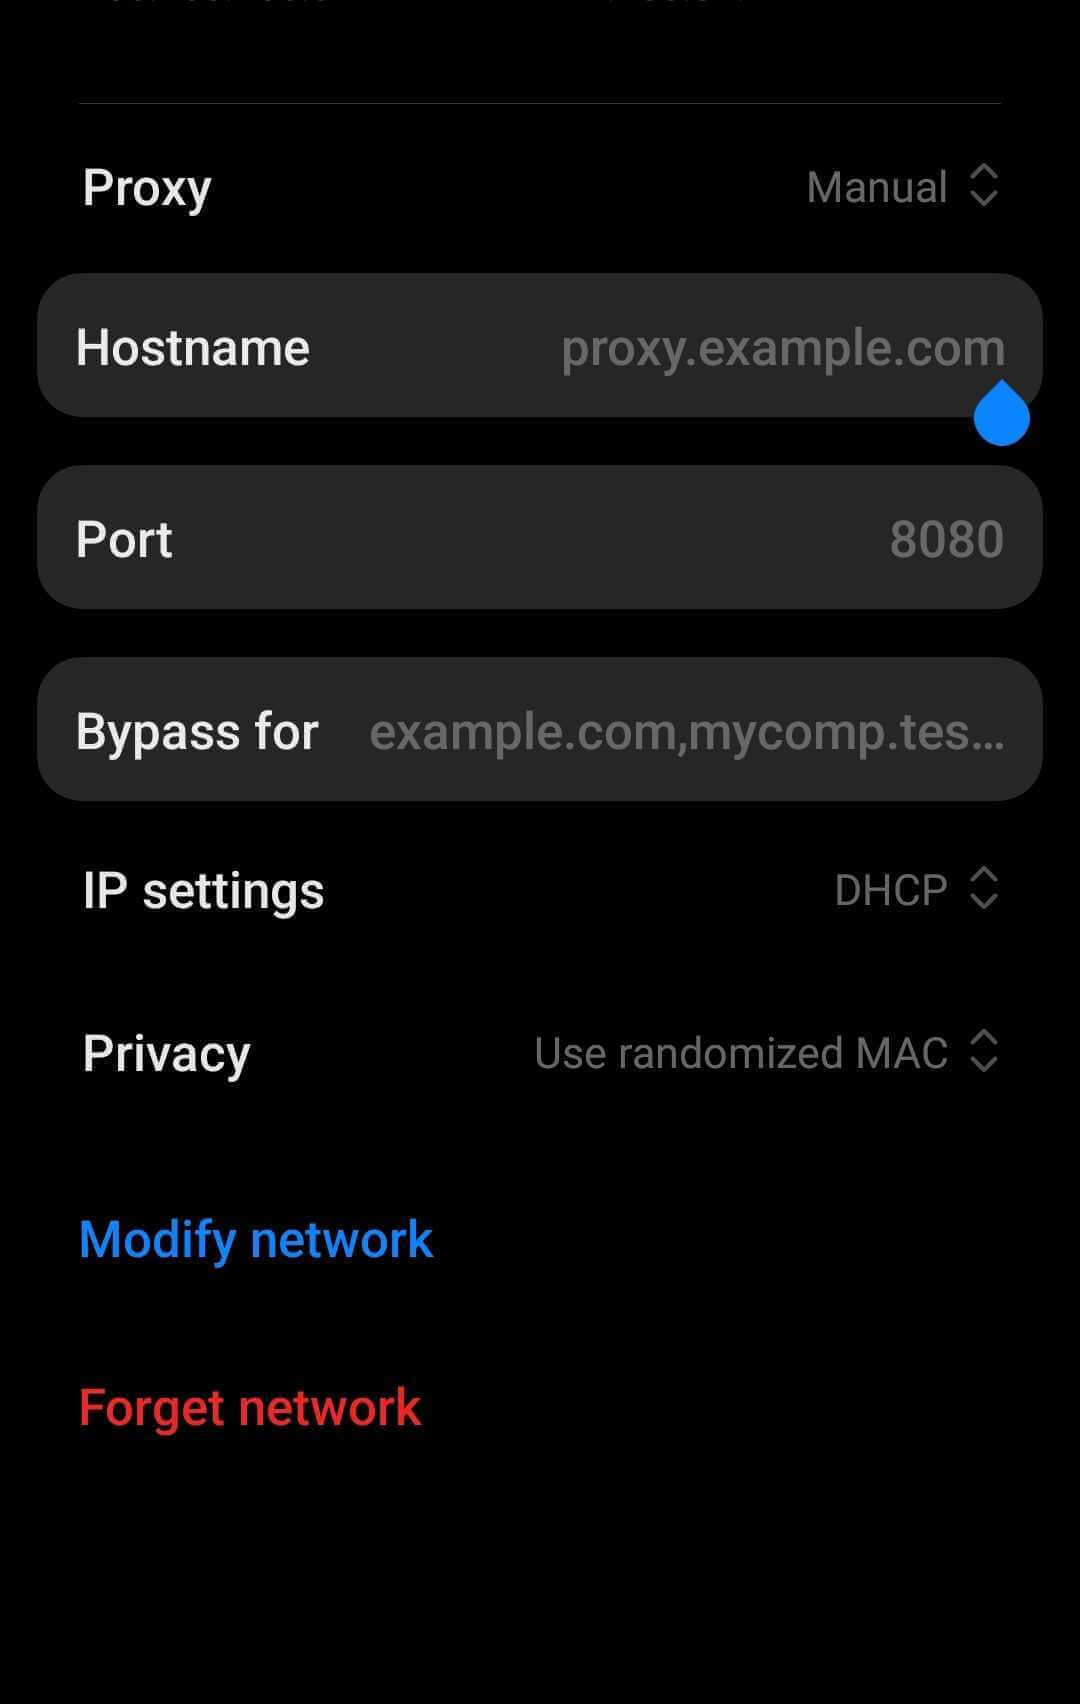
- Modify Network: Long press on the connected network and select “Modify network.”
- Go to Advanced Options: Check the box for “Advanced options.”
- Set Proxy: Under “Proxy,” select “Manual.” (keep in mind that on some Android devices the proxy tab is visible even without going to Advanced options)

- Enter your proxy details: Enter the IP address and port number of your Tinyproxy server.
- Savesettings: Tap “Save” to apply the changes.
Setting Up an iOS Device
- Open the Wi-Fi settings: Go to “Settings” and tap on “Wi-Fi.”
- Configure the proxy: Tap on the connected network to open its settings.
- Manual proxy configuration: Scroll down to “HTTP Proxy” and select “Manual.”
- Enter the proxy details: Enter the IP address and port number of your Tinyproxy server.
- Save settings: Tap “Save” to apply the changes.
7. How to Test Your Proxy Configuration
After configuring your browser or mobile device to use Tinyproxy, it’s important to test the setup to check if everything is working correctly.
- Check your IP address: Go to a website like WhatIsMyIP.com to verify that your IP address matches the Tinyproxy server’s IP address.
- Access restricted sites: Try accessing websites that are normally restricted to verify that your traffic is being routed through the proxy.


- Check the logs: On your Tinyproxy server, check the logs to see if traffic is being routed through the proxy. You can view the logs by running
sudo tail -f /var/log/tinyproxy/tinyproxy.log
Facing Slow Internet or Security Concerns?
Improve your online privacy and speed up your internet with a reliable proxy service. Get Rapidseedbox’s proxy service and enjoy high-speed connections, superior privacy, and top-notch customer support.
8. How to Monitor and Manage Tinyproxy
To check if Tinyproxy is running smoothly, it’s important to monitor its performance and manage its configuration when needed.
a. Checking Logs
Tinyproxy logs contain important information information about its operation. The log file is typically located at /var/log/tinyproxy/tinyproxy.log.
View Logs:
|
1 2 |
sudo tail -f /var/log/tinyproxy/tinyproxy.log |
This command allows you to view the latest entries in the log file, which can help with troubleshooting.
b. Monitoring Usage
You can monitor the usage of Tinyproxy by checking the log file for connection details, or by using additional tools like iftop to monitor network traffic.
#1 Install iftop:
|
1 2 |
sudo apt install iftop |
#2 Run iftop:
|
1 2 |
sudo iftop -i eth0 |
Replace eth0 with your network interface name. This tool provides a real-time view of network traffic and can help identify heavy usage or potential issues.
9. How to Improve Tinyproxy’s Performance
It’s important to make sure that Tinyproxy is running smoothly, especially if you’re using it to handle a lot of traffic or to improve security. Here are some detailed steps and tips to help you optimize Tinyproxy’s performance.
a. Limit Client Connections
Setting a limit on the number of clients that can connect at once helps keep the server from getting overloaded and ensures it stays up and running smoothly.
Adjust the MaxClients Directive:
- Open the configuration file:
sudo nano /etc/tinyproxy/tinyproxy.conf - Locate the
MaxClientsdirective and set it to a number suitable for your server’s capacity. A typical value is 100, but you can adjust this based on your needs and server specifications –MaxClients 100 - Save the changes and exit the editor.
- Restart Tinyproxy to apply the changes:
sudo systemctl restart tinyproxy
b. Adjust the Timeout Settings
Optimizing timeout settings can help manage idle connections, which frees up resources for active users.
Set the Timeout directive:
- In the configuration file (
/etc/tinyproxy/tinyproxy.conf), find theTimeoutdirective. - Set it to an appropriate value, such as 300 seconds (5 minutes). This keeps idle connections closed after a while, which helps to reduce unnecessary resource usage.
Timeout 300 - Save and exit the file, then restart Tinyproxy:
sudo systemctl restart tinyproxy
c. Use a Dedicated Server
If you’re dealing with heavy traffic, running Tinyproxy on a dedicated server can really help to improve performance. A dedicated server means that Tinyproxy has all the CPU, memory, and network resources it needs without competing with other applications.
How to set up Tinyproxy on a dedicated server:
- Select a server with adequate resources (CPU, RAM, bandwidth) based on your expected traffic load.
- Follow the installation steps from here to install Tinyproxy on the dedicated server.
- Configure and optimize depending on your needs to make sure the server runs efficiently.
d. Enable Access Control
Restricting access to trusted IP addresses helps reduce unwanted traffic and potential misuse of your proxy server.
- Open the configuration file:
sudo nano /etc/tinyproxy/tinyproxy.conf - Use the
Allowdirective to specify which IP addresses or ranges are permitted to access Tinyproxy. For example –Allow 192.168.1.0/24 - Optionally, use the
Denydirective to block specific IP addresses.Deny 10.0.0.1 - Save your changes and restart Tinyproxy:
sudo systemctl restart tinyproxy
e. Optimize Logging
Good logging helps you keep an eye on how things are going and figure out what’s going wrong without overloading the system with too much data. Additionally, monitor log size and rotate logs regularly to prevent them from consuming too much disk space.
f. Monitor Network Traffic
Using tools like iftop or nload can help you monitor network traffic in real-time, identify bottlenecks, and adjust configurations as needed. I’ve already mentioned iftop above, but here’s how to install and use nload.
- Install
nload:sudo apt install nload - Run
nloadto visualize incoming and outgoing traffic:sudo nload
I know that optimizing Tinyproxy can be a bit tricky at first, but if you follow the recommendations above, you shouldn’t experience any challenges. However, if you do, here’s how to overcome them.
10. How to Troubleshoot Tinyproxy
Even with a well-configured Tinyproxy setup, you might encounter some issues. Here’s how to troubleshoot common problems to guarantee Tinyproxy runs smoothly.
a. Tinyproxy Not Starting
If Tinyproxy is not starting, it could be due to configuration errors, missing files, or permission issues. This is how you can troubleshoot it.
- Check the configuration file syntax:
- Check if there are any syntax errors in
/etc/tinyproxy/tinyproxy.conf. - Use the command to validate the configuration:
sudo tinyproxy -d -c /etc/tinyproxy/tinyproxy.conf - This will run Tinyproxy in debug mode, and show you any configuration errors directly in the terminal.
- Check if there are any syntax errors in
- Review the logs for errors:
- Check the log file for detailed error messages:
sudo tail -f /var/log/tinyproxy/tinyproxy.log - Look for lines that show why Tinyproxy failed to start.
- Check the log file for detailed error messages:
- Check file permissions:
- Check if the Tinyproxy user has the necessary permissions to access configuration and log files:
sudo chown tinyproxy:tinyproxy /etc/tinyproxy/tinyproxy.conf sudo chown tinyproxy:tinyproxy /var/log/tinyproxy/tinyproxy.log
- Check if the Tinyproxy user has the necessary permissions to access configuration and log files:
- Verify the required packages:
- Make sure all required packages and dependencies are installed. You can use this command:
sudo apt update sudo apt install tinyproxy
- Make sure all required packages and dependencies are installed. You can use this command:
b. Connection refused
If you get a “Connection refused” error when trying to connect through Tinyproxy, it might be due to firewall settings or incorrect IP configuration. If this happens, try the following:
- Check your firewall settings:
- Check if your firewall allows traffic on the Tinyproxy port (default is 8888).
- On Ubuntu, use
ufwto allow the port:sudo ufw allow 8888/tcp
- Verify the IP address allowance:
- Check if your IP address is allowed in the Tinyproxy configuration file:
Allow 192.168.1.0/24 - Update the configuration file and restart Tinyproxy –
sudo nano /etc/tinyproxy/tinyproxy.conf sudo systemctl restart tinyproxy
- Check if your IP address is allowed in the Tinyproxy configuration file:
- Check the Tinyproxy status:
- Make sure that Tinyproxy is running:
sudo systemctl status tinyproxy
- Make sure that Tinyproxy is running:
c. Slow Performance
If Tinyproxy is running slowly, it could be because of high traffic, not enough resources, or not optimal configuration settings. You can resolve this by trying the following methods:
- Monitor resource usage:
- Use tools like
toporhtopto check CPU and memory usage.
- Use tools like
- Check the network traffic:
- Use
iftopornloadto monitor network traffic and identify any bottlenecks:sudo iftop -i eth0 sudo nload
- Use
- Update your configuration settings:
- Check if you have optimized settings such as
MaxClientsandTimeout. I’ve discussed them above. - Edit the configuration file if necessary and restart Tinyproxy.
- Check if you have optimized settings such as
- Limit logging:
- Excessive logging can slow down performance. Set an appropriate log level to balance between your logging needs and performance.
d. Tinyproxy Not Forwarding HTTPS Traffic
If Tinyproxy is not forwarding HTTPS traffic, the reason is most likely a misconfigured ConnectPort directive or firewall issues. This is how to resolve it:
- Configure ConnectPort:
- Check if the
ConnectPortdirective includes port 443 for HTTPS traffic:ConnectPort 443
- Check if the
- Update your firewall settings:
sudo ufw allow 443/tcp
- Restart Tinyproxy.
e. No Internet Access Through Proxy
If devices configured to use Tinyproxy cannot access the internet there are either network issues or the proxy settings are incorrect. Try the following:
- Verify your proxy settings:
- Check if the device’s proxy settings match the Tinyproxy server’s IP address and port.
- Check the network connectivity:
- You can test this by running
ping google.com
- You can test this by running
- Check the log for errors or blocked connections.
If you face any additional challenges, feel free to drop us a comment below and we’ll help you get it resolved!
Facing Slow Internet or Security Concerns?
Improve your online privacy and speed up your internet with a reliable proxy service. Get Rapidseedbox’s proxy service and enjoy high-speed connections, superior privacy, and top-notch customer support.
11. Final Words
Setting up and optimizing Tinyproxy can help you keep your online privacy, manage internet access, and improve connection speeds through efficient proxying. It works on Unix-like systems and even on Windows through WSL, so you can use it no matter what kind of computer you have.
However, although Tinyproxy is powerful it is not suitable for advanced users. If you are one and you are looking for a more robust and feature-rich proxy, Rapidseedbox’s proxy service is an excellent alternative.
Rapidseedbox offers a reliable, secure, and high-performance proxy solution that’s easy to set up and use. With features like high-speed connections, enhanced privacy, and superior customer support, Rapidseedbox can handle more demanding proxy needs with ease.
0Comments