Imagine having a personal Netflix filled with your favorite movies, TV shows, music, and photos, accessible from any device, anywhere, anytime. That’s the power of Plex. When combined with the reliability and efficiency of a Synology NAS, you’re in for a top-notch media streaming experience.
The process is somewhat technical, but if you follow this guide, we will walk you through each step. Let’s roll if you’re ready to build your Plex Synology movie library.

Disclaimer: This material has been developed strictly for informational purposes. It does not constitute endorsement of any activities (including illegal activities), products or services. You are solely responsible for complying with the applicable laws, including intellectual property laws, when using our services or relying on any information herein. We do not accept any liability for damage arising from the use of our services or information contained herein in any manner whatsoever, except where explicitly required by law.
Table of Contents
- Understanding Synology NAS and Plex
- Prerequisites: What You Will Need
- Hardware and Software
- Plex Account
- Network Access
- Step-by-Step Guide to Installing Plex on Synology NAS
- Preparing Your Synology NAS
- Installing Plex Media Server
- Configuring Plex Media Server
- Accessing Your Plex Media Server
- How to Optimize Plex Performance on Synology NAS
- Troubleshooting Common Issues
- Conclusion
1. Understanding Synology NAS and Plex
Synology is one of the more prominent brands in the Network Attached Storage game. These handy devices allow you to centralize data storage in one place. Even better, you can configure your NAS for access virtually anywhere.
However, a Synology NAS is more than just a storage device; it’s a hub where you can manage files, share content, and even run various applications. The specific features will vary depending on which Synology NAS model you choose since they come in a broad range.
Combining Plex With a Synology NAS
One of the many applications you can run on your Synology NAS is Plex. It’s a media server software that organizes your media libraries and streams them to any device, including your TV, smartphone, or computer. You can handle anything from mobile formats to 4K streaming with Plex.
When Plex is installed on a NAS system like Synology, it transforms your NAS into a powerful media server. Your media files stored on the Synology NAS can be easily accessed and streamed using the Plex app on any device, anywhere in the world, as long as it’s connected to the internet.
Running Plex on your Synology NAS offers several advantages;
- You can centralize your media library, saving space and reducing redundancy
- It allows you to access your content anytime and from anywhere.
- Synology reliability ensures a smooth and stable streaming experience.
- The convenient interface makes management and organization simple.
Pro Tip! You can use a seedbox to build up your media content remotely with high-speed downloads/uploads and ultra-privacy. You can then transfer your files to your NAS via secure FTP. A remote seedbox will help you reduce the load on your home internet, optimize NAS storage, serve as content backups and more. You can also run Plex Media Server on your seedbox or Synology NAS and then remote-share your content with other Plex clients.
2. Prerequisites: What You Will Need
Before embarking on the journey to set up Plex on your Synology NAS, ensuring you have everything you need for a smooth and successful setup is crucial. Don’t let a missing piece of the puzzle spoil your experience.
a. Hardware and Software
- Synology NAS Device: Ensure you have a Synology NAS device compatible with Plex Media Server. (Synology lists Plex-compatible models here)
- Internet Connection: A stable and robust internet connection is essential for downloading the necessary software and streaming media later on.
- Computer: A computer to access and manage the Synology NAS interface and Plex Media Server.
b. Plex Account
Create a Plex account if you don’t have one already. A Plex account will allow you to manage your media library, customize your server settings, and stream media on various devices. Plex offers free accounts and paid ones in the form of Plex Pass. Using the free account is fine in most cases.
c. Network Access
Ensure your Synology NAS device is connected to your network and is accessible from the computer you will use for the setup. Check the network settings and confirm that the necessary ports are open for communication.
3. Step-by-Step Guide to Installing Plex on Synology NAS
Now that we have all the prerequisites, it’s time to walk through the Plex installation process for your Synology NAS. This section will be longer, so take time and move things along in stages.
We will cover the following critical areas in this section:
- Preparing Your Synology NAS
- Installing Plex Media Server on Your Synology NAS
- Configuring Plex Media Server
- Accessing Plex Media Server on Other Devices
a. Preparing Your Synology NAS
Before diving into the installation of Plex on your Synology NAS, it’s essential to ensure your NAS is prepared and ready. This preparation involves ensuring your Synology NAS is up to date, creating necessary folders, and ensuring proper permissions and sufficient storage space.
Follow the steps below to prepare your Synology NAS for Plex installation;
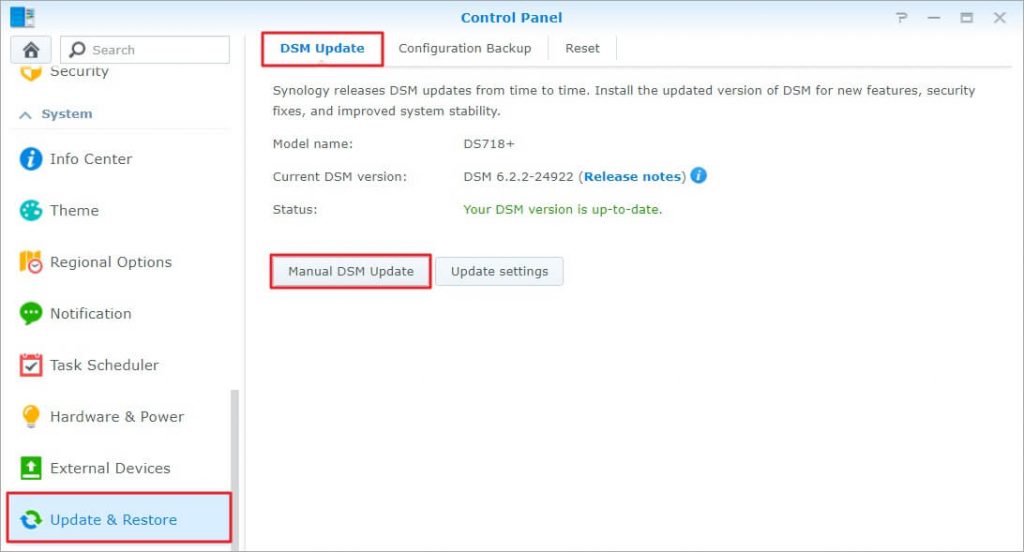
Update Your Synology NAS

- Log into your Synology NAS.
- Go to the Control Panel.
- Click on Update & Restore.
- Select the DSM Update tab and click on Manual DSM Update.
Create The Necessary Folders
- In the DiskStation Manager (DSM), navigate to File Station.
- Create a new shared folder by right-clicking and selecting Create (Shared Folder).
- Name the folder (e.g., “Plex Media”) and set the permissions by giving read/write access to the admin and users.
Allocate Sufficient Storage Space
- Ensure your Synology NAS has enough storage space for your media files.
- Check the available storage space by going to the Storage Manager in DSM.
- If necessary, you can manage the volume or add additional drives.
b. Installing Plex Media Server
Now that your Synology NAS is prepared, installing the Plex Media Server is next. This section provides a detailed guide to downloading and installing the Plex Media Server package on your Synology NAS, ensuring it’s configured correctly for optimal performance.
Navigate to the Package Center
- Access DSM on your Synology NAS.
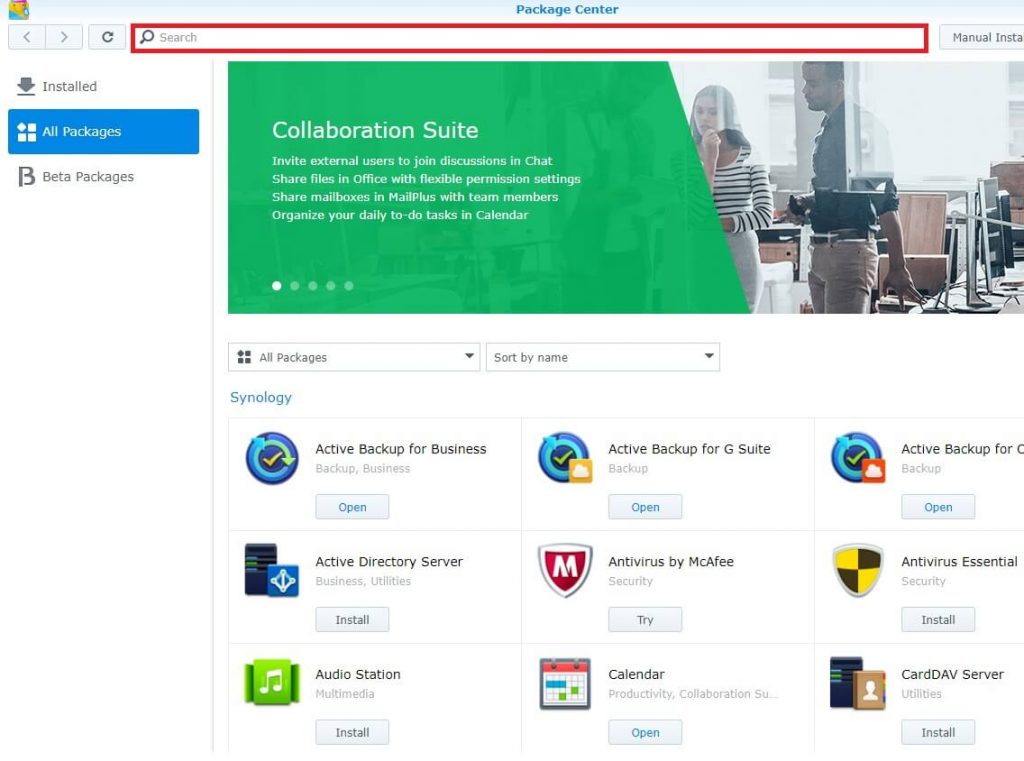
- Locate and click the Package Center icon on the main menu. This center is where you can find and install various packages (applications) for your Synology NAS.
Search for Plex Media Server:

- Use the search bar at the top of the Package Center to find Plex.
- The Plex Media Server should appear in the search results.
Download and Install Plex Media Server:
- Click the Install button next to Plex Media Server in the search results.
- The Package Center will download and automatically install the Plex Media Server package on your Synology NAS.
- Wait for the installation to complete. The time taken will depend on your internet connection and NAS performance.
4. Run Plex Media Server:
- Once installed, go back to the main menu of DSM.
- Locate the Plex Media Server icon and click on it to launch the server.
- Accept the terms of service and sign in with your Plex account.
c. Configuring Plex Media Server
With the Plex Media Server installed on your Synology NAS, it’s time to configure it for optimal performance and functionality. Now, we must understand how to set up your media libraries, optimize server settings, and ensure your media is ready to stream on any device.
Access Plex Media Server Settings
- Launch the Plex Media Server from the main menu of your DSM.
- On the Plex web interface, click the Settings Icon (a wrench and screwdriver) in the upper right corner.
Add Your Media Libraries
- In Settings, select Manage and then Libraries.
- Click Add Library to create a new media library.
- Choose the type of media library (Movies, TV Shows, Music, Photos, or Other Videos).
- Browse to the folder on your Synology NAS with the corresponding media files.
- Repeat the process for each library you wish to create.
Update Your Media Libraries

- Ensure your Plex library is updated after adding and organizing your media files.
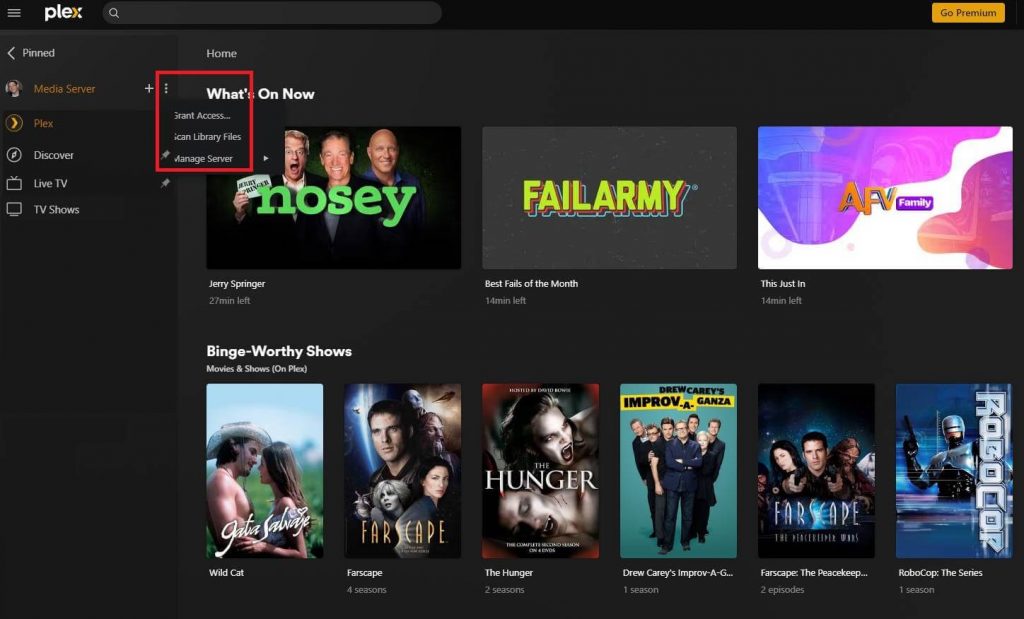
- In the Plex web interface, click on the three dots next to your library and select Scan Library Files to update the library with the new media files. Depending on how many files you’ve added or updated, this may take some time.
d. Accessing Your Plex Media Server
Now that your Plex Media Server is set up and configured on your Synology NAS, it’s time to access it from your devices and enjoy your media collection. This section will guide you through accessing your Plex Media Server on various devices, ensuring you can stream your media anytime, anywhere.
Accessing Plex From Your Computer
- Open a web browser on your computer.
- Navigate to app.plex.tv/desktop.
- Sign in to your Plex account.
- You can now access your media libraries for streaming.
- Alternatively, download the Plex app and install it on your computer.
Accessing Plex on a Mobile Device
Download the Plex app from the Apple App Store or Google Play Store.
Launch the app and sign in to your Plex account.
You can access and stream your media on your mobile device.
Note: The free version of Plex only allows short periods of uninterrupted streaming on mobile devices. If you intend to stream frequently on this format, consider getting the Plex Pass.
Accessing Plex on a Smart TV or Streaming Device
- Download the Plex app on your Smart TV or streaming device (e.g., Roku, Amazon Fire TV, Apple TV).
- Launch the app and sign in with your Plex account credentials.
- You can browse and stream your media on your TV or streaming device.
Remote Access to Plex
- Ensure remote access is enabled in your Plex Media Server settings (it is enabled by default).
- Access your Plex Media Server from any device by signing in to your Plex account, allowing you to stream your media even when you are away from home.
4. How to Optimize Plex Performance on Synology NAS
One of the most vital things you must remember is that most NAS devices are less powerful than PCs. Because of that, getting Plex streaming well on your Synology NAS sometimes takes tweaking.
Here are some ways to do this;
Use Wired Connections
Utilize Ethernet cables to connect your Synology NAS and streaming devices. Wired connections offer enhanced stability and speed compared to wireless connections, ensuring uninterrupted streaming.
This can be somewhat frustrating since you’ll be tied to the NAS (quite literally). Think of it as a troubleshooting step. If you can stream well with a wired connection, it may be time to update your wireless router or the WiFi interface of your device.
Activate Hardware Transcoding
If supported by your Synology NAS, activate hardware transcoding in Plex. This feature utilizes the NAS hardware to convert media formats, relieving the CPU and ensuring smooth streaming even for high-definition content.
Properly Format Your Media Files
Plex works best with media file formats that it knows and are standardized. If it encounters media it can’t handle correctly; Plex will try to convert it to something it can handle. This conversion takes a lot of power and may cause stuttering during the streaming process.
To avoid this, convert your media files to formats supported by Plex and your streaming devices. Using compatible formats minimizes transcoding demands, ensuring quicker access and smoother streaming.
5 Troubleshooting Common Issues
While getting Plex to run on your Synology NAS is straightforward, unfortunately, bad things sometimes happen for unknown reasons. Consequently, in this final section, we will cover some common issues you might encounter. Furthermore, we’ll provide solutions to resolve them.
a. Problem: Plex Server Not Accessible
- Ensure your Synology NAS is powered on and connected to the network.
- Check your internet connection and ensure your device is connected.
- Verify that you are using the correct Plex account credentials.
b. Problem: Media Not Loading or Buffering
- Ensure your media files are in supported formats.
- Check the network connection and bandwidth; upgrade if necessary.
- Restart your Synology NAS and the device you are streaming on.
c. Problem: Remote Access Issues
- Ensure remote access is enabled in your Plex settings.
- Check your router settings and ensure the necessary ports are open.
- Consult Plex’s official documentation for detailed remote access troubleshooting.
6. Conclusion
Investing the time and effort to set up and optimize Plex on your Synology NAS properly is worth the exceptional, streamlined, and high-quality media streaming experience you will enjoy. After all, while your setup serves as a media server, it’s also essentially a gateway to endless entertainment.
So don’t rush the process. Think of the experience as crafting a personalized media landscape. Ensure that every beat of your favorite song, every frame of that cherished movie, and every pixel of those memorable photos is delivered to you with precision and quality.
Here’s a friendly tip! Use a seedbox for fast, private downloads and uploads to build up your media collection remotely. Then, securely transfer your files to your NAS via FTP.
A seedbox reduces the load on your home internet, optimizes NAS storage, and serves as a backup. You can even run Plex Media Server on your seedbox or Synology NAS to share your content with other Plex clients remotely.
0Comments