Proxies are helpful tools that offer several advantages,, such as bypassing geo-restrictions. If you’ve already subscribed to a proxy service, your next thought might be, “How do I setup a proxy on my device?”
The process is relatively straightforward yet challenging enough to stump anyone unfamiliar with their device network settings. This guide will walk you through the steps to configure a proxy on various platforms.

Table of Contents
- How Do I Setup a Proxy On My Device?
- Setting Up a Proxy on Windows
- Setting Up a Proxy on macOS
- Setting Up a Proxy on iPhone and iPad
- Setting Up a Proxy on Android
- Setting Up a Proxy on Linux
- Advanced Proxy Configurations
- Using Proxy Scripts
- Setting Up a Proxy with VPNs
- Configuring Proxies for Specific Applications
- Frequently Asked Questions
- Final Thoughts
1. How Do I Setup a Proxy On My Device?
To set up a proxy on your device, you will generally have to access the network settings and enter your proxy server IP address and port number. Depending on the proxy type, you may also have to add a username and password.
The process may differ depending on your device platform. For example, setting up a proxy on macOS will have different steps than setting it up on a Windows PC. For specific instructions, check out the relevant sections below on your device.
a. Setting Up a Proxy on Windows
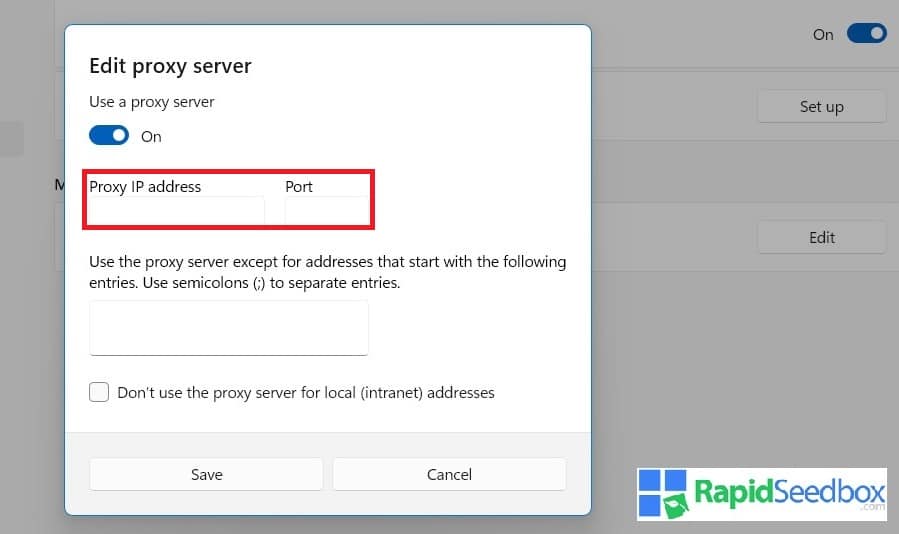
Note: This section addresses proxy setup on Windows 11. However, it should be similar to Windows 10 as well.
Windows 11 provides built-in support for proxy servers, allowing you to configure system-wide proxy settings. This is useful for controlling internet access for all applications on your device.
- Open Settings by pressing Win + I.
- Go to Network & internet.
- Select Proxy from the left sidebar.
- Under Manual proxy setup, toggle Use a proxy server.
- Enter the proxy server address and port.
- If required, enter your username and password.
- Click Save to apply the settings.
b. Setting Up a Proxy on macOS
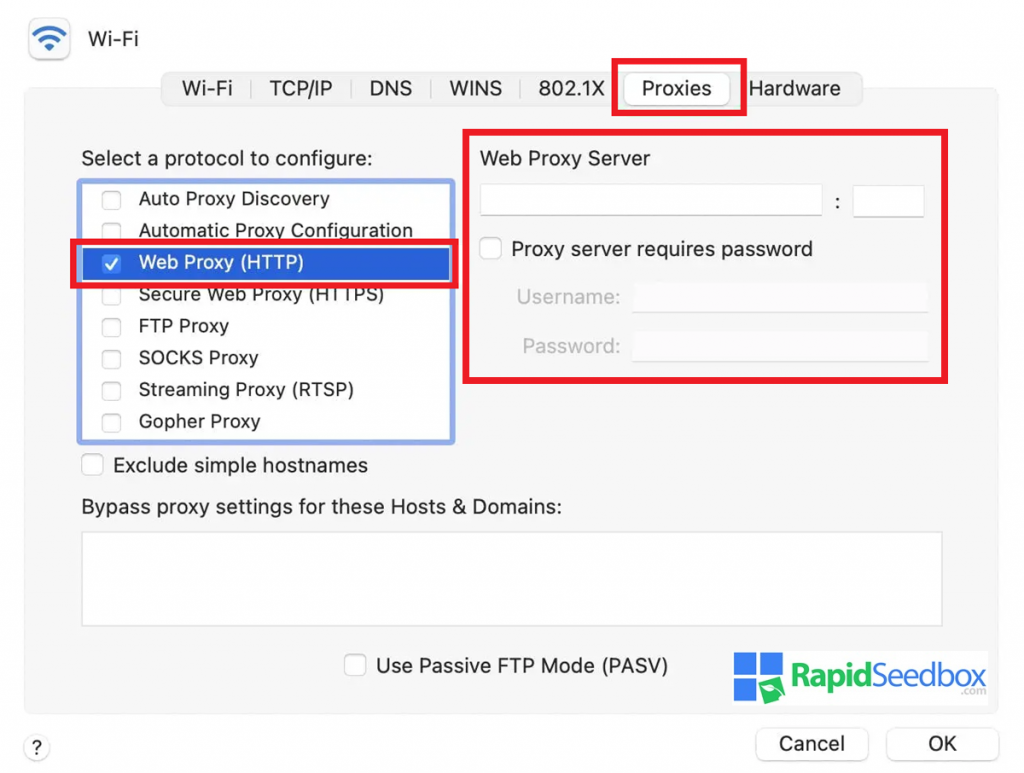
macOS allows you to configure proxy settings at the network level, which means all internet traffic on the system will pass through the specified proxy server. This can be particularly useful for enhancing privacy and managing internet use on Mac devices.
- Open System Preferences.
- Go to Network.
- Select the WiFi connection you are using.
- Click on Advanced.
- Navigate to the Proxies tab.
- Check the protocol you want to configure (HTTP, HTTPS, SOCKS).
- Enter the proxy server address and port.
- Click OK, then Apply.
Need a fast and reliable proxy server?
Look no further than RapidSeedbox! With RapidSeedbox, you get access to top-tier proxy servers that provide excellent speed and reliability, ensuring your internet activities remain private.
Take control over your Internet today!
c. Setting Up a Proxy on iPhone and iPad
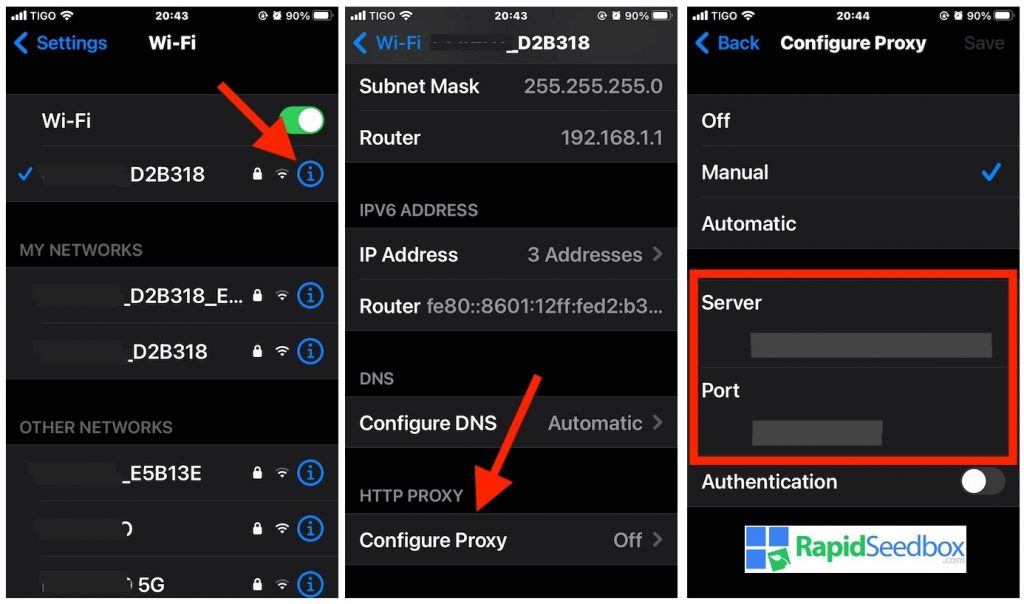
iOS devices like iPhones and iPads require the same configuration process. They allow proxy configuration on a per-network basis, meaning you can set up a proxy for individual WiFi networks.
- Open Settings.
- Select WiFi.
- Tap on the WiFi network you are connected to.
- Scroll down to HTTP Proxy
- Toggle the Configure Proxy setting to On
- Select Manual.
- Enter the proxy server address and port.
- Authenticate if necessary.
- Tap Save.
Note: To learn more about using a proxy on your iOS device, read our Proxy on iPhone guide.
d. Setting Up a Proxy on Android Devices
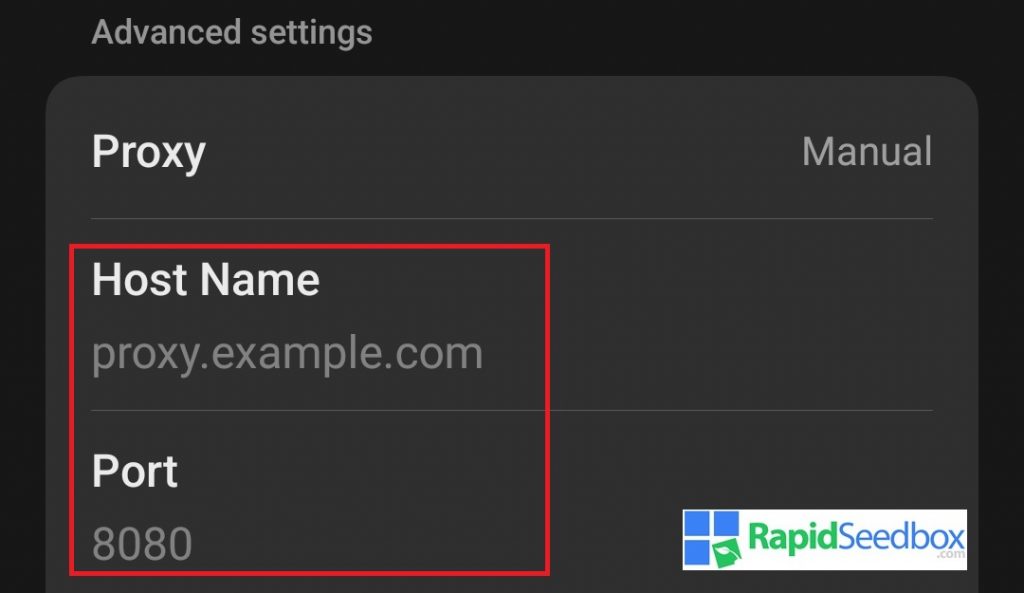
Android devices support proxy configuration at the WiFi network level. This allows you to route your device’s internet traffic through a proxy server for individual networks, similar to how it works on the iOS platform.
- Open Settings.
- Select Network & internet.
- Tap WiFi and select the WiFi network you are connected to.
- Tap Advanced settings.
- Select Manual under Proxy.
- Enter the proxy server hostname and port.
- Save the settings.
e. Setting Up a Proxy on Linux
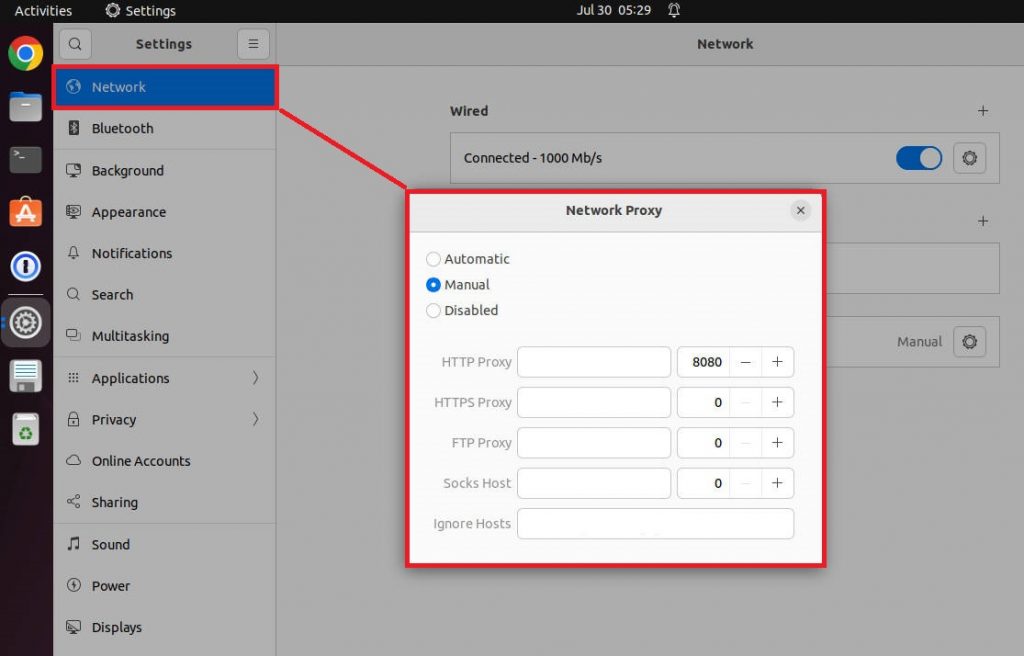
Most Linux distributions today will enable you to set up a proxy for the entire system and individual applications. This can be done through the Graphical User Interface (GUI) or the command line, providing flexibility depending on user preference and requirements.
The process will also be similar for most distributions. For this example, we will demonstrate the process using one of the more popular ones – Ubuntu. Here’s what to do if you’re using the GUI:
- Open Settings.
- Go to Network.
- Select the Network Proxy section.
- Choose Manual.
- Enter the proxy server address and port for HTTP, HTTPS, FTP, and Socks (if applicable).
- Save the settings.
If you don’t have a GUI or prefer command line instructions, add the following lines to your .bash_profile:
2. Advanced Proxy Configurations
While basic proxy configurations can cover most needs, advanced proxy setups provide greater control and functionality. This section delves into more sophisticated configurations, such as using proxy scripts and integrating proxies with VPNs.
a. Using Proxy Scripts
Proxy Auto-Configuration (PAC) files allow for more dynamic proxy configurations. A PAC file is a JavaScript file that defines how web browsers and other user agents can automatically choose the appropriate proxy server for a given URL.
Create a PAC File:
Write a JavaScript file with a function named FindProxyForURL(url, host).
Example:
Save this file with a .pac extension.
Host the PAC File:
Upload the PAC file to a web server or local network location accessible by the devices.
Configure Devices to Use the PAC File:
- Windows 11: In the Proxy settings, select “Use setup script” and enter the URL of the PAC file.
- macOS: In the Network preferences, go to the Proxies tab and select “Automatic Proxy Configuration,” then enter the PAC file URL.
- iOS/Android: Set the WiFi network proxy settings to “Auto” and enter the PAC file URL.
- Linux: Settings > Network > Network Proxy, select Automatic, and enter the PAC file URL.
b. Setting Up a Proxy with VPNs
Combining a proxy server with a VPN (Virtual Private Network) can enhance privacy and security by adding an extra layer of encryption and masking your IP address.
- Install and set up the VPN client application.
- Connect to a VPN server.
- Follow the proxy configuration steps provided above for your device.
- Ensure the proxy settings are applied while the VPN is active.
c. Configuring Proxies for Specific Applications
Certain applications, like web browsers or torrent clients, allow for proxy configuration independently of the system settings. This can be useful if you want specific applications to use a proxy while others do not.
Web Browsers:
- Chrome: Go to Settings > Advanced > System > Open your computer’s proxy settings.
- Firefox: Go to Options > General > Network Settings > Settings. Choose “Manual proxy configuration” and enter the proxy details.
- Safari (macOS): Uses system proxy settings configured in System Preferences.
Torrent Clients (e.g., uTorrent, BitTorrent):
- Open the application and go to Preferences or Settings.
- Navigate to the Connection or Network section.
- Enter the proxy server address and port.
- Choose the appropriate proxy type (HTTP, HTTPS, SOCKS).
- Save the settings and restart the application if necessary.
3. Frequently Asked Questions
Your proxy service provider typically provides the proxy server address and port. If you’re using a paid service, you can find these details in your account dashboard or the setup instructions provided by the service.
First, double-check that you have entered the proxy server address and port correctly in your device’s network settings. Ensure your internet connection is stable and that the proxy server is operational. If issues persist, try restarting your device.
You can set up a proxy on multiple devices using the same proxy server details. However, you must configure each device individually according to its specific operating system and network settings.
To disable the proxy settings, go to your device’s network settings and either turn off the proxy option or remove the proxy server details. This will restore your device to direct internet access without routing through a proxy.
A PAC file is a JavaScript file that specifies how web browsers and other user agents can automatically choose the appropriate proxy server for a given URL. To use a PAC file, enter its URL in your device’s network proxy settings.
4. Final Thoughts
Setting up a proxy on your device can significantly enhance your internet experience by providing increased privacy, improved security, and the ability to access content that might be restricted in your region.
While the setup process varies by device, they are generally straightforward and can be easily made, even by those unfamiliar with networking. Advanced configurations, such as using PAC files or integrating proxies with VPNs, offer further customization to suit your specific needs.
Worried about your online privacy?
RapidSeedbox offers high-performance proxy servers that protect your data and keep your online activities anonymous. Enjoy unrestricted internet access with fast and secure proxies that will enhance your browsing experience.
0Comments