In this post, we’ll explore how to run Plex in Docker containers. We will review two popular Plex Docker container images and what you need to know before creating a Docker container for Plex. But most importantly, we’ll walk together through the whole installation of Plex on Docker for Linux and Windows servers.
Whether you’re a seasoned Docker user or just getting started, this post will provide everything you need to get up and start with Plex in Docker containers.
Without further ado, let’s dive in!

Disclaimer: Please note that the following article discusses the installation of the Plex Media Server on Docker. However, we want to clarify that at RapidSeedbox, we do not run Plex on Docker in our seedboxes (due to performance). If you have a Rapidseedbox server, we suggest installing Plex through our convenient one-click apps, specifically designed for RapidSeedbox customers. But if you choose to install Plex on Docker, you acknowledge and accept that you are doing so at your own risk, utilizing your own resources, and assuming full responsibility for the setup and maintenance. We cannot guarantee the performance, stability, or compatibility of Plex on Docker, as it falls outside the scope of our recommended installation methods.
Table of Contents.
- How to Run Plex Media Server in Docker Containers?
- Plex Docker Container Images.
- Before you create a Docker container for Plex Media Server
- Running Plex on Docker (Linux and Windows).
- Opening Plex Media Server.
- Docker Plex FAQ.
1. How to Run Plex Media Server in Docker Containers?
You might already be familiar with Plex Media Server (PMS) — hands down, the most powerful media server out there. One of the great things about PMS is that it can be installed virtually anywhere (from macOS, Windows, Linux, NAS, TVs, Raspberry Pi, etc.). And, of course, with Docker’s containerization technology, you can also run Plex in a Docker container, making this powerful media server easy to manage and deploy.
Running Docker on Plex gives you many benefits. Not only is it easier to manage and deploy (as mentioned before), but it also makes it more portable, scalable, stable, and consistent. In addition, using Docker will help you create an isolated environment for Plex and its dependencies, allowing your entire Plex media system to remain entirely secure.
In a nutshell, what are the steps to run Plex on Docker?
- Determine which Docker image to use. You can find pre-built images on Docker Hub, including the official Plex image from PlexInc and the linuxserver image.
- Configure networking. Before creating a Docker container, you would first need to configure the networking parameters of your Plex Docker container. There are three modes, bridge, macvlan, and host.
- Create a Plex Docker container. You can create a container using a pre-built image (recommended) or build your own.
- Once the container is set up, you can start configuring it. You’ll need to set up the media folders and specify which files should be included in your Plex library. You can also configure your network settings and set up remote access options.
2. Plex Docker Container Images.
Docker provides many images available for Plex (not explicitly for the Plex Media Server). You can also find images for Plex Meta Manager or PlexPy.
Two of the most popular container images for Plex Media Server are :
- plexinc/pms-docker: The image plexinc/pms-docker (by plexinc) is the official Plex Media Server container. You can also visit their GitHub Repository.
- linuxserver/plex: The image linuxserver/plex (by linuxserver.io) is a PMS container brought to you by LinuxServer.io. You can also find out more about this project by visiting their Gihub Repository.
Where can you find more about these (and other) Plex images?
- Go to Docker Hub. This is a cloud-based Docker container image repository. It allows its users to store, share, and distribute Docker images. A quick search on Docker Hub for the “Plex” keyword will show you the available results.
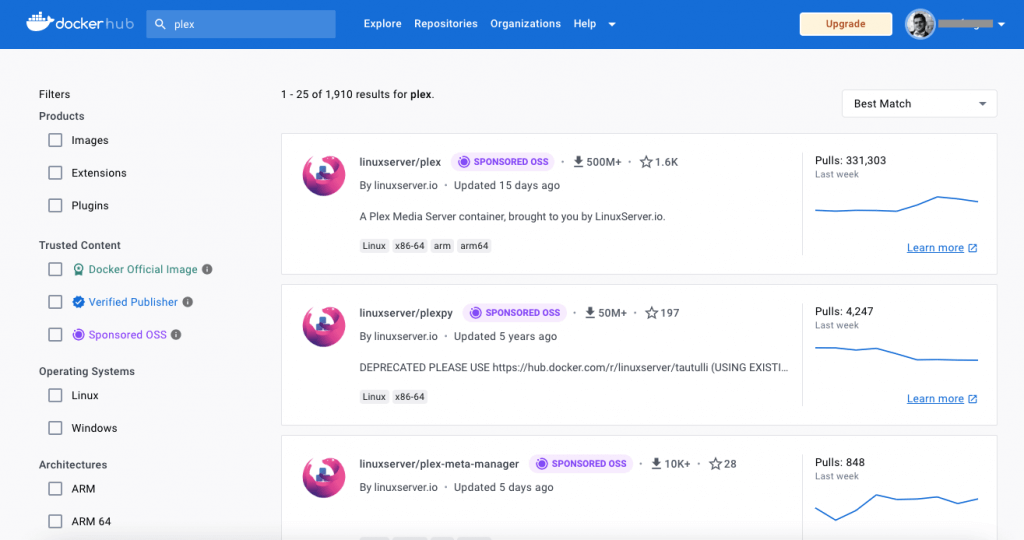
- As you’ll see, you’ll find lots of Plex images. And, of course, you can download any of the two popular container images and find exhaustive documentation from this official Docker repository.
So what are the differences? plexinc/pms-docker vs. linuxserver/plex?
Although both Docker images allow you to run PMS in a containerized environment, and both are based on Linux Ubuntu, they do have differences. First, pms-docker is maintained by the official Plex team, while linuxserver/plex is maintained by the LinuxServer.io community. The other two differences in both images are that pms-docker uses “shell” as its preferred language while linuxserver/plex relies on Dockerfile. Finally, another crucial distinction is that linuxserver/plex uses an open license under (GNU General Public License v3.0 only).
In conclusion, if you focus on running Plex on Docker, both are equally great images regarding functionalities and features; whichever one you choose would depend on your specific usage, resources, and requirements.
3. Before you create a Docker container for Plex Media Server
Before creating your Docker container for Plex, consider the following:
- a. Are you trying to run Plex Media Server on a Seedbox?
- b. Which OS to use to run a Plex Docker image?
- c. Define the container’s and dependency’s configuration.
- d. Decide which type of networking to use.
a. Are you running Plex Media Server on a Seedbox?
Plex Media Server can be used in conjunction with a seedbox. You can use the high-speed connections, robust infrastructure, and remote accessibility the seedbox provides. With Plex Media Server on a seedbox, you can provide seamless media streaming, centralized library management, and sharing capabilities, enhancing your media consumption experience.
How to run Plex Media Server on your Seedbox? (no Docker!)
| Note: If you already have a seedbox from Rapidseedbox, you can leverage one-click apps and skip the entire Plex Media Server installation process. Rapidseedbox supports you with Plex Media Server if you own a streaming seedbox. But outside this, and as stated in the initial disclaimer, installing, running, and maintaining Plex on Docker is outside the scope of our support. |
Starting with Plex on your Seedbox is more manageable than deploying it from zero. RapidSeedbox offers “One-Click Apps.” These are pre-configured applications (including Plex) that can be easily installed on your seedbox with just one click.
To run Plex on your seedbox.
- Go to Rapidseedbox’s Client Area. And ensure your VPS Seedbox is up to date. Check the following tutorial to learn how to start with and use One-Click apps.
- Open OCI installers on the left-hand menu and find Plex. Keep in mind that not all seedboxes are optimized for streaming. Click on the gear icon on the right-hand side to install it. And that’s it; go to “Installed apps,” and you should see the Plex app installed. Click on the key icon to see the credentials and URL.
- For a top-notch streaming experience, we recommend Rapidseedbox’s Stream plan, which runs on top of the right hardware.
b. Which OS to use to run a Plex Docker image?
Docker works differently on Linux, macOS, and Windows. It (including plexinc/pms-docker vs. linuxserver/plex) is native to Linux. So, running Plex Docker on a Linux machine is highly recommended.
Running your Plex Docker container on Windows or macOS would require a virtual machine to run a stripped-down Linux environment. So, if you are running the Plex container on Windows, you’ll have to mount the /config directory as a volume to ensure that the metadata and settings for your Plex server are persisted. This is crucial for maintaining your Plex library and user accounts and ensuring a seamless viewing experience for your users.
c. Define the container’s and dependency’s configuration.
When running Docker containers, you need a YAML file to define the container’s and dependencies’ configuration. This YAML file is also known as Docker Compose. It allows you to specify the configuration of your containers, including networks and volumes, on a single file. Without a YAML file, you must manually specify each configuration setting for every container you launch. This can be time-consuming, error-prone, and difficult to maintain, especially when running multiple containers that depend on each other.
For instance, you can use Docker Compose to define your container configuration using a YAML file. If you use Docker Compose, you will create a compose YAML file such as ./docker-compose.yml and modify it to your needs.
How to get Docker Compose?
If you have containerization technology like Docker CE (Community Edition) and Docker Desktop, you will likely also have Docker Compose. Let’s find out which version of docker-compose we have. You can do this using the following command on your CLI or terminal:
$ docker-compose version

d. Decide which type of networking to use for Plex Docker.
There are three types of networking methods you can use to run Plex Docker from your host machine, these are:
- Bridge networking: This type of network is the default. It creates a new network within the host and runs containers within it. The network is connected to the physical network via an internal router. Docker configures this router to forward Plex ports through to the containers.
- Host networking: This uses the IP address of Docker’s host. Host networking makes the container’s networking appear to be the host’s rather than separate.
- Macvlan networking: This network method creates a new virtual computer (the container).
Generally, the Host and Macvlan methods are easier to set up. But sometimes, you would only be able to use Bridge networking (i.e., when ports need to be forwarded). You find easy-to-use templates at https://hub.docker.com/r/plexinc/pms-docker. Use these templates to create your YML file (i.e., docker-compose.yml in your project directory). But bear in mind the formatting while creating the YML file, as you would need to replace the values on the YML files with your values. Some of these values you would need to replace are Timezone, Plex_CLAIM token, volumes, network mode, IP address, advertise IP, or port mapping. More on setting this up in the coming sections.
4. Running Plex on Docker (Linux and Windows).
For this Plex on Docker install demonstration, we will run Docker on both Linux and Windows. As mentioned in the previous section, it is recommended to run Plex Docker on Linux and not on Windows. But yet, many people do not have access to Linux machines.
What will we be using in our demonstration? We will use Docker Desktop for Windows, and for Ubuntu Linux, we will use Docker CE. You can also use alternatives Docker engines (for containerization) such as Podman, Kubernetes, or OpenShift.
In addition, we will also be using Docker Compose (which comes with Docker Desktop and Docker CE), which is crucial to managing our container (or image) running on the host.
a. Running Plex Docker on Linux
We will use Docker CE installed on an Ubuntu Linux machine. The installation of Docker CE is out of the scope of this guide.
- Ensure your system is up to date using the following command:
|
1 2 |
sudo apt update sudo apt upgrade |
- To check the version of Docker installed on your system, use the following command:
|
1 |
docker version |
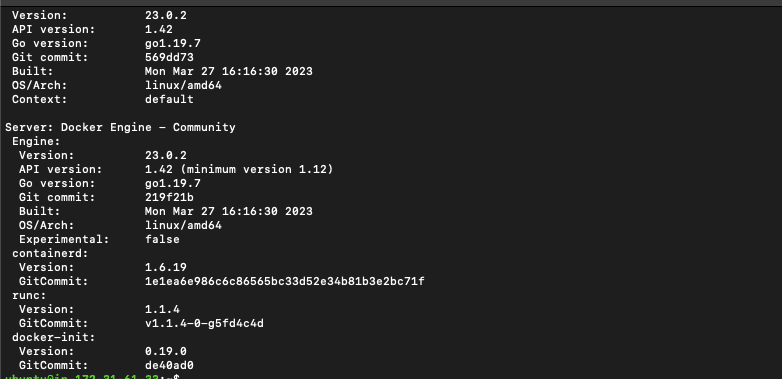
- Let’s check the current version of Docker Compose. Use the following command:
|
1 |
docker compose version |

- Let’s ensure that the Docker engine is active. For this, use the following command:
|
1 2 |
sudo systemctl start docker sudo systemctl enable docker |

- Let’s add and assign a new user docker to the docker group. This action will allow the user to run Docker commands without using “sudo” each time.
|
1 2 |
$ sudo usermod -aG docker $USER $ newgrp docker |
i. Let’s create persistent volumes for Plex.
The following commands will create three directories (database, transcode, and media) inside a plex directory. These volumes ensure your data is persistent across container restarts, upgrades, or server reboots.
|
1 2 |
$ sudo mkdir /plex $ sudo mkdir /plex/{database,transcode,media} |

ii. Let’s create the YAML file and add the networking configuration.
As mentioned in the previous section, you would need a YAML file to define the container’s and dependencies’ configuration. Let’s start by creating this file.
- The following command will create a yml file using the vi text editor.
|
1 |
$ vi docker-compose.yml |
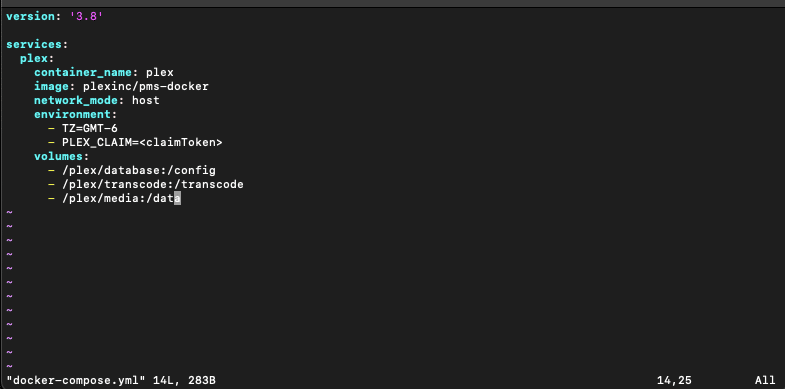
- Once you create the yml file, you’ll need to enter the container’s configuration, which includes key aspects for Plex, networking, and volumes.
- We will use the Host Networking method (but you may have also chosen to use macvlan or bridge networking modes). As mentioned before, you only need to replace information like ‘name,’ ‘host,’ ‘TimeZone,’ ‘Plex Claim,’ and ‘volumes.’
docker run \
-d \
–name plex \
–network=host \
-e TZ=”
-e PLEX_CLAIM=”
-v /plex/database:/config \
-v /plex/transcode:/transcode \
-v /plex/media:/data \
plexinc/pms-docker
Note: Remember the proper formatting of a YML file when creating it. Below is an example of how to properly format this file. For instance, start with the Compose file version, followed by services > name of services, etc.
iii. Start your Plex Docker container.
Use the following command to start your Docker container defined in a docker-compose.yml file in detached mode. The detached mode means that your Docker container (specified on the docker-compose.yml) file will continue to run even if you close the terminal or log out of the server.
|
1 2 |
$ docker-compose up -d $ docker ps |

Note: The Host Networking configuration type uses the host’s networking rather than an isolated container’s networking (such as bridge mode). So, technically you wouldn’t have to forward ports. In fact, the host” network_mode is incompatible with port_bindings.
Upgrade Your Plex Streaming with RapidSeedbox!
Simplify your Plex setup – no more Docker complexities.
Enjoy top-notch security and privacy.
Experience enhanced performance for smooth streaming.
b. Running Plex Docker on Windows.
To run Plex Docker on Windows, we will be using Docker Desktop. This software allows you to build, test, and deploy applications using containers. It is available for Windows and Mac operating systems. It includes all the necessary components to create and manage containers, such as the Docker engine, Docker CLI, Docker Compose, and Kubernetes.
Note: If you want to install Plex on Docker, you will likely already have a way to run Docker containers. Installing Docker Desktop is out of the scope of this guide.
i. How to pull the Plex image on Docker Desktop?
- Open and Ensure Docker Desktop is running. You can use the Docker icon on the shortcut menu to verify whether Docker Desktop is running.
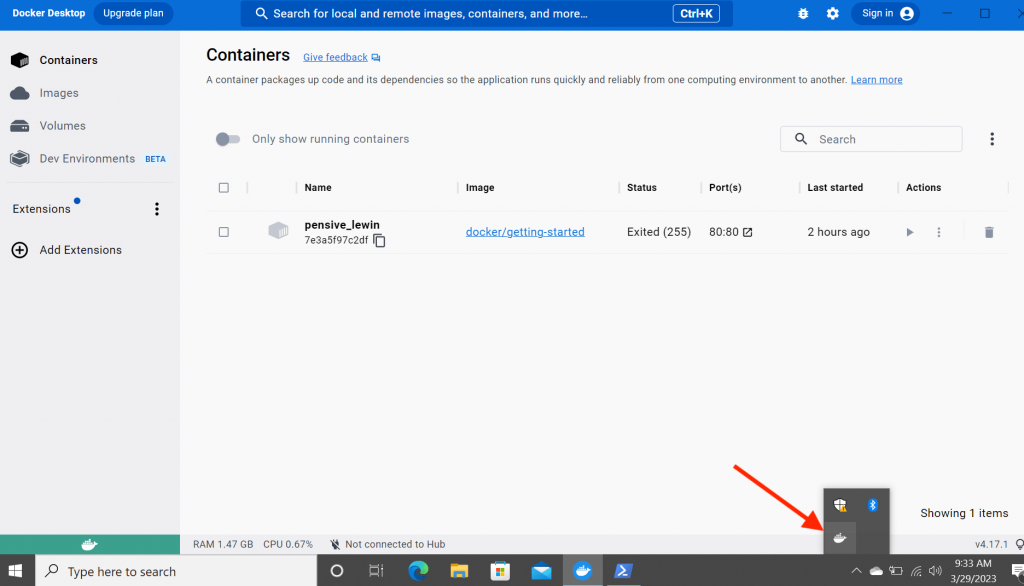
- Open your terminal or command prompt with administrative privileges. You can also run the following commands from the Powershell terminal (if you are using Windows). We will pull the official Plex media server container using the following “pull command”:
|
1 |
docker pull plexinc/pms-docker |
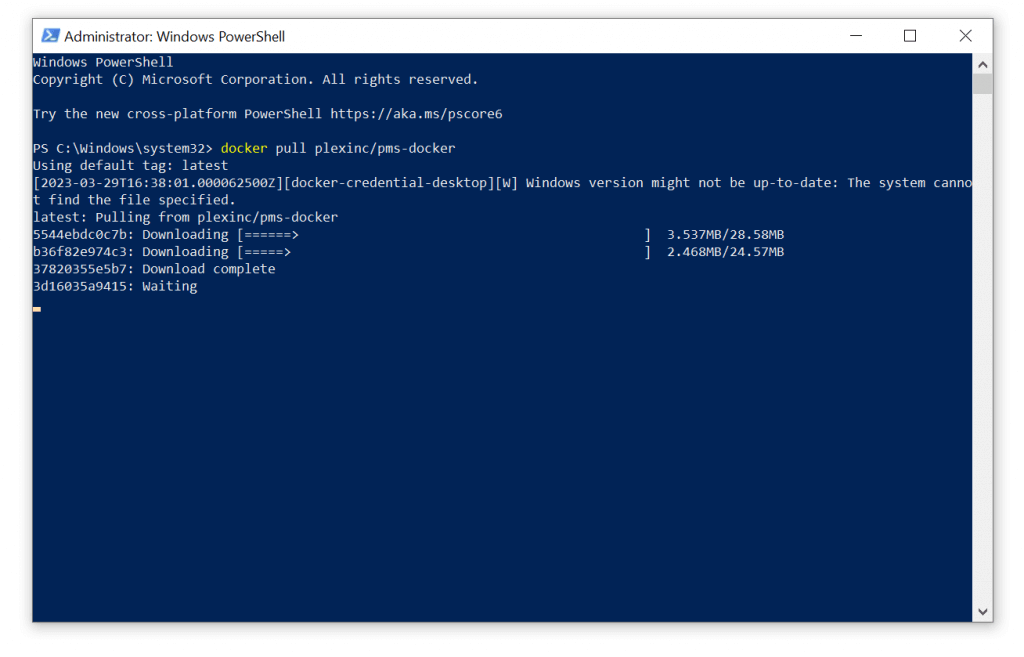
- The Docker container image will begin to download.
- Once you see the results “pull complete” without failure, you successfully pull the image to your machine.
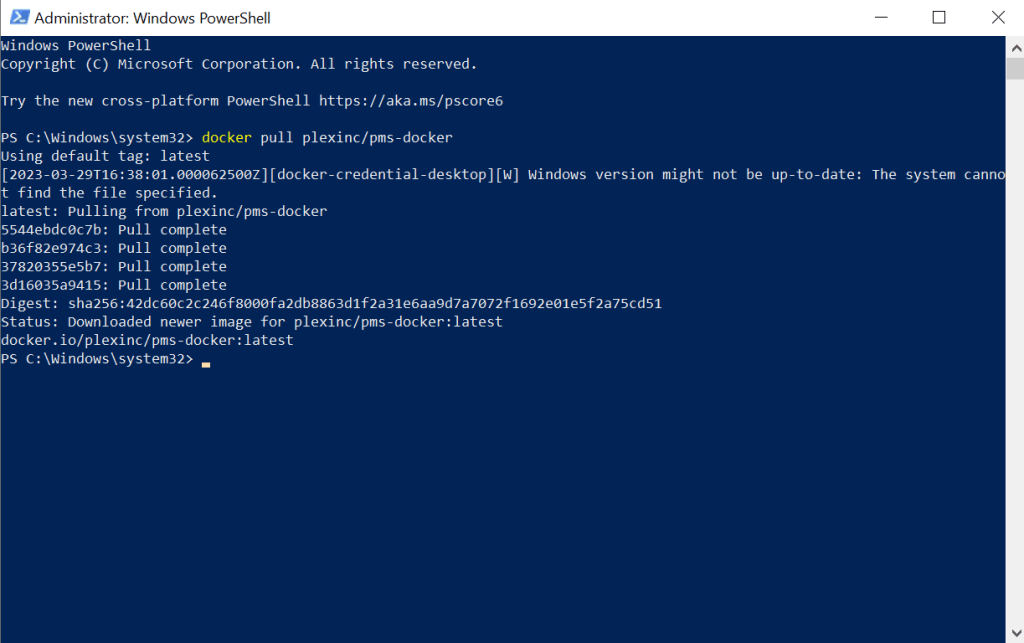
- Now, let’s go back to check into the Docker Desktop platform. Go to the left-side menu and open “Images.” If the PMS-docker was successfully pulled, you will see it here. Still, as you would notice, the image is in an “unused” status.
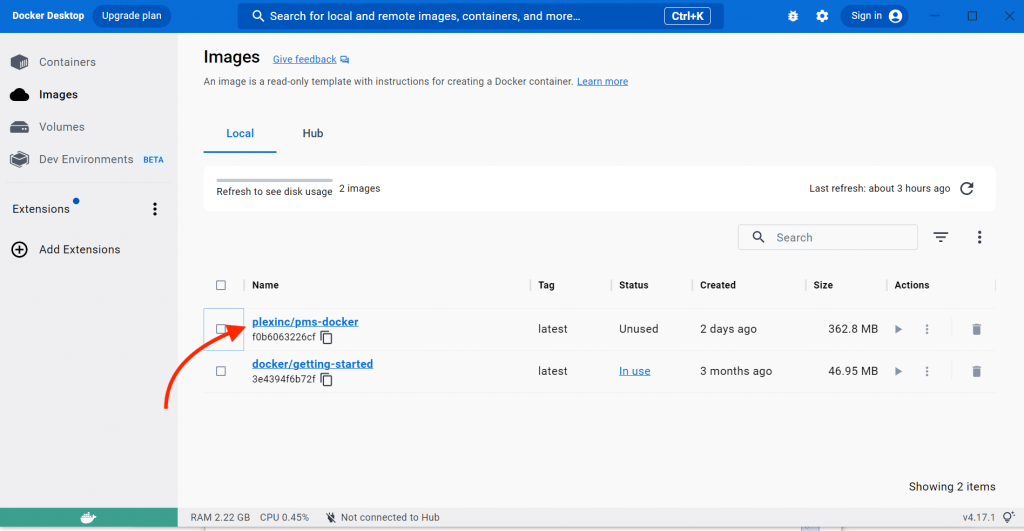
ii. Let’s run the Plex Docker container.
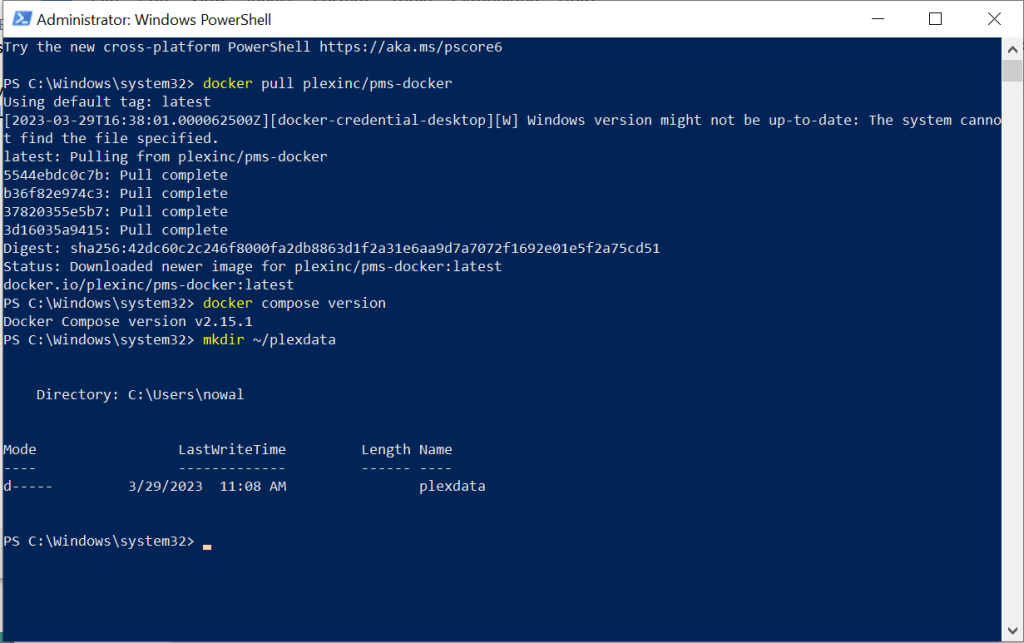
If you don’t have Plex directories in Windows, this is the time to create them.
Open Powershell and create a new directory to store your Plex data by running the following command:
mkdir ~/plexdata
Note: You can choose any directory you like, replace ~/plexdata with your preferred path.
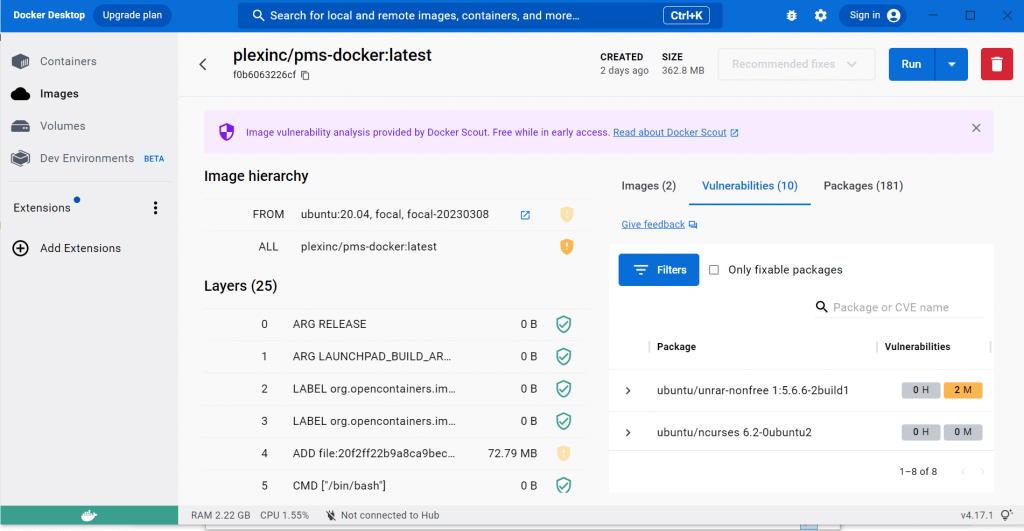
- Go to Docker Desktop > Images > plexinc/pms-docker. If you click on the image, you will see all its detailed information, including its hierarchy, layers, vulnerabilities, and packages.
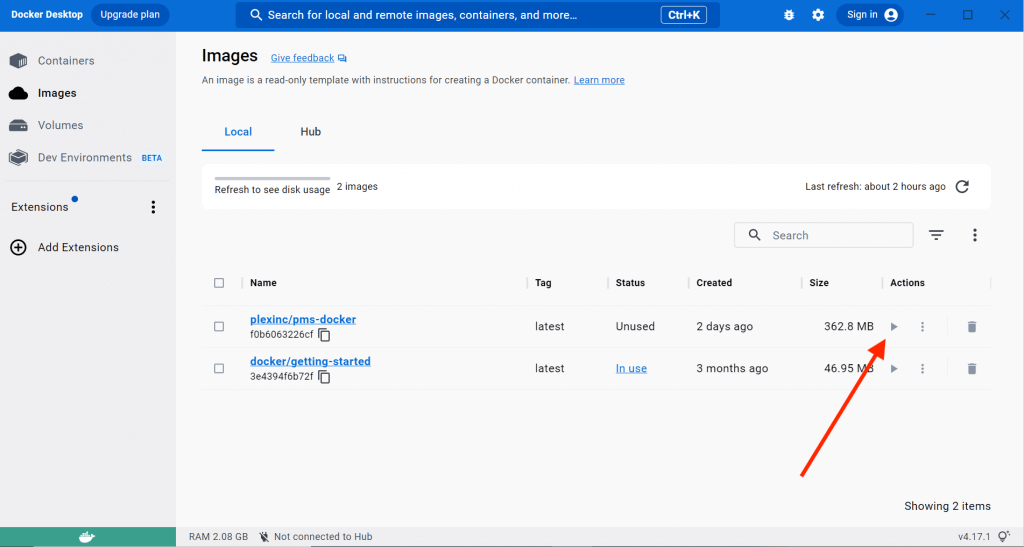
- Start the Plex container by going to Plex Desktop > Images> Choose the Image > Click on the “Start” button.
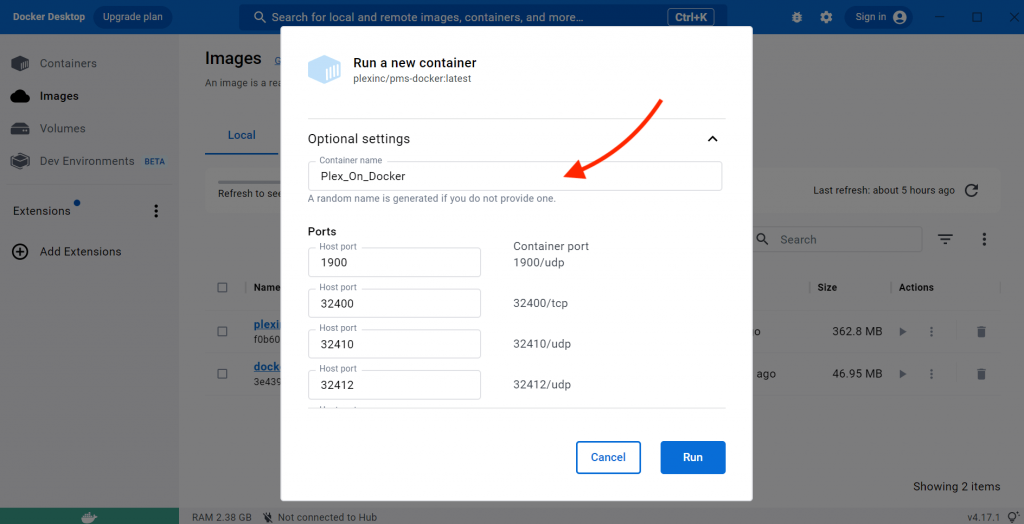
- At this step, when you Run your new container, you’ll get Optional Settings— which are really mandatory to be able to use Plex Media Server.
Note: Your new Plex Docker container has no information about its running network (bridge, overlay, or macvlan). It only sees the current network interface (along with IP address), its gateway, routing table, DNS services, and some other networking information. In this case, we didn’t configure a Docker Compose file previously as we did with the Linux configuration, so here on Docker Desktop, you will be able to configure networking parameters easily.
- On the “Run a new container” menu. Give your new container a name (no spaces are allowed) and map all the ports from the Container (what it needs to work with Plex) and the Host machine to take Plex to the outside world. Take the example from the picture below.
- If you don’t give a name. The Docker Desktop will generate a random name.
- On the bottom of this menu, map your container volume with the host machine volume.
- Click on “Run” to create your Plex container.
- Wait for the container to start up.
iii. Checking the logs and output.
You can monitor its progress by going to “Containers” > plexinc/pms-docker:latest > “Logs.”
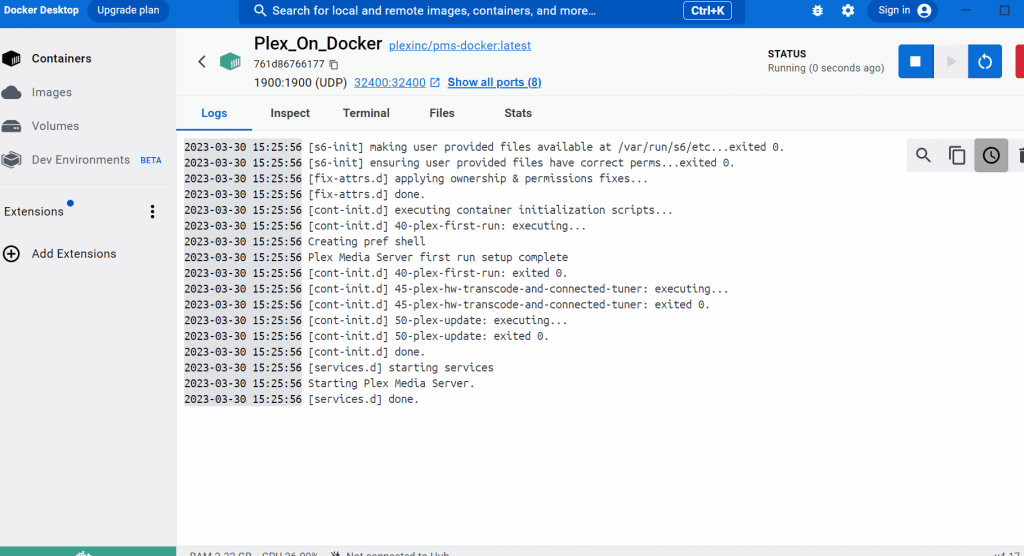
- Or you can also check logs from the terminal, CLI, or Powershell, by issuing the following command:
|
1 |
docker logs -f (name of container) |
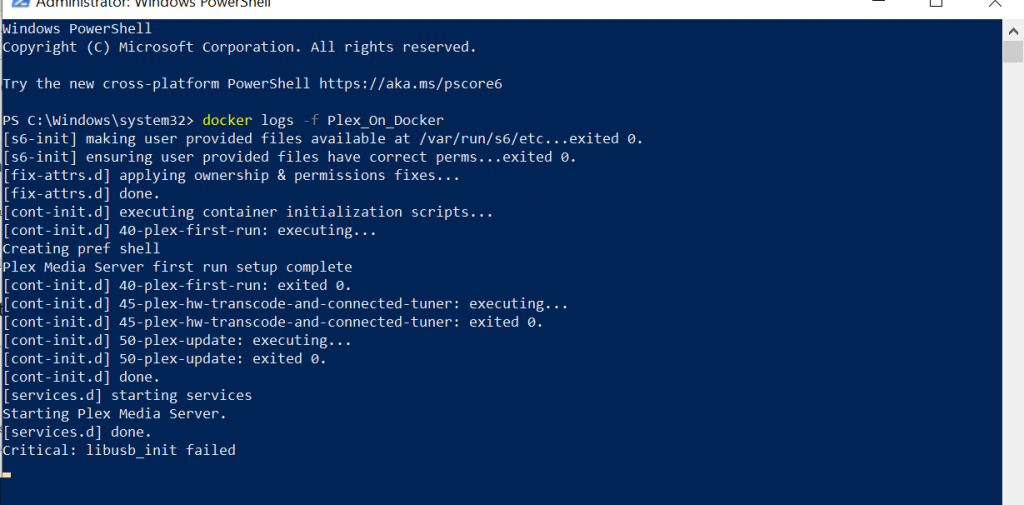
- You might have noticed a few details from the logs output:
- The container was initialized, and the user-provided files were available in a certain directory (var/run/s6/etc., in our container.).
- The container ensures that the user-provided files have the correct permissions. It also applies ownership and permissions fixes to the container.
- It starts and completes three related scripts: The PMS container initialization scripts, the hardware transcoding and connected tuner script, and the update script for PMS.
- The container starts and checks the Plex Media Server services.
- The log also shows an error “Critical: libusb_init failed.” This error typically indicates that there was an issue initializing the libusb library. This is a cross-platform library that provides low-level access to USB devices. We will not be using USB at the moment.
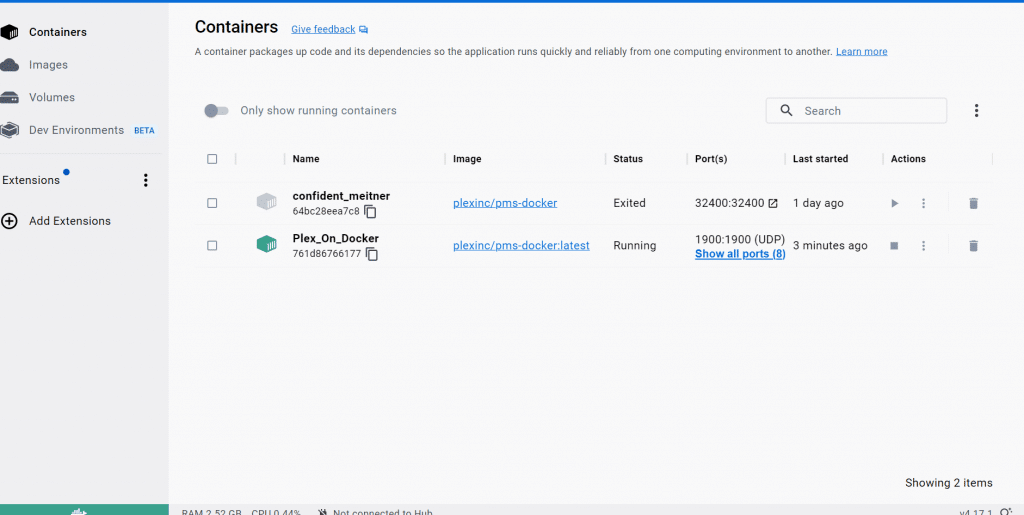
- If you have already checked the logs and are ok with them, return to Docker Desktop > Containers.
- Note that our new Plex_On_Docker container is running and has ports bound to it. So you should be able to access and use it.
c. Other ways to run your Plex Docker?
You can also start the Plex container without needing Docker Compose (although it is not recommended).
- Use the following command, but change the values according to your needs. For example, change the name and TZ. Additionally, replace the ~/plexdata with the directory we created before and /mnt/user/Media with the directory where your media files are located.
|
1 |
docker run -d --name plex --restart=always \ -p 32400:32400/tcp -p 3005:3005/tcp -p 8324:8324/tcp \ -p 32469:32469/tcp -p 1900:1900/udp -p 32410:32410/udp \ -p 32412:32412/udp -p 32413:32413/udp -p 32414:32414/udp \ -e PUID=1000 -e PGID=1000 \ -e TZ=America/New_York \ -v ~/plexdata:/config \ -v /mnt/user/Media:/data \ plexinc/pms-docker |
Note: For security reasons (and by default), running a container using the “docker run” command will not expose any port to the outside world. To make a port, such as Plex ports (1900/UDP, 32400/TCP, 32410/UDP, 32412/UDP, 32413/UDP, 32414/UDP, 32469/TCP, and 8324/TCP) available to services outside your Docker container (or available to other Docker containers running on a different network), you will have to use the –publish or -p flag. This flag explicitly creates a firewall rule inside the container. In other words, it maps a container port to a port on the Docker host (to the external world). This is a bridge networking method.
5. Opening Plex Media Server.
Now that your container is running successfully, you can try accessing the Plex web interface.
- To open your new Plex on a Docker container, go to your web browser and navigate to http://localhost:32400/web. This will open the Plex login screen, where you can sign in or create a new account.
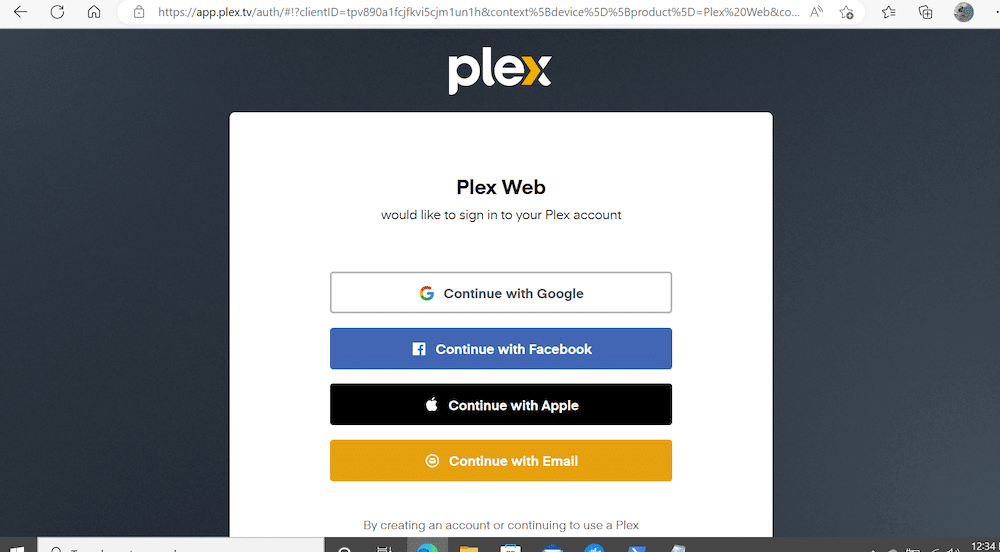
Note: You should run the web browser on the machine where the Docker container (the host) is running. You can also run Plex Media Server on another machine on the same network if you have configured the necessary network settings.
- At this step, if you include the Plex Claim token on the Docker Compose file, your configuration will automatically activate and associate the Plex server with your Plex account.
- Once you sign in, Follow the on-screen instructions to set up your Plex server and add your media files. For more on setting up PMS, check Guide to Setting Up Plex Media Server in 2023.
a. Can’t open the Plex GUI?
If you can’t open localhost:32400/web for your Plex Media Server container installed from Docker image plexinc/pms-docker, try the following:
- Check the container status: Verify that the Plex container uses the “docker ps” command. If the container is not running, start using the docker start <container-id> command, where <container-id> is the ID of the Plex container. From the output below, you can see that the Plex_On_Docker container is healthy.

- Check the container port: You can also see the exposed ports from the output above. The container exposes several ports to the host system, which are used for communication with the Plex media server. The complete list of ports being exposed by the container and mapped to the host system. Always make sure the default port for Plex is 32400 and is correctly mapped to the host system. For example, docker run -p 32400:32400 plexinc/pms-docker. From our output above, Plex is indeed mapped to the 32400/TCP port (the default HTTP port used for web access).
- Check the firewall: Ensure that the firewall is not blocking the connection to the Plex server. You may need to add an exception to the firewall for port 32400. For a Windows Firewall, go to the Windows Defender Firewall with Advanced Security and click on “Inbound Rules” in the left-hand pane. Create a New Rule that filters connections based on port (allow 32400).
- Try accessing using the IP address: Instead of using localhost, try accessing the Plex server using the IP address of the host machine. You can find the IP address using the ipconfig command in the Windows command prompt. For example, if your IP address is 192.168.1.100, you can access the Plex server by going to 192.168.1.100:32400/web.
- Check the Plex container logs: Use the docker logs <container-id> command to check the logs for the Plex container. This can help you diagnose any issues preventing the container from running correctly.
6. Frequently Asked Questions:
a. Running a Plex Docker container with host networking mode vs. bridge mode?
Mapping container ports to host ports (host networking mode) is easier. This mode allows the Plex server access directly from the host machine’s IP address and port. It also simplifies network configuration and troubleshooting. But unfortunately, there are disadvantages to this approach. For example, you may run into port conflicts or can potentially expose the Plex server to security risks. On the other hand, mapping container ports to other container ports (bridge networking mode) can be more secure and flexible, as it isolates the Plex server from the host machine and other containers.
b. Running Plex Docker on a NAS? What are your best options?
Running Plex on a NAS can be a great way to store and access your media files. If you consider installing Plex with Docker on a NAS, check for providers with excellent support for different types of software. Some NAS providers like Synology, QNAP, and Asustor provide products that support Docker. Examples of these NAS (in 2023) are Synology DiskStation DS723+, Synology DiskStation DS920+, and Asustor’s Lockerstor AS6604T
c. Is it possible to run the Plex on Docker without Docker Compose?
While it is possible to run a single container for Plex using the “docker run” command, using Docker Compose is better. We recommend Docker Compose as it provides several benefits, such as ease of use, flexibility, portability, consistency, and maintainability.
d. How to update timhaak/docker-plex?
To update timhaak/docker-plex (now, https://hub.docker.com/r/bytesized/plex) container, follow these steps: Stop the existing Plex (docker stop <name> > Remove the existing Plex container (docker rm <name>) > Pull the latest version of the timhaak/docker-plex image (docker pull timhaak/docker-plex). Finally, create the new Plex container using the updated image.
e. How to install Plex Docker OpenMediaValut?
OpenMediaVault is a free and open-source network-attached storage (NAS) software. It provides a web-based GUI for managing storage and services. To install the Plex Docker container on OpenMediaVault, follow these steps: (1) Install Docker on your OpenMediaVault system > (2) Open the Docker interface and search for the Plex image > (3) Download and configure the Plex image, providing the necessary details such as the port and volume mappings. > (4) Start the Plex container
f. Which unraid Plex Docker to use?
Multiple Plex Docker containers are available on the Unraid community applications repository, including the official Plex container and community-maintained containers such as linuxserver-plex or pms-docker. Choosing which one largely depends on your specific requirements and preferences. However, the official Plex container is recommended for most users, as the developers of Plex maintain it and are frequently updated with the latest features and bug fixes.
Final Words.
We hope this post has helped get your Plex Media Server up and running in Docker containers.
Whether you’re a Docker pro or a beginner, running Plex on Docker can offer a range of benefits and flexibility.
Don’t hesitate to experiment and explore the many options available with Plex Docker containers. If you have any questions, issues, or suggestions, please leave them in the comments section below.
As always, Happy Streaming!
Upgrade Your Plex Streaming with RapidSeedbox!
Simplify your Plex setup – no more Docker complexities.
Enjoy top-notch security and privacy.
Experience enhanced performance for smooth streaming.
Educational Purpose Disclaimer: This material has been developed strictly for educational purposes. We at RapidSeedbox do not endorse or promote any activity involving copyright infringement or illegal activities related to torrenting. Always abide by the laws and regulations concerning copyrights in your jurisdiction.
I followed every step except this one:
“On the bottom of this menu, map your container volume with the host machine volume. ”
but I cannot access my server. The above quote may very well be in Chinese to me. Can you please go into much, much, much more detail about this presumably crucial step?
Hi there Kehk…
It is not Chinese… but it was actually an error in the article — thanks for bringing that up! :p
The words meant: “On the bottom of this menu, map your container port number with the host machine’s port number”
Cheers!