Looking to supercharge your torrenting experience with Jackett?
Well, look no further. In this ultimate guide to Jackett, we will take you on a step-by-step journey into this amazing indexer and tracker service. You will learn everything, from downloading and installing Jackett to integrating it with your favorite torrenting tools.
Learn how to run Jackett from your seedbox, install it on Windows or Linux, and even set it up in a Docker container. Discover how to use Jackett to access your favorite torrenting sites and add new indexers, add your favorite RSS feeds, and more. This guide has your back!

Disclaimer: This material has been developed strictly for informational purposes. It does not constitute endorsement of any activities (including illegal activities), products or services. You are solely responsible for complying with the applicable laws, including intellectual property laws, when using our services or relying on any information herein. We do not accept any liability for damage arising from the use of our services or information contained herein in any manner whatsoever, except where explicitly required by law.
Table of Contents:
- What is Jackett, and how it works?
- How to download and install Jackett?
- How to use Jackett?
- Prowlarr vs Jackett: Which to Choose?
- Jackett: FAQ
- Final Words.
1. What is Jackett, and How it Works?
Jackett is a robust free and open-source maintained indexer scraping & translation logic. It is compared to a proxy server because it is an intermediary between various torrent indexers (providers) and applications like Sonarr, Radarr, and CouchPotato. In other words, Jackett monitors all the trackers (public or private) you assign to and forward requests to other apps.
As long as you can access these public/tracker sites, Jackett is your get-go to finding all kinds of torrents. Many old-time Jackett users have used this amazing piece of machinery to automate their torrent environment and save time.
How Jackett works?
As mentioned previously, Jackett works as a proxy server. It translates queries from popular apps like Sonarr, Radarr, CouchPotato, and qBittorrent into tracker-site-specific HTTP queries. It parses the HTML or JSON response and then returns the results to the requesting app (Sonarr, Radarr, etc.). Jackett can aggregate results from multiple torrent trackers and present them in a consistent format to the requesting software.
Jackett uses port 9117 to communicate with such applications. This port is also used for the web interface, API, and RSS feed. By default, the port is set to 9117 during installation, but you can later change it if you need to.
What is Jackett’s API for? Jackett provides an API that you can use to access the indexer data programmatically. You can view your API key and any related documentation by clicking the “API” tab in the web interface. (more on this later!)
2. How to Download and Install Jackett?
You can install Jackett on various platforms, including Windows, macOS, Linux, and Docker. Keep in mind that depending on your platform, you’ll need to have some dependencies ready before installing the software.
We always recommend obtaining your Jackett download from none other than the official site >> https://github.com/Jackett/Jackett. Here you’ll find the most stable and latest version of Jackett.
Note: if you own a Rapidseedbox’s VPS seedbox and would like to use Jackett, you can use one-click apps and skip the entire installation. However, if you are starting from scratch with Jackett on your own server, we recommend using Docker hosted on Linux.
a. From your Seedbox.
Starting with Jackett via Rapidseedbox’s one-click apps is easier than deploying it from zero. If you own a Rapidseedbox server, we strongly recommend you run Jackett using the one-click apps (pre-configured applications that can be easily installed on your seedbox with just one click).
Here’s how you do it.
- Go to Rapidseedbox’s Client Area. And ensure your VPS Seedbox is updated. Check our tutorial to learn how to start with and use One-Click apps.
- Open OCI installers on the left-hand menu and find Jackett. Click on the gear icon on the right-hand side to install it.
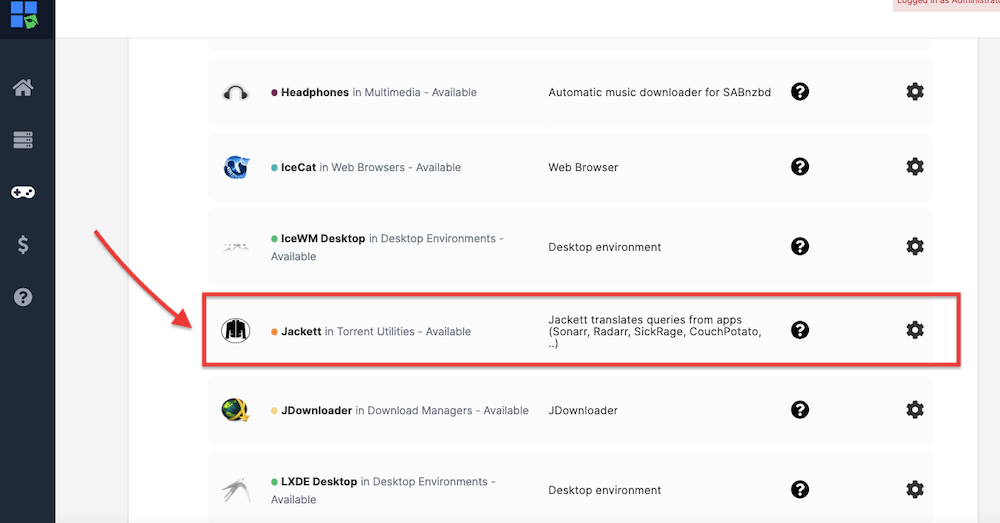
- And just like that, your Jackett is installed in your Seedbox server. You’ll now just need to find its URL and credentials. And open it through the web browser.
Disclaimer: Rapidseedbox provides support to its one-click apps and seedboxes. The following tutorial is instructional and for educational purposes. We do not provide support for installing Jackett outside Rapidseedbox’s servers. But, that being said, you are welcome to leave comments, questions, and suggestions on the following installation process, and we will be happy to help as best as possible.
b. How to Install Jackett On Windows?
We recommend using the provided official installer and installing the software as a Windows service. But you may also download the zipped version and configure everything manually. In addition, before installing Jackett on Windows, ensure you have all the .NET prerequisites installed (Install the .NET 6 SDK).
Here are the step-by-step instructions for installing and using Jackett on Windows:
- Go to the releases page, find Jackett download, and get the latest version of the Windows Jackett installer, “Jackett.Installer.Windows.exe.”
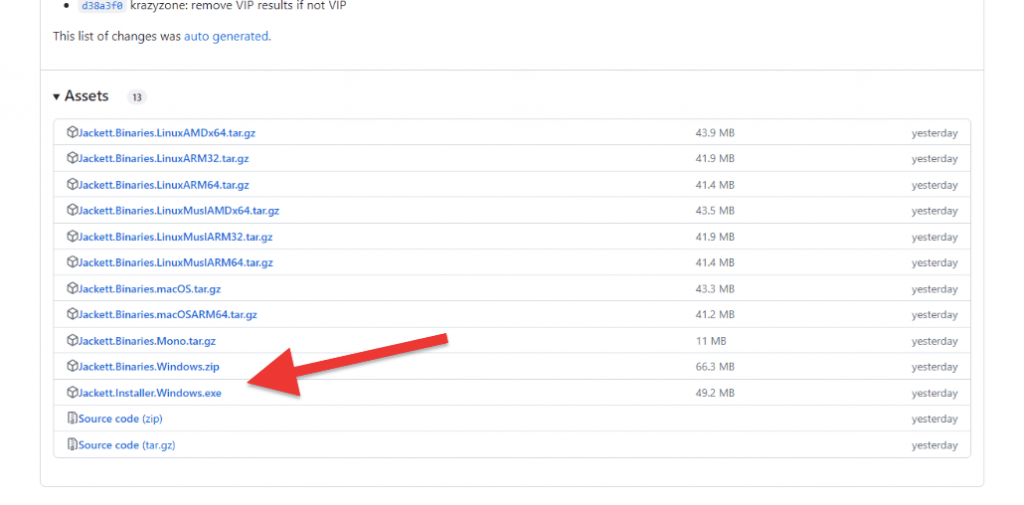
- Once the Jackett download is complete, locate the file and double-click it to start the installation process. You will be prompted to allow the app to make changes to your computer > select “yes.”
- If you want to install Jackett as a Windows Service, make sure to select the “Install as Windows Service” checkbox during the installation process.
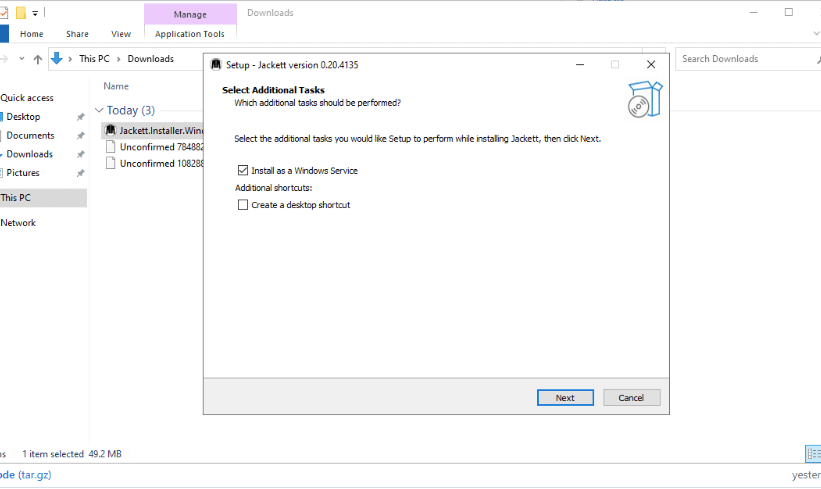
- Click on Next > Install.
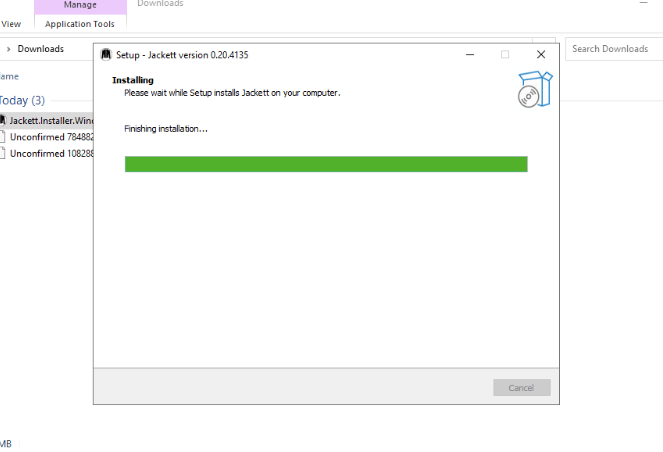
- Once the installation has finished, check the “Launch Jackett” box to get started. If you installed Jackett as a service, you can open, start, or stop Jackett from the Windows tray icon. If you do not install Jackett as a service, the software will run its web server from the tray tool.
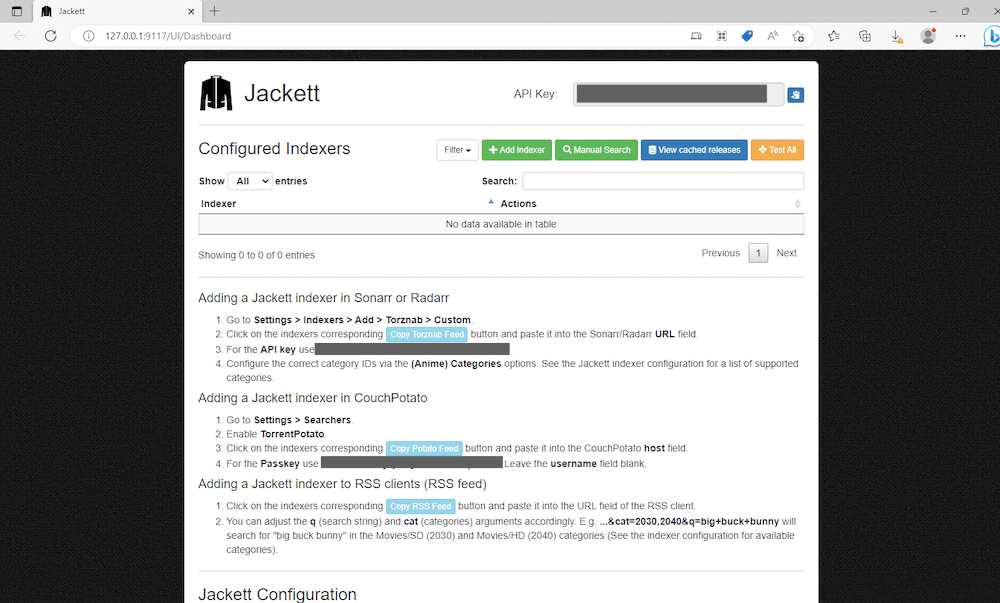
- The Jackett web-based user interface will open. You can also open your web browser and navigate to http://127.0.0.1:9117.
c. How to Install Jackett On Linux?
Jackett can be installed on Linux (AMDx64), Linux (ARMv7 or above), or Linux (ARMv6 or below). For illustration purposes, we will be installing Jackett on an Ubuntu-jammy-22.04-amd64-server. Here are the detailed steps to install Jackett on Ubuntu Linux.
- Open a terminal on your Ubuntu server. Update the package lists by running the following command:
$ sudo apt update
- Install the required dependencies by running the following command:
$ sudo apt install wget curl libicu-dev libcurl4-openssl-dev

- Issue the following command. Get the latest release in your Jackett download and then extract the binaries to the /opt/Jackett directory. If the command ran without errors, Jackett should be installed, and the binaries should be located in the /opt/Jackett directory.
cd /opt && f=Jackett.Binaries.LinuxAMDx64.tar.gz && release=$(wget -q https://github.com/Jackett/Jackett/releases/latest -O - | grep "title>Release" | cut -d " " -f 4) && sudo wget -Nc https://github.com/Jackett/Jackett/releases/download/$release/"$f" && sudo tar -xzf "$f"
- Change the owner of the Jackett directory with the chown command. Issue the command:
chown <user>:<user> -R "/opt/Jackett”- Dont forget to replace the above command with your user and group.
- Now, install Jackett and set it up as a systemd service on Linux. Use the following list of commands.
sudo rm -f "$f"cd Jackett*
sudo ./install_service_systemd.shsystemctl status jackett.service
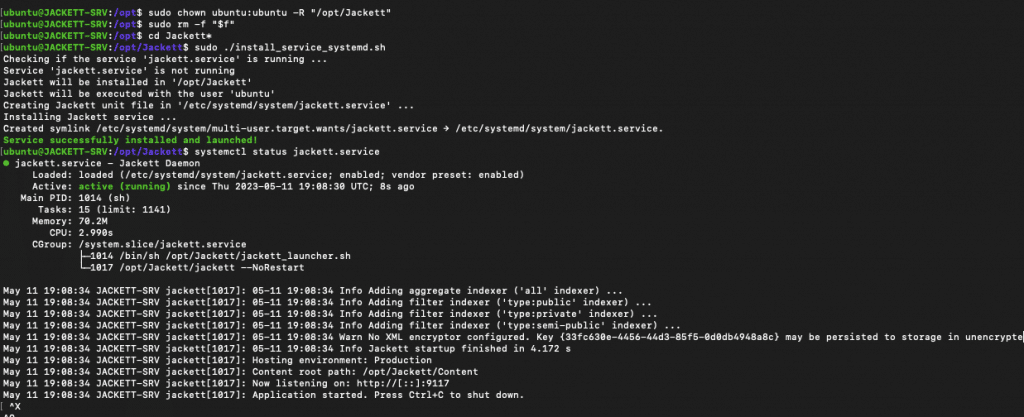
- Check the URL where Jackett can be accessed in a web browser.
echo -e "\nVisit http://127.0.0.1:9117"

Note: Now you have installed Jackett as a system service. This means it will start automatically on boot. If you don’t want to install it as a service, you can run Jackett manually by navigating to the Jackett directory and running the ./jackett command.
d. How to Install Jackett On a Docker Container?
We recommend using the popular linuxserver/jackett Docker image. This image allows you to run Jackett on a Linux host without having to install any dependencies or configure the application manually (as we previously did). The linuxserver/jackett image is built on top of Ubuntu and includes all of the dependencies and configuration files to run Jackett. Although it is possible to run linuxserver/jackett on a Windows-hosted Docker container, it is always recommended to use Linux (and especially Ubuntu).
Here is a step-by-step guide to install Jackett on Docker using the Linuxserver/jackett image.
- We are assuming Docker is already installed on your Linux machine.
- Go ahead and open a terminal window on your Linux host and enter the following command to download the Linuxserver/jackett image:
docker pull linuxserver/jackett

- Before moving on to creating the new Jackett Docker container, let’s ensure you have the right volume (directory) on your host machine. You’ll need a Jackett configuration and downloads directory on your host machine.
- To show you the process, we have already created two directories in our host machine.
$ sudo mkdir /home/ubuntu/jackett_config$ sudo mkdir /home/ubuntu/downloads
- In the following command, you will map your host machine volume with the containers. You should replace “yourusername” with your actual “username,” and modify the paths to match the location of your configuration files and downloads.
Create the container.
- Now that the image is downloaded create a new container. Use the following command:
|
1 2 3 4 5 6 7 8 9 10 11 12 13 14 15 16 17 18 19 20 21 22 |
docker run -d \ --name=jackett \ -e PUID=1000 \ -e PGID=1000 \ -e TZ=Etc/UTC \ -e AUTO_UPDATE=true `#optional` \ -e RUN_OPTS= `#optional` \ -p 9117:9117 \ -v /path/to/config:/config \ -v /path/to/downloads:/downloads \ --restart unless-stopped \ lscr.io/linuxserver/jackett:latest |
Note: Before you run this command, you’ll have to replace “/path/to/config” and “/path/to/downloads” as discussed above. In addition, the other options like -p map port 9117 inside the container to port 9117 on your host system.
- Once you’ve started the container, you can access Jackett’s web interface by opening a web browser and entering “http://localhost:9117” in the address bar.
- To stop and start the container, use the following commands:
docker stop jackettdocker start jackett
Need a Jackett upgrade?
Why struggle when RapidSeedbox offers a one-click wonder, lightning-fast searches, and iron-clad security?
3. How to use Jackett?
a. Access the Web Interface
- Once Jackett runs, you can access the web interface by opening a web browser and navigating to http://localhost:9117. You should see the login page as follows:

b. Adding Indexers
To start using Jackett, you need to add some indexers. The software supports a wide range of trackers (private, public, or semi-private), and you can search for supported indexers by clicking the “Indexers” tab in the web interface.
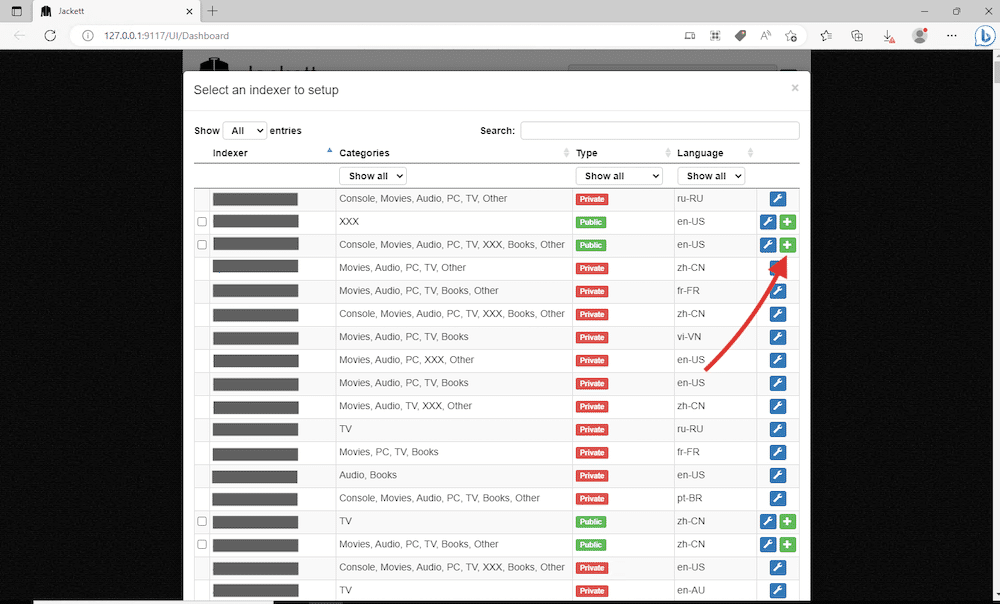
- To add an indexer, click the ” + Add indexer” button. The “Add indexer” option allows you to add a new indexer to Jackett by selecting it from a list of supported indexers.
- Select the tracker you want to add, and enter the required information.
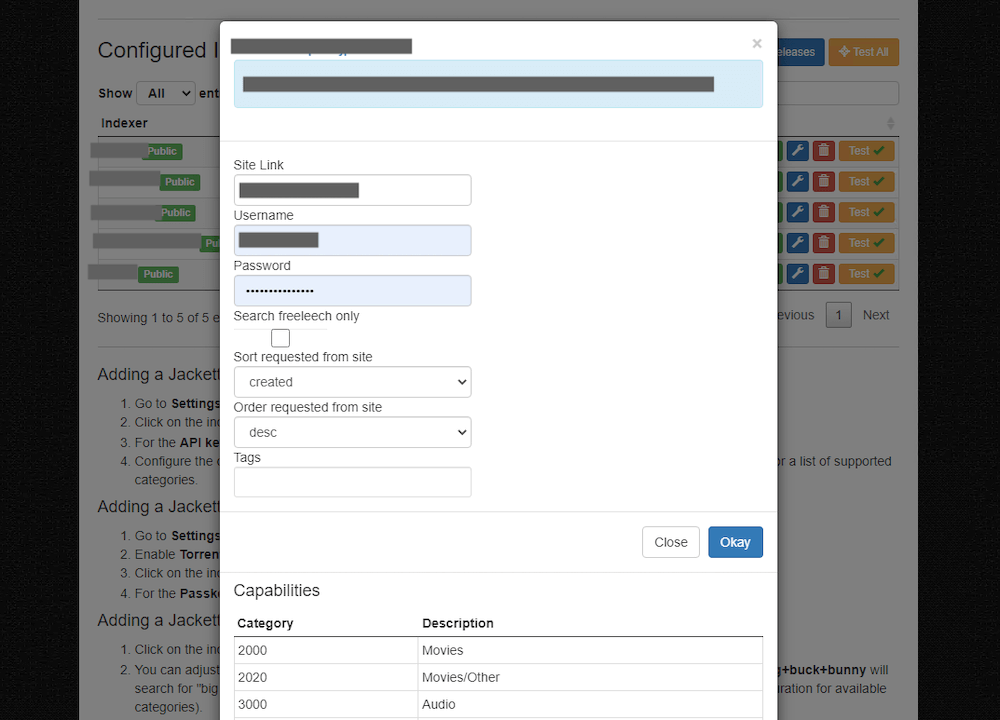
- Private: To add a private tracker, you must enter authentication and integration methods such as credentials, API key, 2FA, cookie, etc.
- Public: You can also add a public indexer simply by clicking on the green box with a white cross.
- Below is a screenshot showing the process for adding a private tracker based on the site link and credentials. The process is quite straightforward; simply enter your credentials and hit “Okay.”
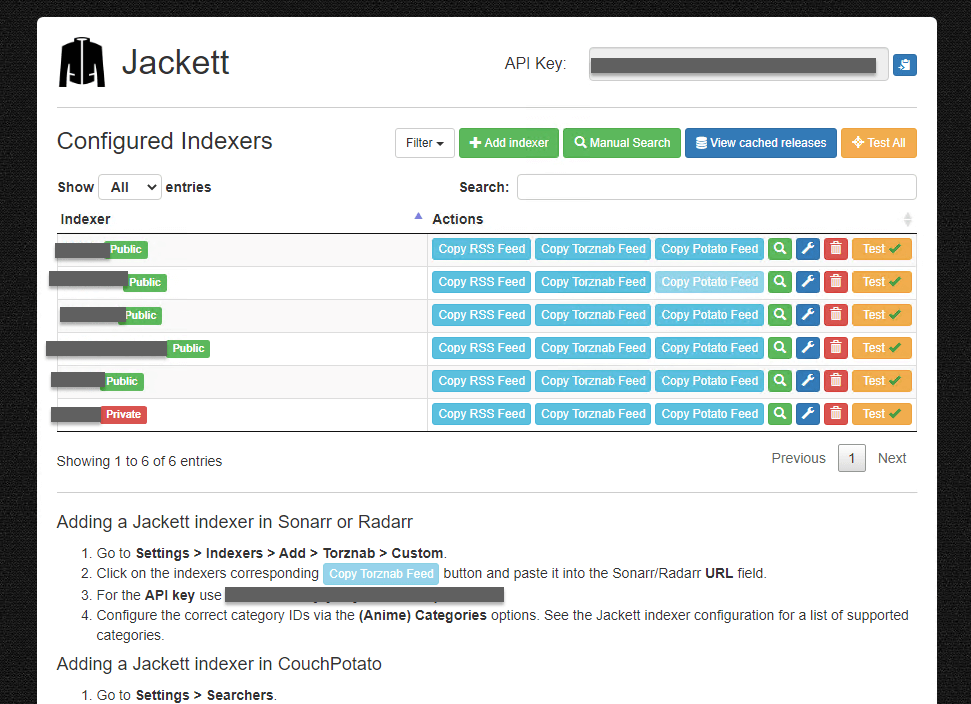
- You will see all your added indexers back on the main dashboard. In Jackett’s “Configured Indexers,” you also have the following options:
- “Filter” – Allows you to search for a specific indexer or group of indexers in the list of configured indexers.
- “Manual Search” – Allows you to perform a manual search for a specific release on a selected indexer. This is useful if you are looking for a specific release your media manager is not automatically picking up.
- “View Cached Releases” – Allows you to view a list of cached releases that have been retrieved from all of your configured indexers. This is useful for troubleshooting and debugging purposes.
- “Test All” – Allows you to test the connection to all of your configured indexers to ensure they are working correctly.
Perform a manual search for all (or specific indexers).
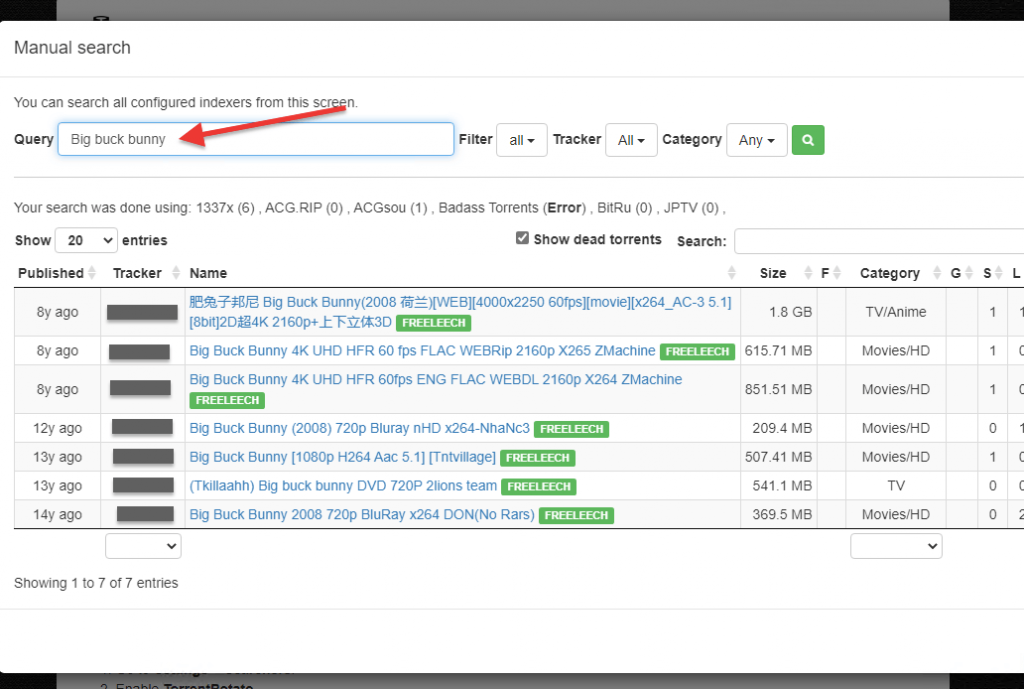
Now that you have added a few indexers in your Jackett configuration let’s perform a query (or manual search) in all or certain indexers (based on tracker, type, or media.)
- Perform a manual search for a specific release on a selected or all indexers. Jackett will search all your selected trackers and display the results here.
c. Link an indexer into your Sonarr or Radarr.
To link Jackett to Sonarr or Radarr, you’ll need first to gather Jackett’s information, including URL and API. Jackett uses the Torznab open-source protocol to integrate indexing functionality into applications. Many popular Torrenting and Usenet indexing sites and applications, including Radarr, Sonarr, and Jackett, use Torznab to provide search and indexing capabilities to their users.
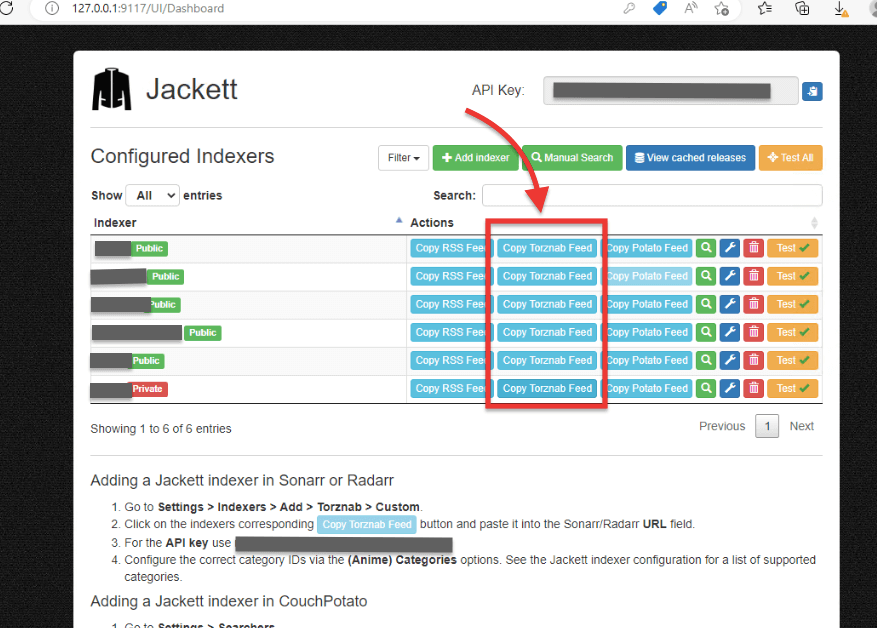
- URL: This is the URL of the indexer (not Jackett’s IP and port). To find this value, go to Jackett, under Configured Indexers > find the blue button “Copy Torznab Feed”. This will copy the URL of the Torznab feed for this specific indexer.
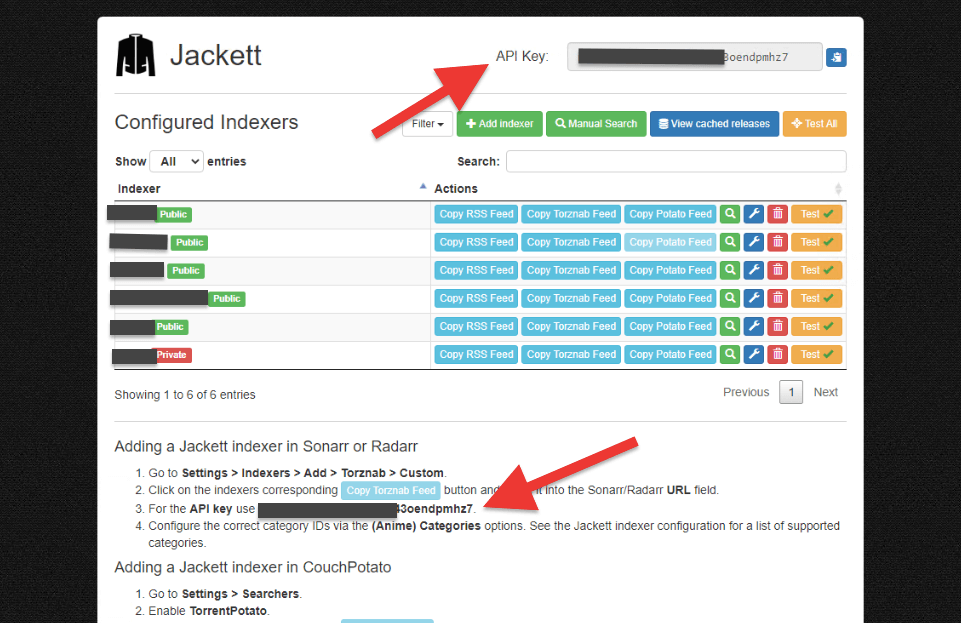
- API Key: Your API Key can be easily found on the Jackett web interface, on the top, and next to the logo. You can also find it in the “Adding a Jackett indexer in Sonarr or Radarr” instructions.
Setting up Radarr or Sonarr
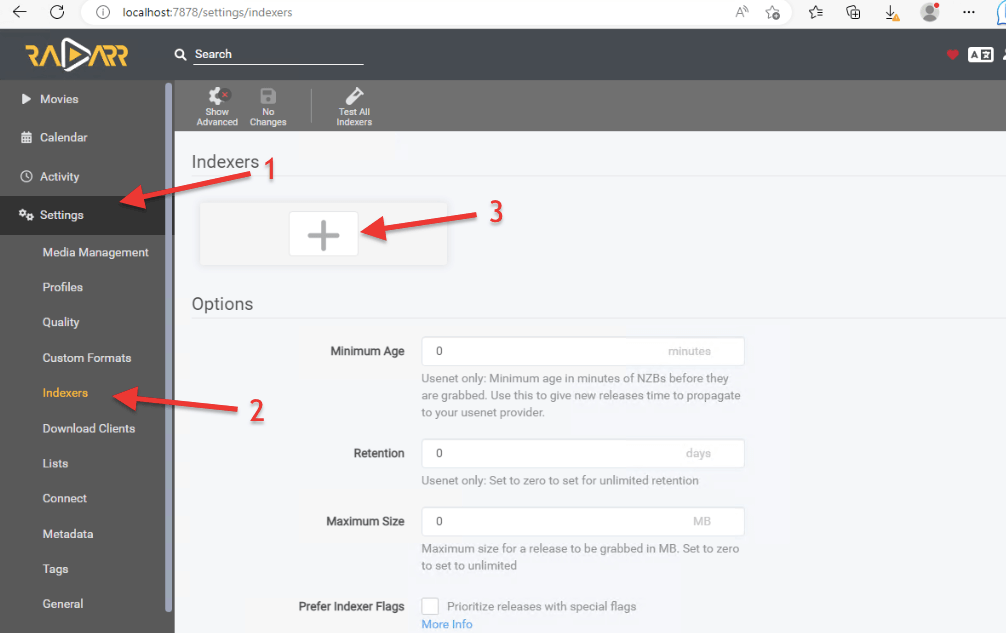
- Go to Radarr or Sonarr > Settings > Indexers > Add (+)
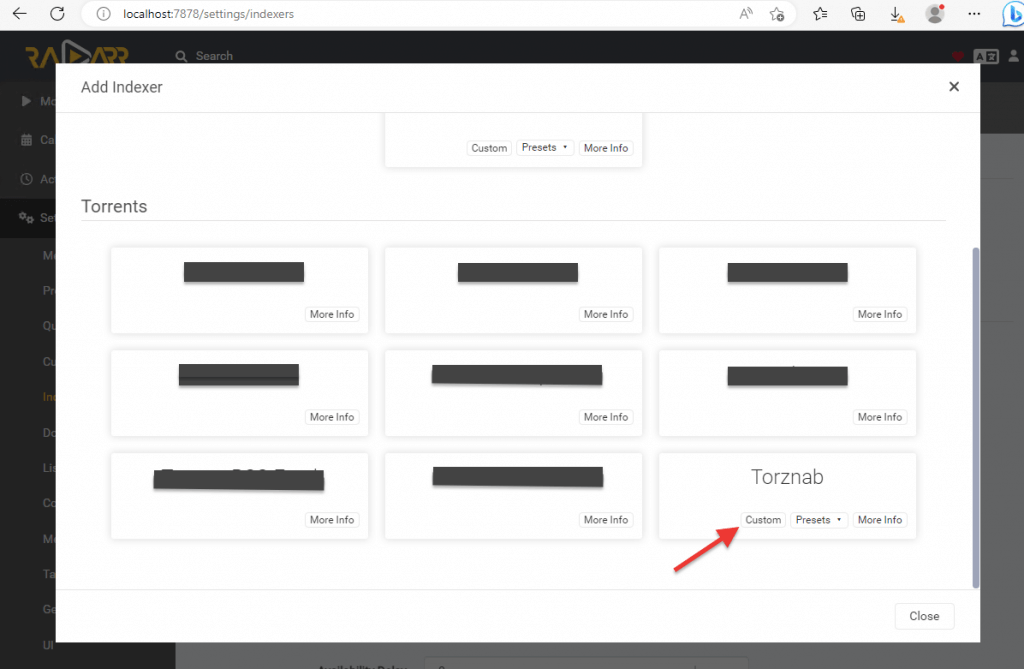
- Find Torznab > click on “Custom.”
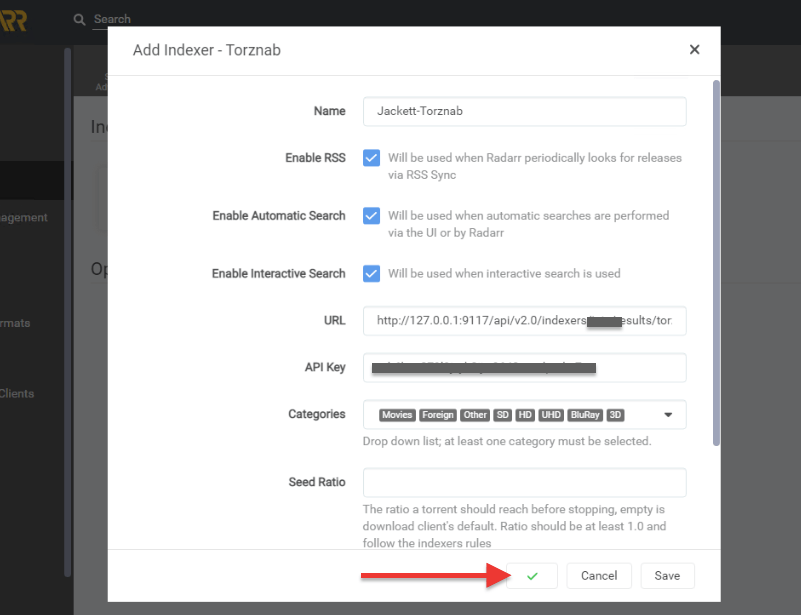
- Under Add Indexer – Torznab > Fill in the following fields and leave the rest as it is.
- Name: Give it a custom name, such as Jackett-Torznab-Indexer#.
- URL: Paste the URL you collected previously.
- API Key: Paste the API you collected previously.
- Categories: You may also want to configure the correct category on the Categories options. To discover your categories go back to the Jackett indexer configuration and find the list of supported categories.
- Click on “Test”. If you see a green checkmark (such as the one shown in the screenshot below), that means your configuration is correct. Click on “Save”
- If your test didn’t pass, you’ll get a red note with the results and things you can try to fix your connection.
- Your new Jackett-Indexer will be added to your Sonarr/Radarr indexers.
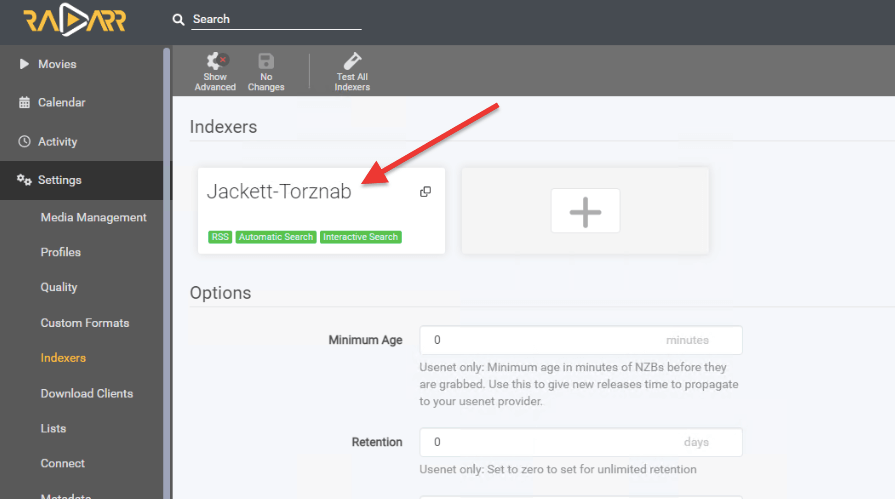
- If you successfully link Jackett with Sonarr or Radarr, the following will happen:
- Sonarr or Radarr will send a search request to Jackett.
- Jackett will receive the request and search your configured indexers. It can query multiple torrent trackers or Usenet indexers to find the requested content.
- Once Jackett has received all the search results, it will send them back to Sonarr or Radarr.
- And finally, Sonarr or Radarr uses the search results to find and download the requested content.
d. Adding an indexer to an RSS client.
An RSS client (RSS reader or aggregator) collects and organizes RSS feeds from multiple sources into a single, easily accessible location. RSS clients subscribe to RSS feeds provided by websites. When a website updates its content, the RSS feed is also automatically updated.
Some torrent clients, such as qBittorrent and Deluge, offer built-in RSS support. This feature allows you to subscribe to an RSS feed of your favorite torrent sites and automatically download new torrents as they become available. Similarly, some Usenet clients like SABnzbd and NZBGet also offer support for RSS feeds, allowing you to automate the entire download process from Usenet.
Let’s add the Jackett indexer to your favorite RSS client.
- Go to Jackett > In the Configured Indexers > click on the blue button “Copy RSS Feed.” You will need to paste this RSS feed into the URL field of the RSS client.
- The string looks as follows: http://127.0.0.1:9117/api/v2.0/indexers/XXXX/results/torznab/api?apikey=xxxxxxxxxxxxxxxxxxxxxxxxxxx&t=search&cat=&q=
- Note: You can adjust this RSS feed. For instance, you can use the “q” parameter to specify a search string and the “cat” parameter to specify the categories you want to search within. For example, in our string, we could add the following parameters “&cat=2030,2040&q=big+buck+bunny” to make the feed search for “big buck bunny” from the years 2030 and 2040 categories.
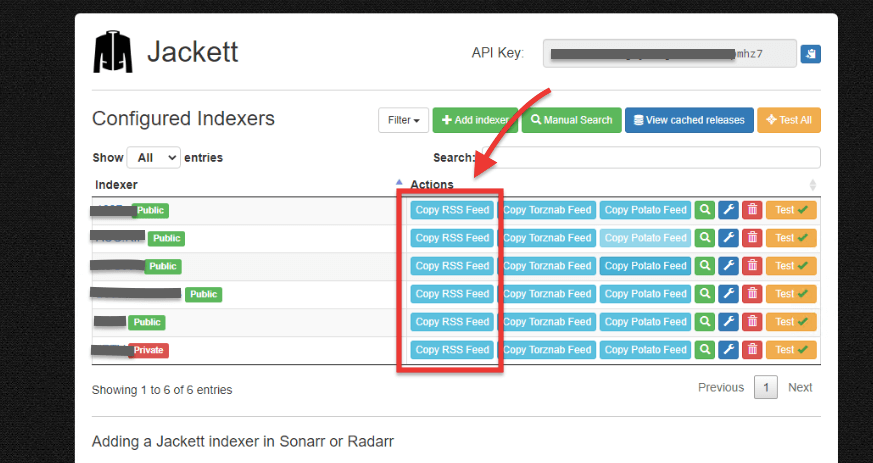
- With your string in the clipboard (copied), go to your RSS client and paste it. For example, qBitTorrent comes with an RSS reader. Linking Jackett to qBittorrent helps introduce automation, expand content sources, improve privacy and security, and allow centralized management.
- To link qBittorrent with Jacket > Go to qBitTorrent > the RSS tab (1) > New Subscription (2), > Paste the RSS feed URL (3), > Ok (4).
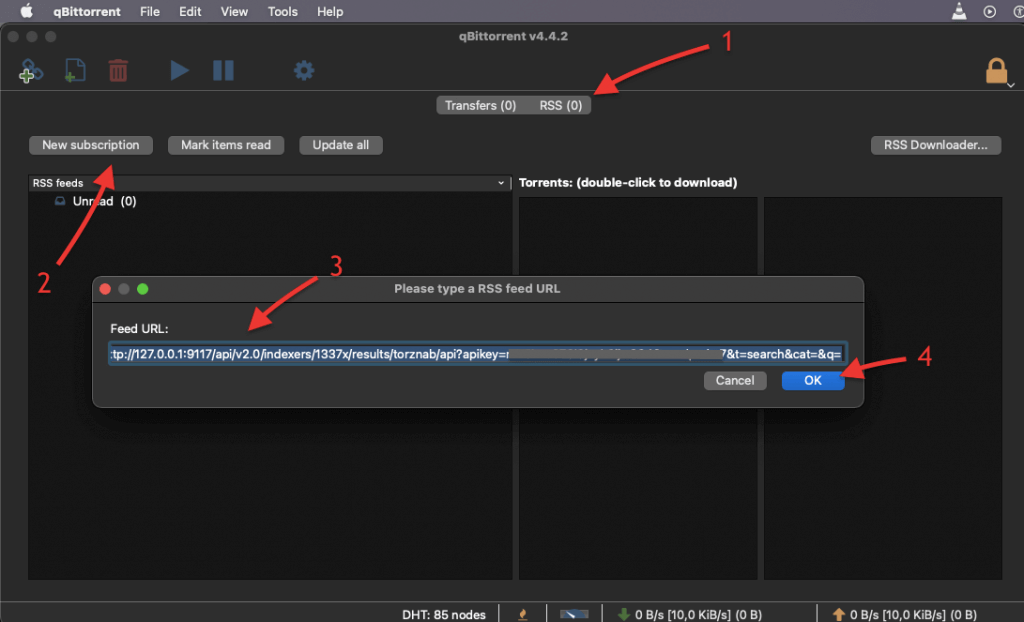
- Now, qBitorrent will collect and organize RSS feeds from your provided sources via Jackett.
4. Prowlarr vs Jackett: Which to Choose?
When choosing between Jackett and Prowlarr to manage your media downloads, it really comes down to what you need and how you plan to use them. Both tools are excellent for handling indexers in a media server setup but have different strengths.
Jackett is handy if you mainly deal with torrents, especially from private or semi-private sites. It supports a massive range of trackers and shines when you need to pull content from less common sources.
Prowlarr, on the other hand, is a bit more sophisticated. It supports both Usenet and torrent indexers. It makes management easier thanks to direct integration with other applications like Sonarr, Radarr, and Lidarr.
Prowlarr also checks the health of your indexers and can disable ones that aren’t working, which keeps your setup running smoothly without much fuss.
Our Recommendation: If your setup is heavily torrent-based and you need a tool that can handle many different trackers, Jackett is a great choice. But if you’re looking for something that offers more management options, Prowlarr might be more up your alley.
5. Jackett – FAQ.
a. How do I add a Jackett indexer in CouchPotato?
With Jackett, you can configure your CouchPotato to search for and add content from various Jackett-supported public and private trackers. To add a Jackett indexer in CouchPotato, enable TorrentPotato in the Searchers settings and paste the indexer’s URL into the CouchPotato host field. Use your passkey and leave the username field blank.
b. Why does Jackett service won’t start?
There are several reasons why your Jackett service won’t start. To solve this problem, try the following:
- Ensure that all required dependencies are installed and up to date.
- Check the logs for errors and try restarting the service.
- Ensure you are using the correct port and it is not already in use by another program.
- Try reinstalling or running it in compatibility mode if necessary.
c. Why does Jackett won’t connect?
Jackett may not connect for several reasons, such as an incorrect API key, incorrect indexer configuration, firewall blocking, or general network issues. Troubleshooting steps may include checking the logs for error messages, verifying the API key, checking the indexer settings, and ensuring that the network and firewall settings are configured correctly.
d. How to open Jackett web UI?
To access the web UI, open a web browser and enter the URL http://localhost:9117 or the IP address of the machine running Jackett, followed by port 9117. If it is running on a remote machine, replace “localhost” with the IP address or hostname of the remote machine.
e. Why won’t Jackett work when started with systems?
If Jackett doesn’t work when started with system services, the issue may be related to permissions or startup orders. To troubleshoot the issue, ensure that Jackett is started with the correct permissions and check the startup order to ensure that all dependencies are met.
f. How to update Jackett Docker?
To update Jackett Docker, stop the existing container, pull the latest image, and start a new container with the same configuration and data volume. Alternatively, you can use a Docker management tool like Portainer to perform the update automatically. Be sure to read the documentation for the specific Docker image to understand any version-specific update steps that may be required.
g. What is the “filter” indexer available in Jackett, and how can it be used to query multiple indexers simultaneously?
The “filter” indexer in Jackett is a special feature that allows you to query multiple indexers at once by applying various filters to the search criteria. To use this “filter”, you can access the endpoint /api/v2.0/indexers/<filter>/results/torznab and specify a filter expression criteria in place of <filter>. The available filters include type, tag, lang, test, and status, which allows you to search for indexers based on their type, tags, language, test results, and status.
h. How can you configure Jackett to work behind a reverse proxy?
To configure Jackett to work behind a reverse proxy, ensure that the original hostname of the request is passed to Jackett. If HTTPS is used, you must also set the X-Forwarded-Proto header to “https”. You will also need to adjust the “Base path override” option in Jackett accordingly.
i. Jackett vs. Prowlarr: What’s their difference?
Jackett is an indexer proxy that supports a wide range of public and private trackers. Prowlarr, on the other hand, is a fork of Sonarr that supports both Usenet and torrents. While both applications serve similar purposes, Jackett focuses on indexing, while Prowlarr is a complete solution for managing downloads from Usenet and torrents.
6. Final Words.
And that’s it, friends… We hope this guide has helped you navigate the world of Jackett and make the most of its powerful features. With this tool, you can easily expand your media library and find all your favorite shows and movies.
If you have any other questions or issues regarding Jackett outside of what’s covered in this guide, we suggest checking out the official documentation on the project’s GitHub repository. The Jackett team also provides support through its website and community forums.
And of course, you are also welcome to leave your suggestions and feedback in the comments section below; we’ll do our best as possible to provide our answer.
Thank you for this excellent guide! I was completely confused on how to setup and use Jackett but this information worked perfect.
hi there Justin…
We are glad you found this guide useful!
I have Jackett installed on Windows via Docker, but now I’m migrating to Raspberry Pi 5. I’ve installed everything, but I don’t know how to transfer the Jackett settings and indexes from Docker on Windows to Docker on Raspberry Pi… Do you know how to do this?
Hi Deez, first, congratz on moving to microservices! Regarding transfers, you first need to backup your configuration data. This requires identifying the right container ID and using the docker cp command. Next:
BTW, this process should move your indexes as well. Hope that helps!