In a nutshell, Sonarr is an advanced software-based Personal Video Recorder (PVR) for TV shows. It uses a sophisticated RSS downloader for Torrents and Usenet. Just tell Sonarr that you like a particular TV show, and it will grab it for you as soon as it is available.
In this 2024 ultimate step-by-step guide to Sonarr, we will go through a few concepts on how to start with Sonarr. You’ll learn the basics of what it is, how it works, and how to set it up and use it with other apps. The following table of contents shows in detail what we will cover.

تنويه: تم تطوير هذاه المادة لأغراض معلوماتية فقط، وهي لا تشكل تأييدًا لأي أنشطة (بما في ذلك الأنشطة غير القانونية) أو منتجات أو خدمات. أنت وحدك مسؤول بشكل كامل عن الامتثال للقوانين المعمول بها، بما في ذلك قوانين حماية الملكية الفكرية، عند استخدام خدماتنا أو الاعتماد على أي معلومات هنا. نحن لا نتحمل أي مسؤولية عن الضرر الناشئ عن استخدام خدماتنا أو المعلومات الواردة هنا بأي شكل من الأشكال، إلا في الحالات التي يُشترط فيها وجود ذلك صراحة بموجب القانون.
Table of Contents.
- What is Sonarr?
- How Sonarr works?
- Downloading, installing, and opening Sonarr.
- How to set up Sonarr.
- How to set up Sonarr with different Torrent Clients?
- Deluge
- qBittorrent
- Torrent
- uTorrent
- Sonarr’s FAQ.
1. What is Sonarr?
Sonarr (former NZBDrone) is a PVR (Personal Video Recorder) designed for BitTorrent and Usenet. It automatically monitors different RSS sources to find your favorite new TV show episodes.
Sonarr not only looks for TV shows but also grabs, sorts, organizes, and updates their names to your choice. It can also automatically check what you have in store and update your content (if configured for) by downloading a newer and better version of your favorite TV show and deleting the old content.
What is not Sonarr? Sonarr is not a download client. It simply scans TV show information from the web, grabs the magnet URL of a specific file, and then connects it with the Usenet or torrent client.
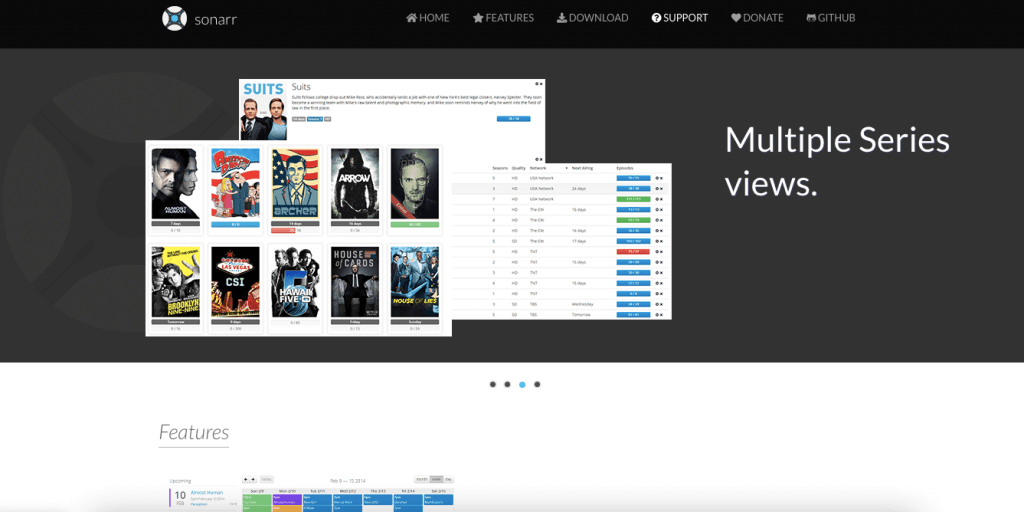
Sonarr Features:
- Advanced inventory management, renaming, metadata scraping, and completion.
- Sonarr includes a calendar so you can see all upcoming episodes.
- In addition to auto-downloads, you can also use Sonarr to manually find releases and send them directly to your download client. Sonarr can integrate with popular download clients such as SABnzbd, NZBGet, Deluge, qBittorrent, and much more.
- Sonarr automatically removes your download entries (history) in your download clients.
- Advanced failed download handling. Sonarr automatically retries failed episodes (different versions), blacklists release password-protected sources or the ones with missing blocks, etc.
- Create and customize your quality profile so Sonarr automatically downloads a show once it finds a higher quality.
- Get notifications via email, mobile, etc., once a download is successful.
2. How does Sonarr Work?
To learn how Sonarr works, refer to the diagram below. Sonarr uses a “watchlist” you initially created with your favorite TV show and episode information. It keeps track of everything it has at the store and whatever it still hasn’t downloaded.
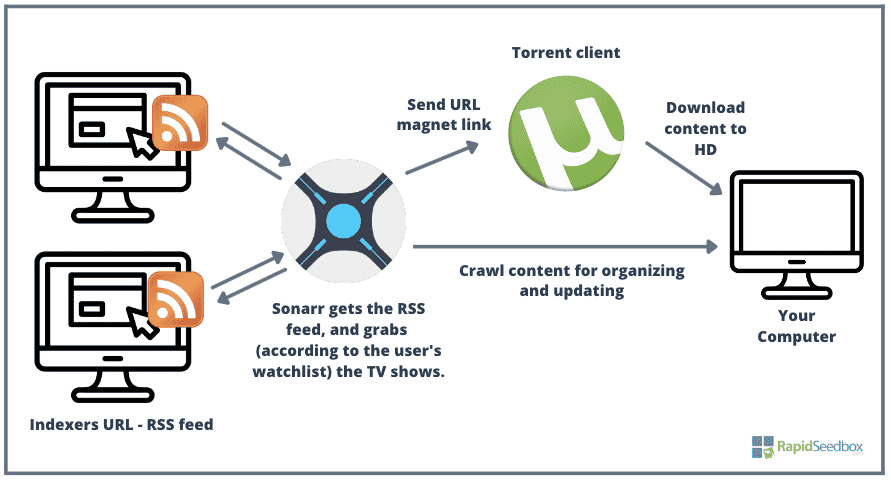
Sonarr uses RSS feeds to get the latest data on TV shows. It scans TV show data from a TV database (via RSS feed). You can point it to scan for episode data in specific indexers (sites). You can also complement Sonarr with applications like Jackett, which translates queries from Sonarr into a tracker site HTTP-query; Jackett parses the “HTML response” and then sends the result back to Sonarr. Jackett and Sonarr complement well with each other because Sonarr tells Jackett what to look for, and it keeps track of Jackett’s RSS feeds.
Sonarr sends the information to your favorite Usenet or torrent client (such as uTorrent) so that it proceeds to download the content to your computer. Sonarr also creates a folder on your hard drive, which uses for the following:
- Dumping the media content.
- Crawling the existing content.
When Sonarr crawls the content, it organizes or improves it (if you allow it to do so). Sonarr will rename the episode information, move it to an appropriate folder, or update it with a better version.
3. Downloading, installing, and opening Sonarr.
Sonarr is a multi-platform, natively supported on Windows (as a Windows service or system tray app) but also supported on Linux, macOS, NAS appliances, and Docker containers.
- Sonarr download. The latest version of Sonarr is v3. If you have Sonar v2 installed and are going to install Sonarr v3, bear in mind that it will automatically replace the v2 installation (NzbDrone) with Sonarr v3. The best place to download Sonarr is from its official site.
- Sonarr installation. The installation process is pretty straightforward (detailed below). For Windows, download the installer and run the .exe file. NAS and Sonarr Docker installations are different (we’ll cover this in an upcoming blog post).
Installing Sonarr.
In the following section, we’ll discuss how to set up Sonarr. We’ll set up Sonarr on a Windows 10 machine.
- After downloading Sonarr from the official site, run the .exe file with admin privilege.
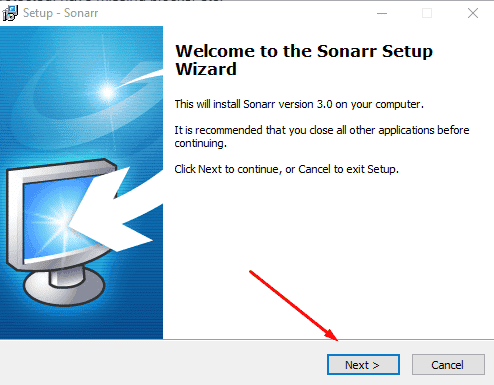
- Click on “Next.”
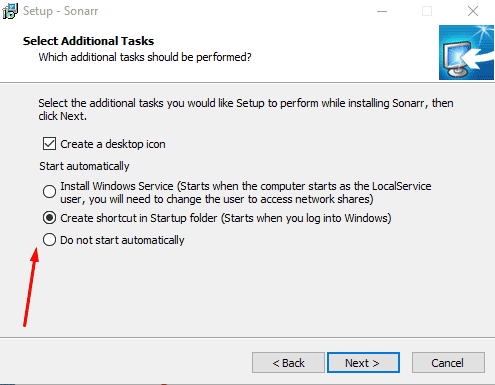
- Select how you would want Sonarr to start. Install Sonarr to run as a system tray app if you use a download client (i.e., uTorrent) to download content to your home directory. This is because Sonarr v3 runs with a Local Service Account by default and does not have permission to access the home directory.
- Select whether you want to allow access to Sonarr from other devices and start Sonarr right away.
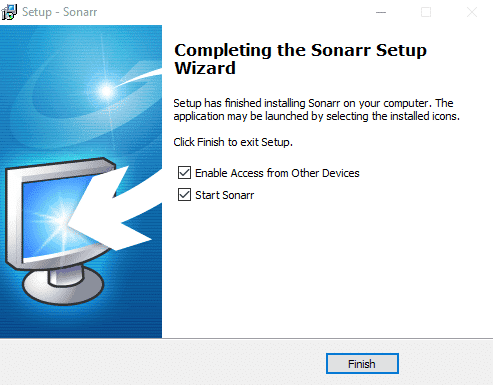
- Click on “Finish”
Opening Sonarr.
In the previous section, you installed the Sonarr application. To open it, you’ll need to use a web browser. Open Sonarr using your web browser. Type “localhost:8989” or 127.0.01:8989.
Sonarr port. By default, Sonarr uses port 8989. So, once you install it, you can go to http://localhost:8989 using your favorite browser to start using Sonarr. Sonar port (8989) must also be opened on your local firewall or router if you want to access Sonarr from another computer in the same network.
Can’t open Sonarr?
If you can’t access Sonarr or get a “The application Sonarr can’t be opened” message, close the application down from the Windows tray and open the executable (.exe) with admin rights. Then try to open the web application again using the “localhost:8989” URL. This problem can also happen to Linux and macOS users. To solve this, open the terminal and type “chmod +x …(Sonarr directory/sonarr).”
In addition, if you are trying to access Sonarr from a computer on the same network, ensure the port is open on your router and firewall. Also, if you use any VPN or proxy on the Windows machine, turn it off, as it might interfere with your local connections.
4. How to set up Sonarr?
When you open Sonarr for the first time, you’ll notice that it has a simple menu that includes the following options: “Series,” “Calendar,” “Activity,” “Wanted,” “Settings,” “System,” and “Donate.”
Start with Sonarr by first configuring how you want your media to be saved.
- Go to Settings > Media Management. At the bottom of this window, choose the “Root Folders” along with their path to show Sonarr where to download and crawl the content.
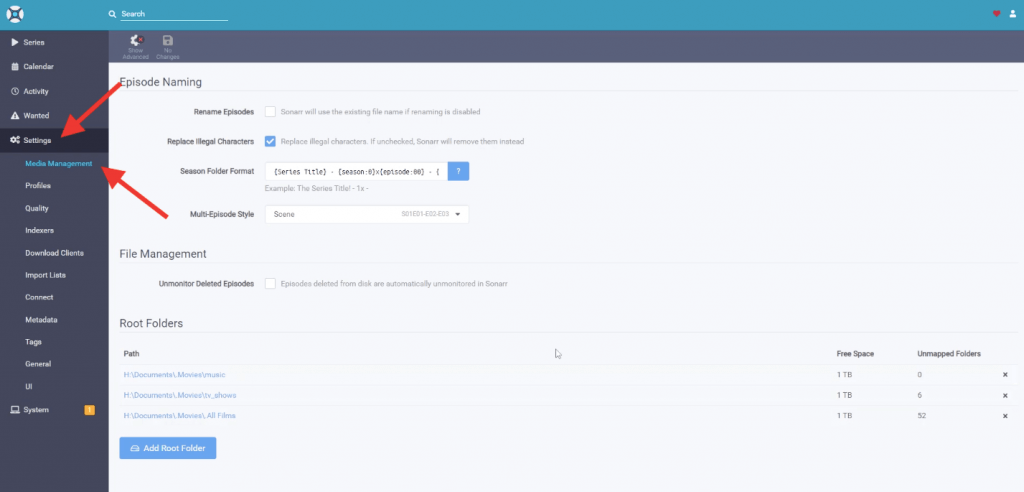
- In addition, you can also personalize your Episode Naming.
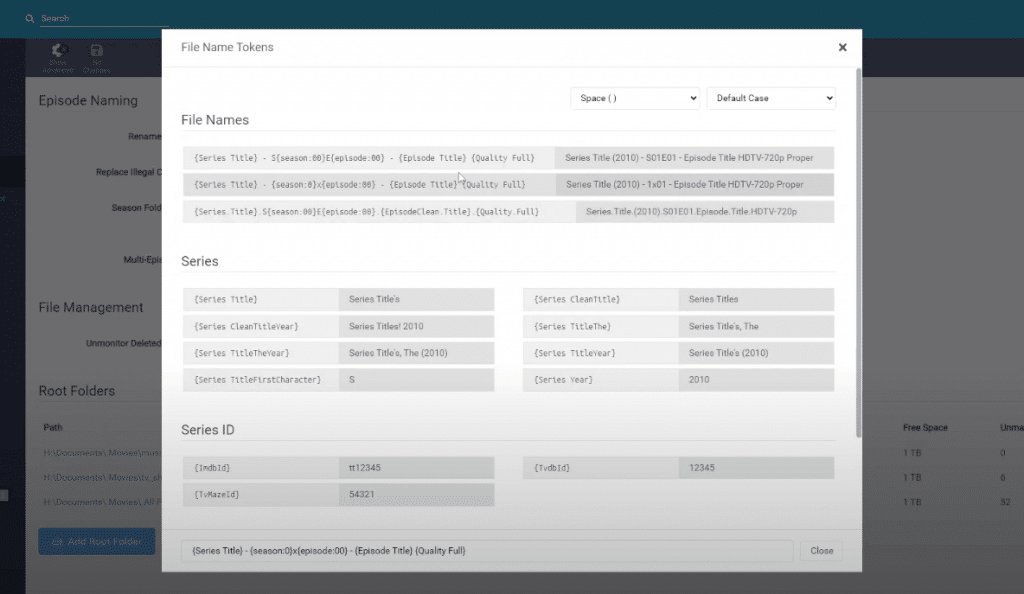
- Clicking on the blue “?” question mark on the “Season Folder Format” and choose your favorite format.
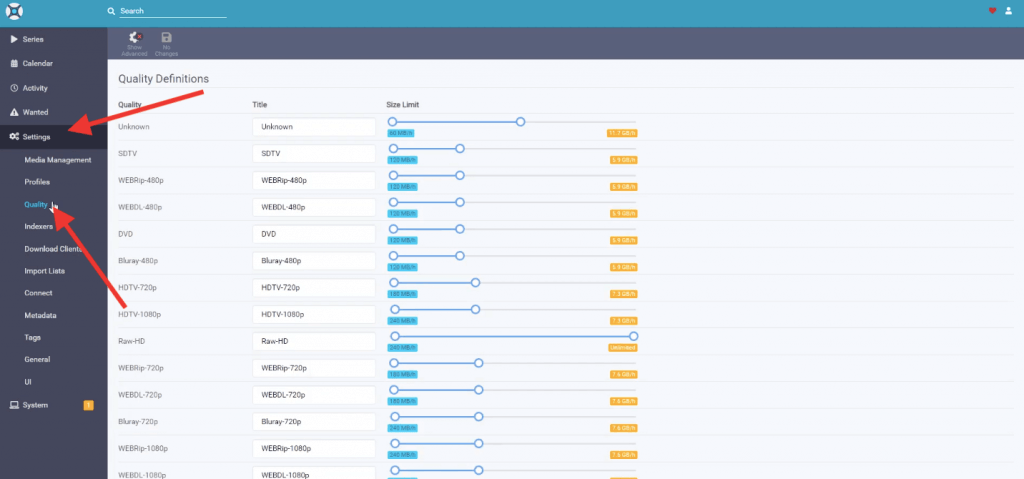
- Next, you’ll need to define the quality of the TV shows that you want Sonarr to grab. Here you’ll be to limit the size of your downloads or quality by format, container, or resolution.
- Next, you’ll need to define the indexers (websites to download content from). To add a new indexer with RSS, go to Settings > Indexers > click on the “+” to add a new indexer. Enter the URL, its RSS, and give it a priority.
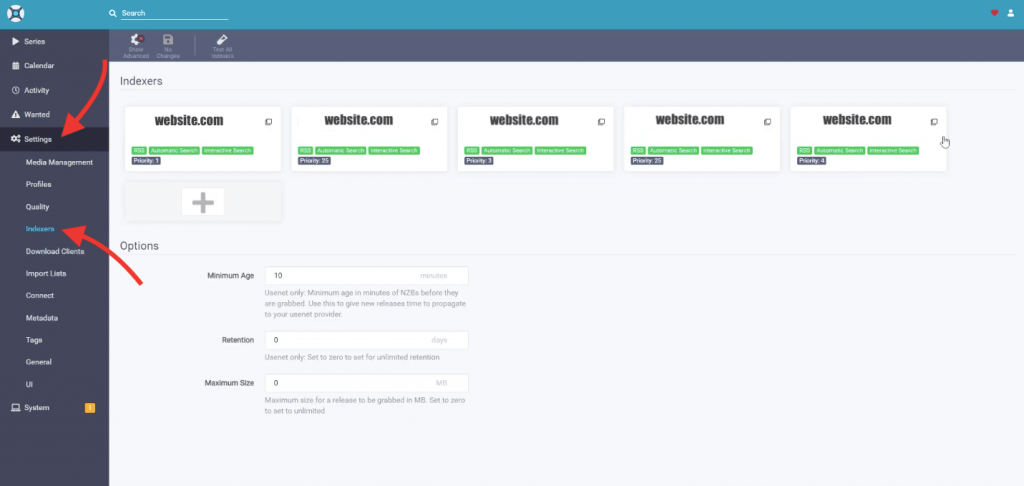
- Once you define the indexers, let’s tell Sonarr which download clients you would want to use.
- To setup up a download client (i.e., Deluge or uTorrent), go to “Settings,” “Download Clients,” and click on the “+” symbol.
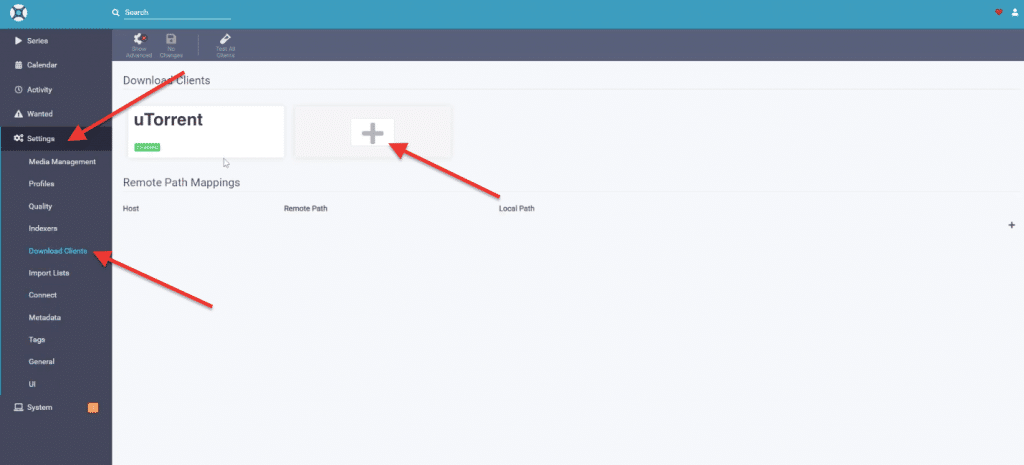
- Enter the name of your download client, the host, and the port number. Put the hostname or IP address here if the client’s computer, server, or NAS is on another network. Or use localhost for the same computer. You’ll also need to define the credentials, so Sonarr can access the download client.
- Click on “Test” to verify the connection with the torrent client and click on Save.
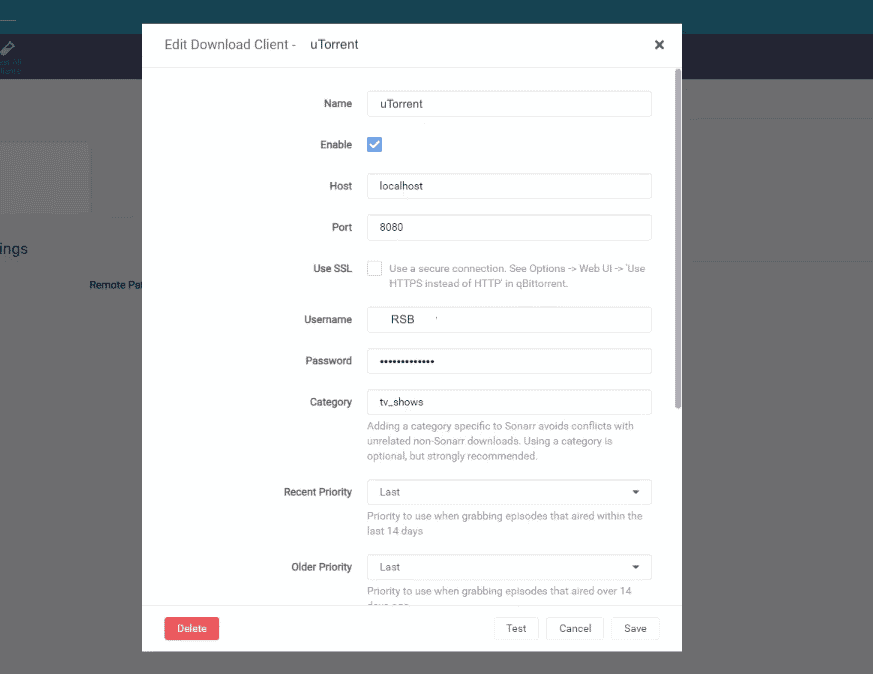
Check the configuration on your download client.
- Verify that the credentials and hostname configured on the download client are the same as the one you just put on the Sonarr configuration. For instance, go to uTorrent’s Settings > click on Web UI > and check on “authentication.”
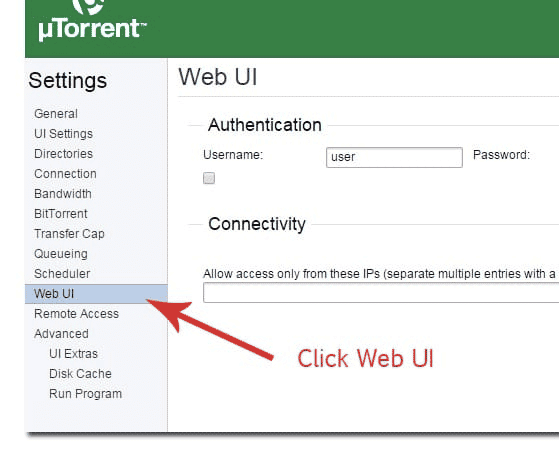
- The second option you need to check on your download client is “Directories.” You’ll need to confirm that your download client is dumping content in the same place Sonarr has access to organize and update the content.
Elevate Your Streaming Experience with Rapidseedbox!
Stream media seamlessly and manage content effortlessly. Enjoy our Seedbox with pre-installed Sonarr for easy access to your favorite shows and movies.
5. How to set up Sonarr with your favorite Torrent Client?
The following step-by-step guide will show you how to set up Sonarr with your favorite torrent clients; these include Deluge, qBittorrent, rTorrent, and uTorrent.
a. Deluge.
To link Sonarr with Deluge, you’ll need first to check Deluge’s settings and then configure Sonarr to connect to it.
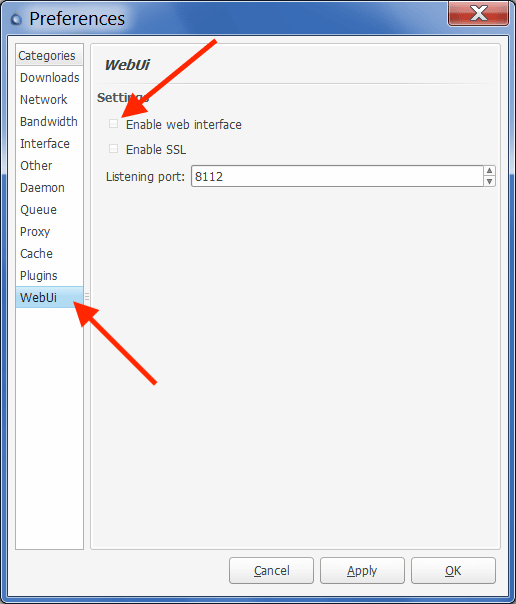
- In Deluge, go to “Edit” > “Preferences” > “Plugins.” Ensure that the WebUi plugin is enabled.
- Once WebUi is enabled, go ahead and find “WebUi” in the left pane of the Preferences menu.
- On the WebUi menu (as shown below): check the “Enable Web Interface” box. Record or write down the listening port. By default, the Deluge WebUi uses 8112 for listening to connections.
- Open the Deluge WebUi with its IP-address:8122 or localhost:8112. The client will ask you for credentials. Deluge uses a default password (deluge), which you’ll be able to change on the initial login.
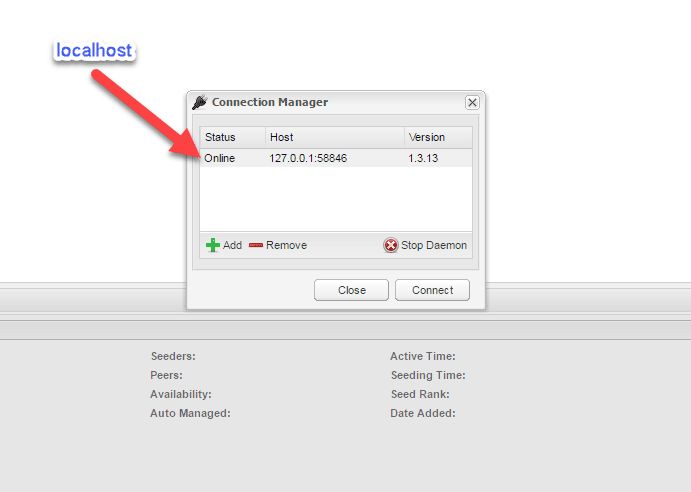
- The Connection Manager window will open. You can also open it on the upper bar menu. For instance, if your Deluge is local, select > localhost:port or (127.0.0.1:58846). Click on “Connect” to start the Deamon.
Open Sonarr
Now that you set up Deluge independently, you’ll need to go to Sonarr’s web interface http://localhost:8989 or (127.0.0.1:8989) and configure your “Download Client.” For more information on setting up Deluge on Sonarr, check the previous section, “How to set up Sonarr?”.
- In Sonarr, go to “Settings,” “Download Clients,” and click on the “+” symbol. Scroll down to “Torrents and find “Deluge.”
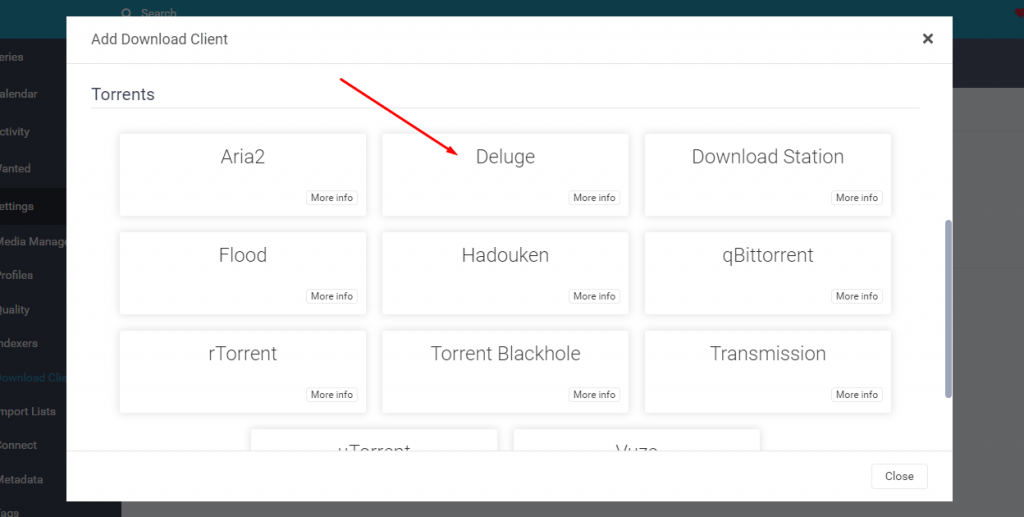
- Sonarr comes with a pre-built Deluge settings “template,” so you can link Sonarr with Deluge easier. You’ll notice that the template already contains the Deluge WebUi default port (8112) and the password. Of course, if you have different settings, you’ll need to change them here.
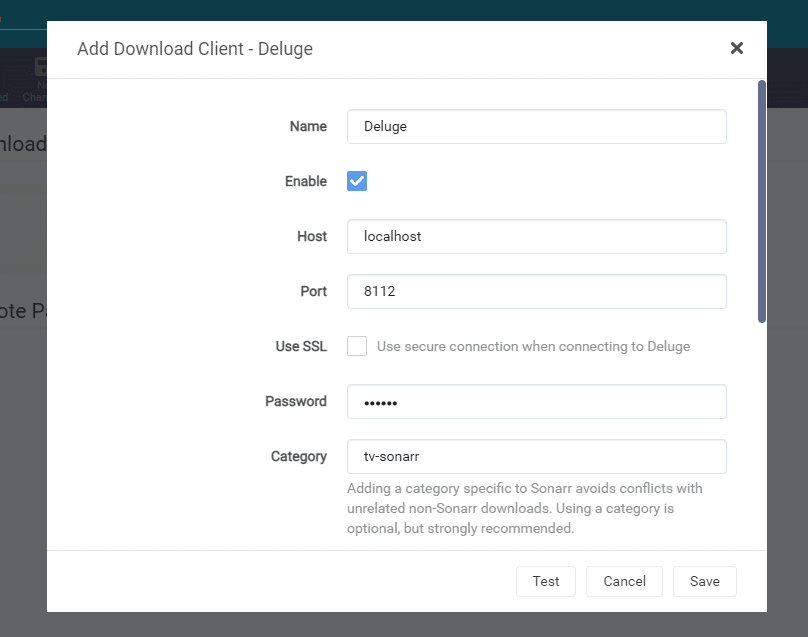
- Give your download client a name and enter its information.
- Name: Deluge (or whichever name identifies Deluge for you)
- Host: Whether it is localhost or on the same network (IP address.)
- Port: The default Deluge port for WebUI is 8112
- Username: Credentials for Deluge.
- Password: Credentials for Deluge. Enter the default (deluge) password or the one you created.
- Category: Leave as default.
- Leave the rest with its default options.
- Before clicking on Save, go ahead and “Test” the connection. If you got a “Connection completed,” go ahead and click on “Save” and “Add.” But if you can’t connect, you may have a Deluge configuration or network issue that you’ll need to address. To help you find a solution, check this unofficial guide to Deluge.
c. qBittorrent.
To set up Sonarr to qBittorrent, let’s first check qBittorrent’s settings. Then we’ll go ahead and configure Sonarr to link to the qBitorrent download client.
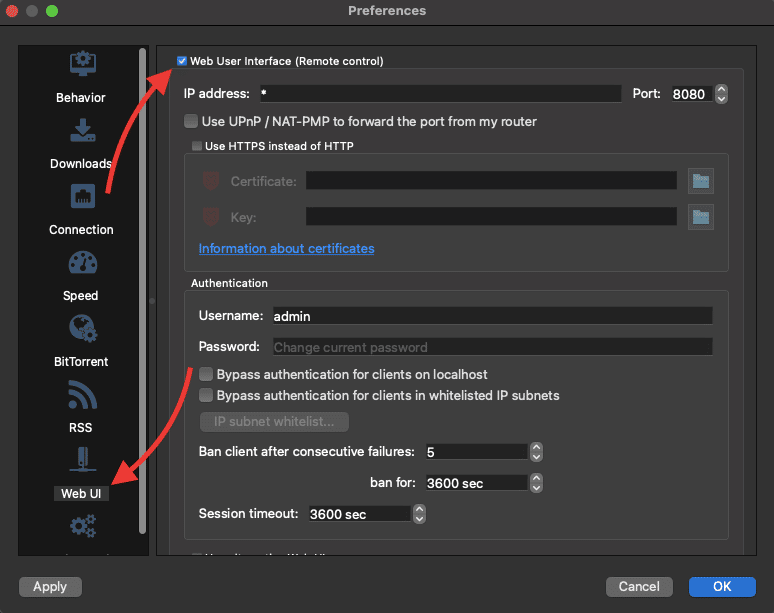
- In qBittorrent, go to “Preferences” > “WebUI.” Ensure that “Web User Interface (Remote Control)” is enabled.
- IP Address: Enter the IP or host that the qBittorrent WebUI will bind to. For instance, enter 127.0.0.1 or localhost if Sonarr is deployed on the same computer.
- qBittorrent port: By default, the qBittorrent process listens to port 8080. The 8080 is a common alternative port to HTTP used for web traffic. Many web servers use port 8080 for remote management. If there is another application or service using port 8080, you’ll need to change the port for qBittorrent.
- Do you want to access qBittorrent WebUI from outside the network? Enable the UPnP/NAT-PMP so that your local router (if it supports those protocols) can forward the port from external connections into your internal qBittorrent server. Refer to the best settings for qBittorrent, to learn how to optimize your connectivity.
- Authentication: Take note of the username (or change it), and give a new password.
- Leave the rest by default.
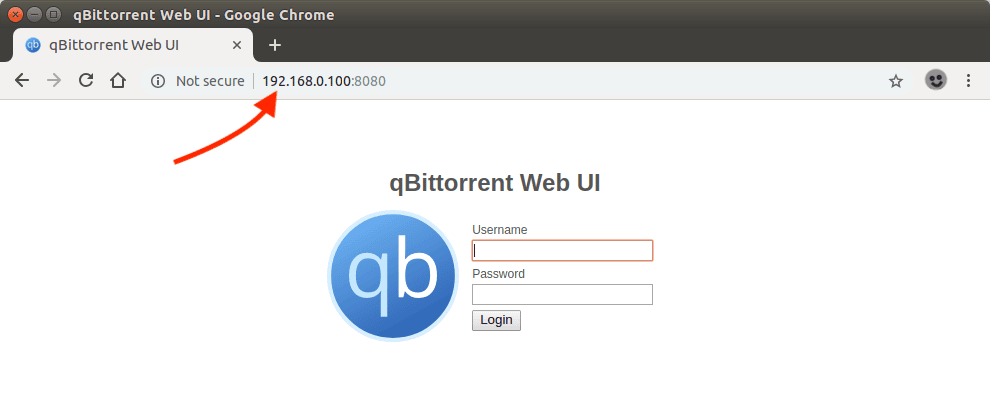
- Test qBittorrent Web UI connection by going into your web browser, entering the IP address (or host) followed by the port, and then entering your credentials. For instance, 192.168.0.100:8080, if qBittorrent WebUI is on the same network, or localhost:8080 if qBittorrent WebUI is on the same machine.
Open Sonarr
Now that you set up qBittorrent WebUI and have tested it, you’ll need to configure it in Sonarr. Go to Sonarr’s web interface http://localhost:8989 (127.0.0.1:8989) or its IP address and configure your “Download Client.”
- In Sonarr, go to “Settings,” “Download Clients,” and click on the “+” symbol. Scroll down to “Torrents and find “qBittorrent.”
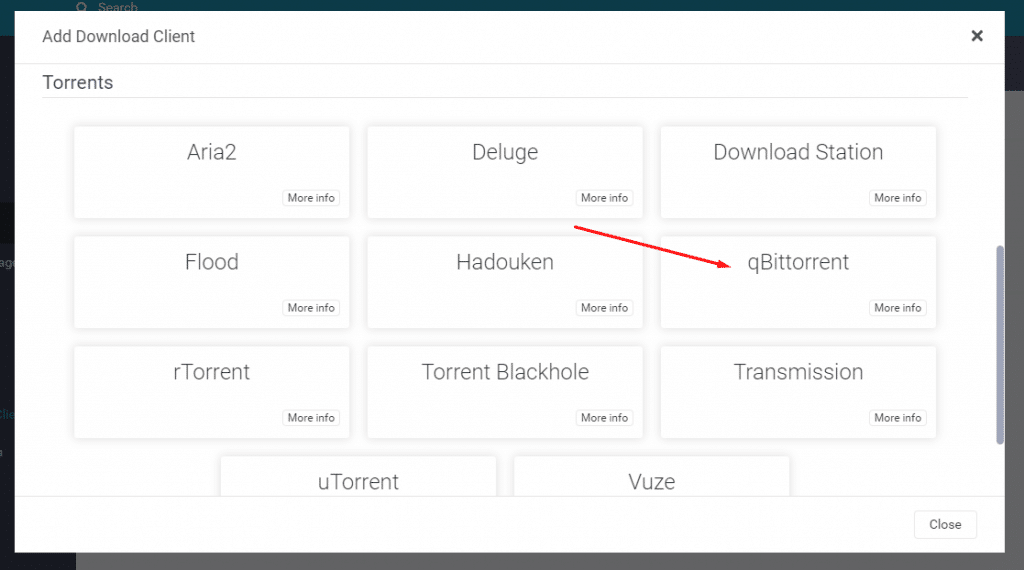
- Sonarr comes with a pre-built qBittorrent settings “template,” so you can easily connect Sonarr with qBittorrent. You’ll notice that this template contains the qBitorrent’s WebUI default port (8080). You’ll need to update information such as host, username, and password.
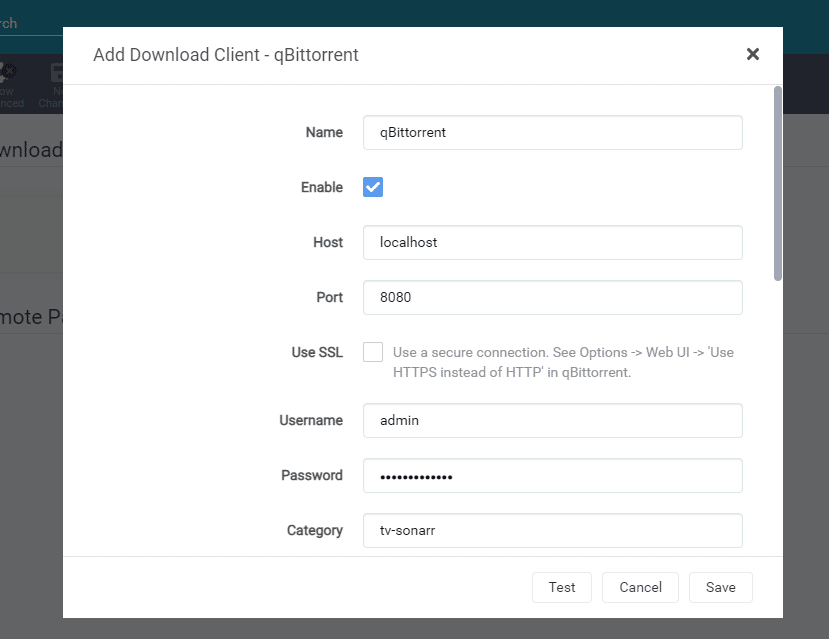
- Leave the rest with its default options and test your connection.
b. rTorrent and ruTorrent
To set up Sonarr to ruTorrent, the easiest path is first to check the ruTorrent’s current settings and then configure Sonarr to connect with the ruTorrent client. For more information on configuring ruTorrent and rTorrent, check our beginner’s guide to ruTorrent.
- Check your IP address or hostname.
- rTorrent’s port for web communication by default is 8080 (which is the same as qBittorrent and other services). Make sure no other service or app is using it, or else change it.
- Check the path to the XMLRPC endpoint. XMLRPC is a Remote Procedure Call (RPC) protocol based on XML. It is used for encoding calls and HTTP for transport. XMLRPC is necessary because ruTorrent uses rTorrent’s built-in XML-RPC server for communication. rTorrent 0.8.2 (or later) is compiled with xmlrpc-c, and is a dependency of ruTorrent.
- To find the XMLRPC path, check the ruTorrent’s config file. The URL path for the RPC is where the config is, usually: “/plugins/rpc/rpc.php”
- Check rtorrent’s credentials (username and password.)
Open Sonarr
After checking the rTorrent’s configuration and testing it, go to Sonarr’s web interface http://localhost:8989 (127.0.0.1:8989) or its IP address and configure your “Download Client.”
- In Sonarr, go to “Settings,” “Download Clients,” and click on the “+” symbol. Scroll down to “Torrents and find “rTorrent.”
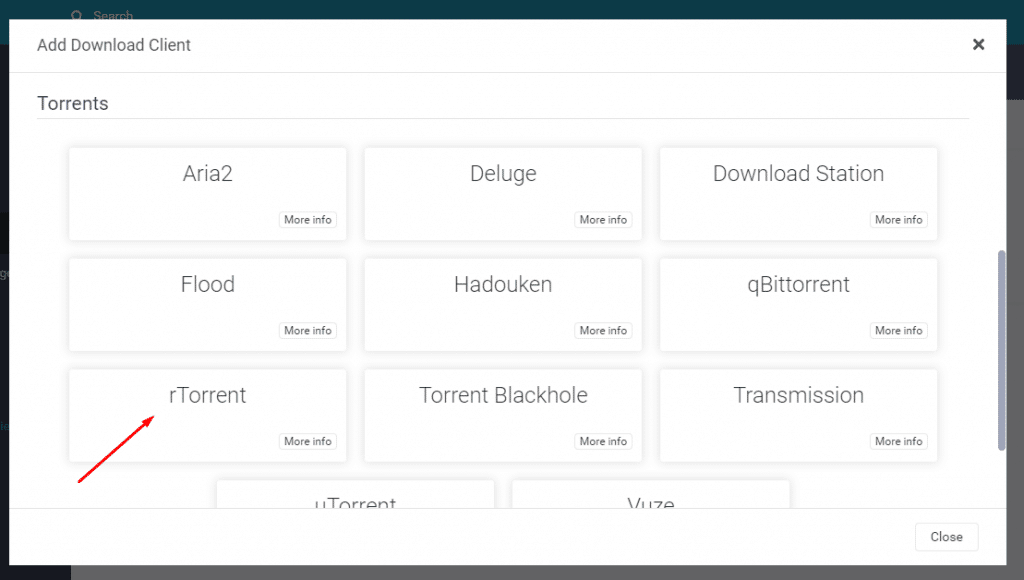
- As you will notice, Sonarr comes with a pre-built rTorrent settings “template,” so you can easily connect Sonarr with rTorrent. You’ll notice that this template contains the rTorrent’s default port (8080) and fields to fill out, including host, username, password, and URL path.
- Name: Give the download client a name (i.e., rTorrent)
- Click on Enable.
- Host: Enter the IP address of where the rTorrent server is. You can leave it as default (localhost) if it is on the same machine. For instance, 127.0.01:8080, or IP_address, 443, TLS=on, if the torrent client is on another host (the connection is remote.)
- Port: Leave as default 8080 unless it has been changed on the rTorrent client.
- URL Path. The format for the XMLRPC endpoint should be where RPC is, for instance: /plugins/rpc/rpc.php
- Username and Password. Enter your rTorrent credentials.
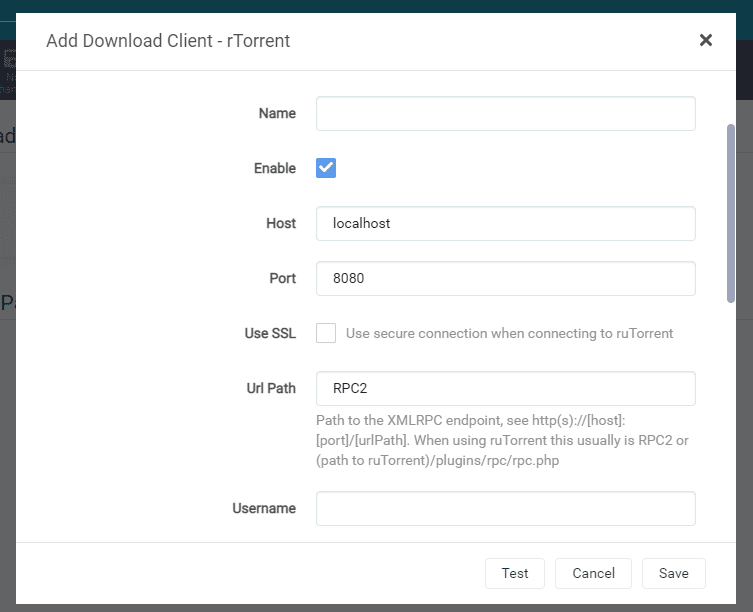
Leave the rest with its default options and test your connection.
Note: If your rTorrent host is on a remote network, possibly in a seedbox, and your Sonarr is local, you will need to follow a very similar configuration such as the one above (with some exceptions). Check our guide to learn how to connect local Sonarr to seedbox Torrent.
d. uTorrent.
To set up Sonarr to uTorrent, you’ll need to check uTorrent’s settings and then configure Sonarr to connect to it.
- In uTorrent, go to “Options” > “Preferences” > “Advanced,” “WebUI”
- Ensure that the “Enable Web UI” is checked.
- Change the default “Username” and “Password” and record them.
- uTorrent uses the default port 8080 for active listening.
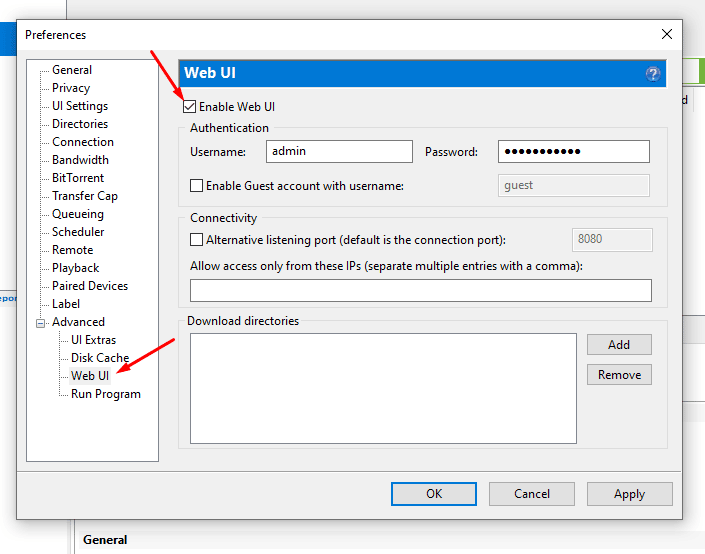
- Test the configuration by connecting to the WebUI from the same computer (localhost:8080 or 127.0.01:8080) or another computer on the same network (uTorrent-ip-address:8080). If you can’t connect, you may need to optimize uTorrent to connect without issues.
Open Sonarr
After checking the uTorrent’s configuration and testing it, go to Sonarr’s web interface http://localhost:8989 (127.0.0.1:8989) or its IP address and configure your “Download Client.”
- In Sonarr, go to “Settings,” “Download Clients,” and click on the “+” symbol. Scroll down to “Torrents and find “uTorrent.”
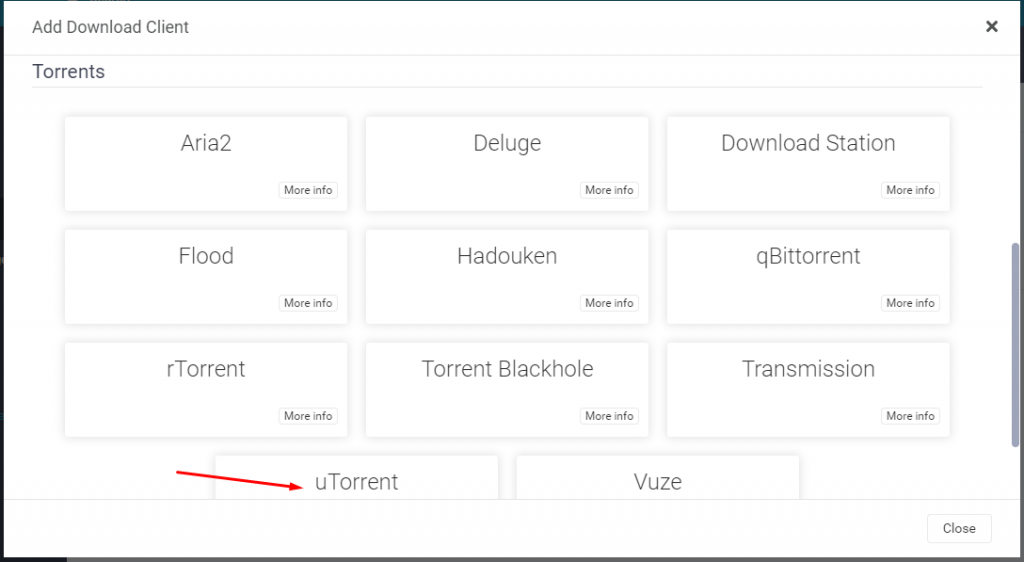
- As you will notice, Sonarr comes with a pre-built uTorrent settings “template,” so you can easily connect Sonarr with uTorrent. Enter the information as suggested.
- Name: Give the download client a name (i.e. rTorrent)
- Click on Enable.
- Host: Enter the IP address of where the uTorrent server is. If it is on the same computer, you can leave it as default (localhost).
- Port: Leave as default 8080 unless it has been changed on the uTorrent client.
- Username and Password. Enter your uTorrent credentials.
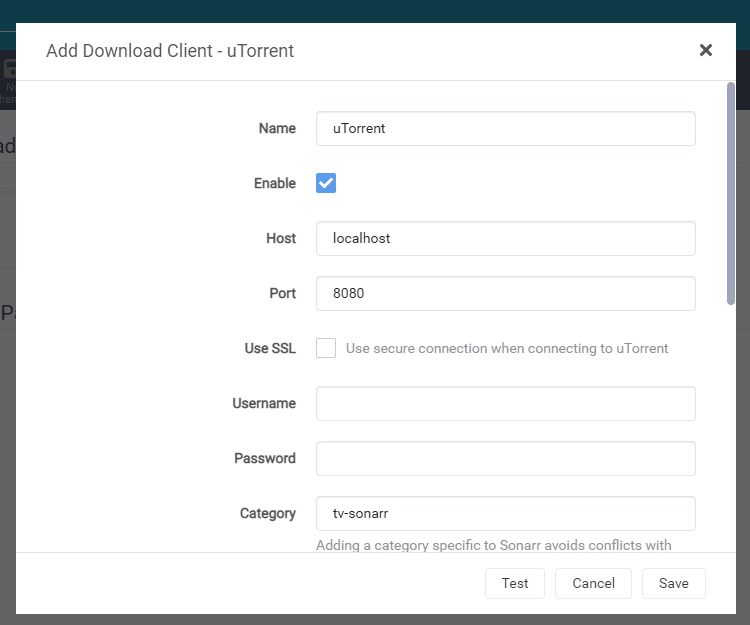
- Leave the rest with its default options and test your connection.
6. Sonarr’s FAQ.
a. How to use a Seedbox with Sonarr?
Modern cloud-based seedbox providers already include Sonarr (and other arr applications) as part of their solution. For instance, Rapidseedbox provides the one-click-installer “Sonarr,” which lets you toggle on or off the Sonarr application in your Seedbox. If your seedbox does not include Sonarr as a pre-install application, you’ll have to install it depending on your seedbox’s OS.
b. How to set up Sonarr with uTorrent or BitTorrent?
In Sonarr, go to Settings > download clients > and click the + button. In this window, you’ll need to define the connectivity and credentials. Test the connection to your client and click on save. Remember that you’ll need to confirm that the information (credentials and directory) is correct by checking the download client’s side. For more information, refer to the above section (how to set up Sonarr).
c. How to set up Sonarr with Plex?
To learn everything you need to know about Plex, refer to the ultimate complete guide to Plex. Let Plex organize the content while only using Sonarr for the download automation. To integrate Sonarr with Plex, you’ll need to go to Sonarr > Setting > and “Connection Settings.” Enter your Plex Media Server (PMS) connection details, such as host, port, username, and password, and click on “Test.” If you cannot integrate Sonarr with Plex, ensure the details are correct or that the router and/or firewall allow both apps to communicate.
d. How to install Sonarr Docker?
Docker is a great solution for setting up Sonarr on different platforms. You can install Sonarr Docker in a new container, but ready-made containers are available from the Docker Hub. Get the Sonarr image from the official Docker’s Sonarr container and install it on any platform, whether Linux, macOS, NAS, Windows, or via the cloud providers like AWS, GCP, or Azure. Sonarr Docker can even run on small computers like the Raspberry Pi.
e. How to set up Sonarr with NAS over Docker?
One of the most straightforward ways to install Sonarr on a NAS is via Docker. It is convenient to use Docker for an implementation like this because it allows easier app management and retains security. For instance, if you have a Synology NAS, go to “Package Center” and install Docker. Download the Sonarr image on Docker, and click “Start image .”The additional setup of Sonarr on a NAS using Docker is out of the scope of this guide.
f. Sonarr vs. Radarr? What are the differences?
Radarr and Sonarr are both considered the top media downloaders and automation tools. Radarr is similar to Sonarr but grabs movies instead of TV shows. Sonarr also uses RSS feeds and sends download requests to Usenet or torrent clients.
g. What are the best alternatives to Sonarr?
Although you could manually configure RSS feeds on a torrent client as an alternative to Sonarr, the implementation does not have the automation powers of Sonarr, especially when it comes to updating and organizing content. The next best alternative to Sonarr is SickBeard, a PVR for episodes of your favorite TV shows. Other alternatives are Sickchill, Sickrage, or Medusa.
Final Words.
In this 2024 ultimate step-by-step guide to Sonarr, we went through what you need to know about how to start with Sonarr; how to install, set it up, solve a few common problems, and integrate it with a few other apps. Bear in mind that Sonarr is quite an outstanding application, and although we cover lots of topics in this guide, in reality, this is only the tip of the iceberg. If you have comments, feedback, or suggestions, please comment below.
Be aware, some torrent sites have recently banned Sonar users but it is due to incorrectly setting it up. example from a site ” Over the past few weeks we have been seeing an increase in unsecured Jackett and -arr Apps (Sonarr, Radarr etc.). Apparently some users are installing these applications on their seedboxes without also adding any form of authentication like a password. This is a security risk and user/client will be banned.” “For most of these applications you can do so by going into Settings, then General and change Authentication to “Basic”. If you are unsure then please contact your seedbox provider” . Just thought I would help with this information.
Hey David…
Thanks for the update. We will keep track of those sites that ban Sonarr… and then update the guide accordingly.
Thank you for this, valuable advice for a newbie
you are welcome
Your 2023 guide links to a download link for an EOL version of Sonarr that doesn’t exist and has no support any more. Please update your links.
Thanks for the heads up mate!
We updated the links!