Accessing Deluge with a thin client remotely is one of the greatest features of the Deluge torrent client.
It allows you to manage torrents in Deluge remotely via a local client.
You have to prepare your remote Deluge machine to accept remote connections, so please follow this tutorial carefully.
1. Log in to your Seedbox/VPS
To setup Deluge remote access, we need to configure our remote client first.
Log in via SSH to your Seedbox.
If you are logged in as a root issue this command to switch to the user account.
|
1 |
su - user |
The reason for this is that Deluge is configured for an unprivileged account like user’s account.
2. Gather the required information
We need to find info about our Deluge. If you are using our default configuration, information like username, password, and Seedbox IP can be found in our Welcome email, and the default port is set to 58846.
If this is not the case follow the steps to find your details:
- Find your IP address:
|
1 2 |
ip a |
or
|
1 |
/sbin/ifconfig |
- Find your username:
|
1 |
whoami |
- Use the following command to get the Deluge remote port:
|
1 |
sed -rn 's/(.*)"daemon_port": (.*),/\2/p' ~/.config/deluge/core.conf |
- Find your password:
|
1 |
sed -rn "s/$(whoami):(.*):(.*)/\1/p" ~/.config/deluge/auth |
3. Configure Deluge remote option
Now you need to do some little tweaks on your VPS/Seedbox. Login remotely via SSH. If you are not sure how, please follow this guide How to Connect to Your Seedbox using SSH.
We need to stop the existing Deluge service first:
|
1 |
systemctl stop deluged |
Or if you are using our newest template:
|
1 |
systemctl stop deluged@user |
If you are logged via SSH as a root account, you need to switch to a user account first, or to a user for which Deluge is configured.
|
1 |
su - user |
The next step is to set a password:
|
1 |
echo "user:MyPassword:10" >> ~/.config/deluge/auth |
For everything to work properly, we need to allow remote connections.
|
1 2 |
deluge-console "config -s allow_remote True" deluge-console "config allow_remote" |
Start Deluge:
|
1 |
deluged |
4. Setting your Local Deluge client
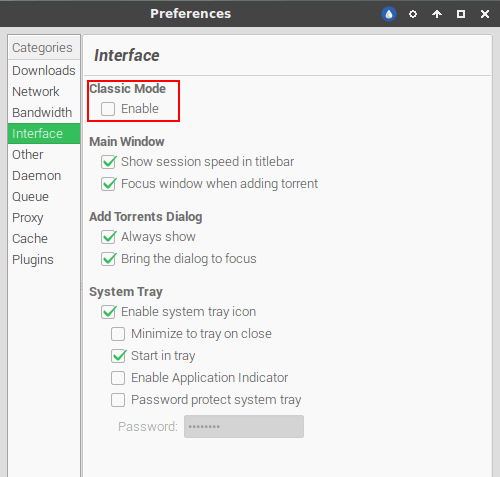
We need to disable Classic mode. Go to Edit/Preferences and navigate to the Interface tab like on the picture.

5. Adding Remote connection
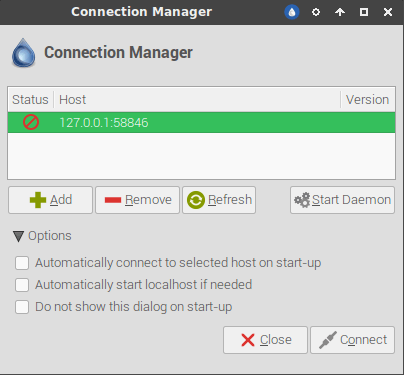
We need to add an actual remote connection now. After you’ve disabled Classic mode, you need to restart your Deluge client.
The window below should pop up when you launch it next time.

If not, open a Deluge and navigate to Edit/Connection Manager or press Ctrl + M.
Click on the Add button, and add parameters that you’ve obtained in previous steps.
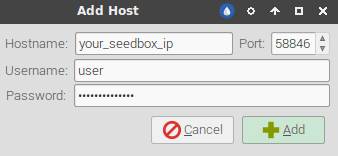
6. Adding host
You need to fill information like on the picture:

Press Add, then Connect. After this step, you should be able to initiate a remote connection with Deluge.
Disclaimer: This material has been developed strictly for informational purposes. It does not constitute endorsement of any activities (including illegal activities), products or services. You are solely responsible for complying with the applicable laws, including intellectual property laws, when using our services or relying on any information herein. We do not accept any liability for damage arising from the use of our services or information contained herein in any manner whatsoever, except where explicitly required by law.
