Switching between different proxy settings can be a cumbersome task, especially if you’re doing it multiple times a day. That is where knowing how to use Proxy SwitchyOmega is handy. Managing proxy settings to increase our privacy shouldn’t be a chore.
If you’re tired of the constant hassle of manual proxy management, you need this hands-on guide to handling proxies with Proxy SwitchyOmega.

جدول المحتويات
- What is Proxy SwitchyOmega?
- How to Install Proxy SwitchyOmega
- Basic Proxy SwitchyOmega Configuration
- How to Optimize Your Proxy Settings
- Troubleshooting Common Issues
- Tips and Tricks for Using SwitchyOmega Effectively
- How Proxy SwitchOmega Enhances Privacy and Security
- Final Thoughts
تنويه: تم تطوير هذاه المادة لأغراض معلوماتية فقط، وهي لا تشكل تأييدًا لأي أنشطة (بما في ذلك الأنشطة غير القانونية) أو منتجات أو خدمات. أنت وحدك مسؤول بشكل كامل عن الامتثال للقوانين المعمول بها، بما في ذلك قوانين حماية الملكية الفكرية، عند استخدام خدماتنا أو الاعتماد على أي معلومات هنا. نحن لا نتحمل أي مسؤولية عن الضرر الناشئ عن استخدام خدماتنا أو المعلومات الواردة هنا بأي شكل من الأشكال، إلا في الحالات التي يُشترط فيها وجود ذلك صراحة بموجب القانون.
1. What is Proxy SwitchyOmega?

Proxy SwitchyOmega is a browser extension that lets you easily manage your proxy settings. It allows you to create multiple proxy profiles, each with unique rules and configurations.
For example, you can define one profile for your work VPN, another for bypassing geo-restrictions, and another for secure browsing.
The extension integrates seamlessly with your Chrome or Firefox browser, making it easy to switch between these profiles with just a few clicks.
Proxy SwitchyOmega is free, and you can add it as an extension via your browser plugin or extension store. You can also get more information about it via the SwitchyOmega GitHub repository.
Key Features
Proxy SwitchyOmega is incredibly versatile, making it suitable for many users. Whether you’re a digital security professional, a web developer testing sites from different locations, or a regular Joe who wants to bypass geo-restrictions, this extension has something to offer.
Auto-Switch Mode: This feature allows the extension to switch between proxy profiles based on pre-set rules automatically. For example, you can set it to use a specific proxy for a particular website.
PAC Script Support: For those who require more advanced configurations, SwitchyOmega supports Proxy Auto-Configuration (PAC) scripts, allowing for a highly customizable experience.
Backup and Restore: Are you worried about losing your carefully configured profiles? SwitchyOmega has a backup and restore feature to put your mind at ease.
2. How to Install Proxy SwitchyOmega
The first step toward a more streamlined proxy management experience is installing SwitchyOmega. Thankfully, the process is quick and straightforward, requiring only a few clicks. Here’s how to get started.
Step 1: Navigate to the Web Store
Open your preferred browser—either Chrome or Firefox—and head to the extension marketplace. Once there, use the search bar to type in “SwitchyOmega” and hit enter.
You can access the respective store pages here;
Step 2: Install the Extension
You’ll see SwitchyOmega listed among the search results. Click on it to go to the extension’s dedicated page. Here, you’ll find an Add to (Browser) button, depending on your browser.
Click this button, and a pop-up window will appear, asking permission to access specific data or features. Don’t worry; this is standard procedure for most extensions. Click Add Extension to finalize the installation.
Step 3: Confirm Installation
After a brief moment, the installation will be complete, and you’ll see a notification confirming the same. You’ll also notice the SwitchyOmega icon appear next to your browser’s address bar. This icon is your gateway to efficient proxy management, so it’s a good idea to get familiar with it.
3. Basic Proxy SwitchyOmega Configuration
Now that you’ve successfully installed SwitchyOmega, it’s time to configure it to your specific needs. The extension offers a user-friendly interface that makes setting up your proxy profiles a breeze. Let’s walk through the basic steps to get you up and running.
Accessing the Dashboard
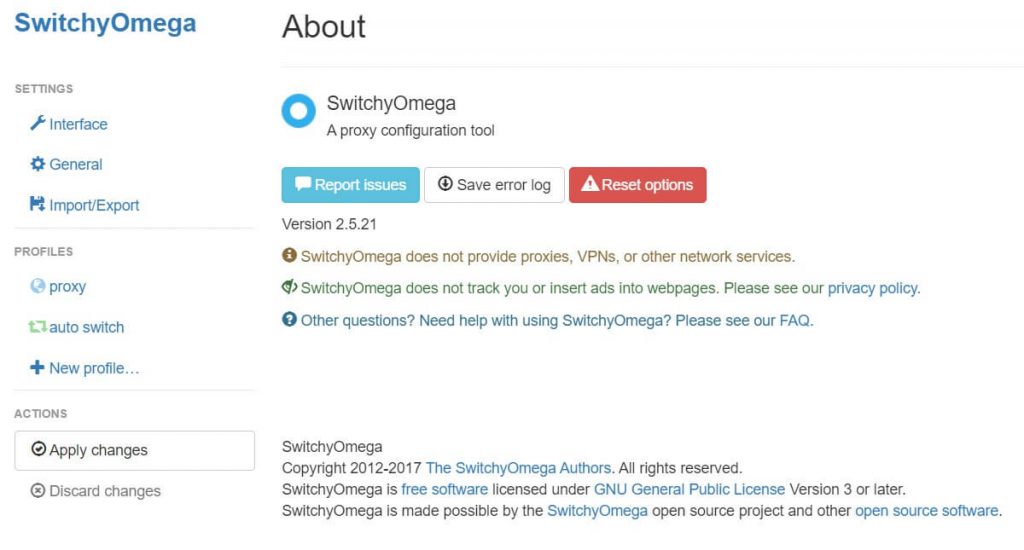
To begin, click the SwitchyOmega icon next to your browser’s address bar. This will open a dropdown menu. From here, select the ‘Options’ button to access the SwitchyOmega dashboard.
This is where all the magic happens; it’s your control center for creating and managing proxy profiles.
Creating a New Profile

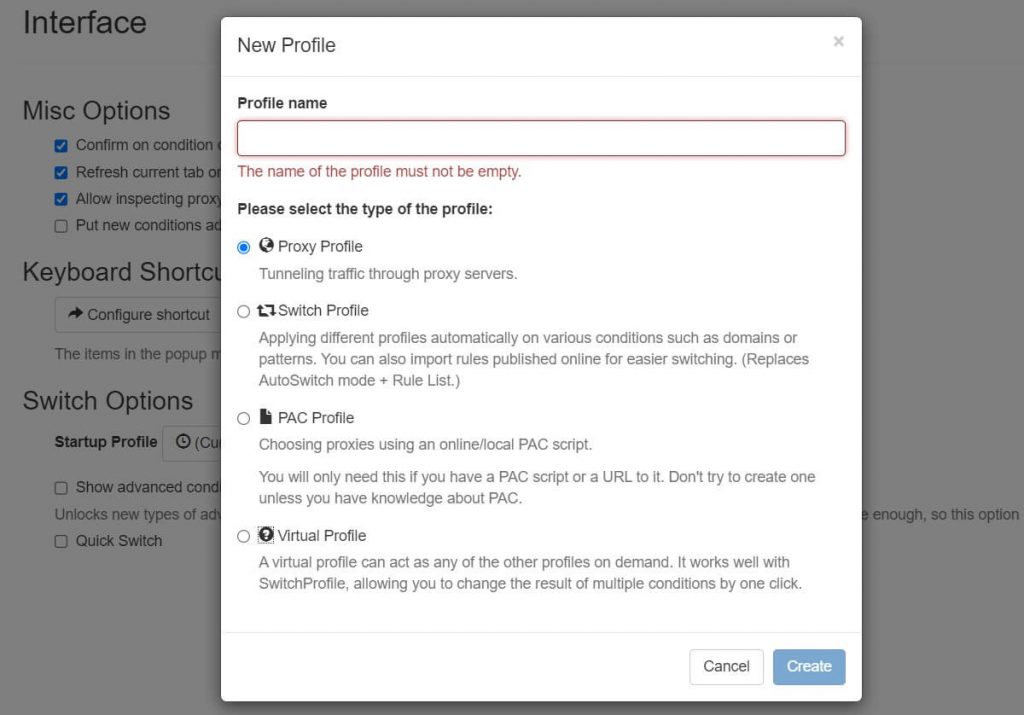
Once you’re in the dashboard, you’ll see an option to create a new profile. Click on it, and you’ll be prompted to choose the type of profile you want to make.
For basic configurations, the ‘Proxy Profile’ option is usually sufficient. Name your new profile something descriptive, like “Work VPN” or “Streaming Service,” to quickly identify it later.
Adding Your Proxy Details
After creating a new profile, you must input the proxy server details. You’ll see fields for the server address, port, and proxy type (HTTP, HTTPS, بروكسيات, etc.). Fill in these details as per your proxy provider’s instructions. Remember to save your settings.
Testing the Profile
Before you start using your new profile, it’s a good idea to test it out. Switch to the profile you just created by selecting it from the SwitchyOmega icon dropdown in your browser. Then, try accessing a website to see if the proxy works as expected.
Proxy Quick Switching
One of the best features of SwitchyOmega is the ability to switch between profiles quickly. Once you’ve set up multiple profiles, you can easily toggle between them by clicking the SwitchyOmega icon and selecting the profile you want to use.
Ready to unlock the full potential of RapidSeedbox Proxies with SwitchyOmega?
Effortlessly configure your browsing through our reliable proxies with SwitchyOmega.
Maintain your anonymity and protect your online activities.
Freely access content from any location, bypassing geo-restrictions.
———
4. How to Optimize Your Proxy Settings
Once you’ve got the hang of the basic functionalities of SwitchyOmega, you might be wondering how to take your proxy management to the next level. Optimization ensures you get the most out of this powerful tool.
Here’s how to fine-tune your settings for optimal performance and convenience.
Set Proxy SwitchyOmega to Auto-Switch Mode

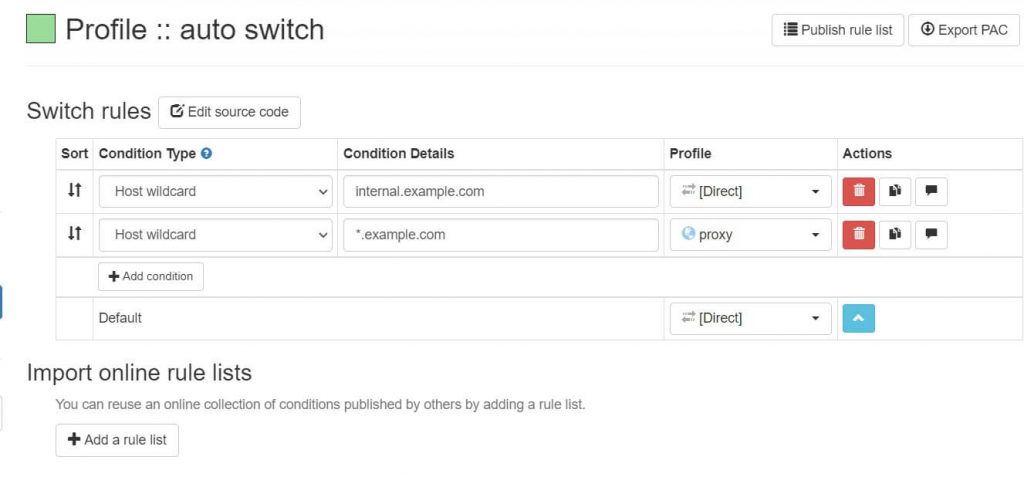
SwitchyOmega’s Auto-Switch Mode is a game-changer. It allows the extension to automatically switch between proxy profiles based on pre-set conditions or rules. This eliminates the need to manually change profiles, making your browsing experience more seamless.
- Open the SwitchyOmega dashboard by clicking on the extension icon and selecting Options.
- Choose Auto Switch from the left sidebar.
- Add conditions or rules that specify which proxy profile to use for particular websites or IP ranges.
- Save your settings.
Implement PAC Scripts for Customization
For those who need a more tailored proxy setup, SwitchyOmega supports Proxy Auto-Configuration (PAC) scripts.
These scripts allow you to define complex rules for when and how to use different proxies. It’s a bit more advanced, but it offers a level of customization that simple profiles can’t match.
- In the SwitchyOmega dashboard, create a new profile and select PAC Profile.
- Input your PAC script in the provided field.
- Save the profile.
Prioritize Your Profiles
If you have multiple profiles, it’s a good idea to prioritize them based on how frequently you use them. SwitchyOmega allows you to rearrange the order of your profiles so that your most-used ones appear at the top of the list. This minor tweak can save you time in the long run.
- Go to the SwitchyOmega dashboard.
- You’ll see a list of your profiles on the left sidebar. Drag and drop them to rearrange.
- The profiles will now appear in your chosen order when you click the SwitchyOmega icon in your browser.
5. Troubleshooting Common Issues
Even the most reliable tools can encounter issues, and SwitchyOmega is no exception. However, most problems you face are easily solvable with some troubleshooting. Here’s a guide to resolving some of the most common issues users encounter.
Proxy Not Switching
Symptoms: You’ve selected a different proxy profile, but your browser still uses the old settings.
- Double-check that you’ve saved the new profile settings in the SwitchyOmega dashboard.
- Try refreshing the webpage you’re on.
- If the issue persists, restart your browser and try again.
Slow Connection Speed
Symptoms: Websites are loading slowly or timing out.
- Test your proxy server’s speed to ensure it’s not the source of the problem.
- Check your profile settings to ensure you’re using the correct server and port.
- If the issue remains, consider switching to a different proxy server.
Extension Not Loading
Symptoms: The SwitchyOmega icon is grayed out, or the dashboard won’t open.
- Try disabling and re-enabling the extension from your browser’s extension settings.
- If that doesn’t work, uninstall and reinstall SwitchyOmega.
Auto-Switch Not Working
Symptoms: The Auto-Switch feature does not switch profiles based on your pre-set conditions.
- Review your Auto-Switch settings in the SwitchyOmega dashboard.
- Test the conditions by visiting the websites you’ve set rules for.
- If it’s still not working, try restarting your browser.
PAC Script Errors
Symptoms: You’re experiencing issues or errors when using a PAC profile.
- Double-check the PAC script for any syntax errors or incorrect configurations.
- Test the script using a different proxy to rule out server-related issues.
6. Tips and Tricks for Using SwitchyOmega Effectively
SwitchyOmega is a powerful tool, but its full potential is unlocked when you know how to use it effectively. Here are some advanced tips and tricks to elevate your experience.
Use Keyboard Shortcuts
Keyboard shortcuts offer a seamless way to switch between profiles without breaking your workflow. This is especially beneficial for those who multitask across various web services that require different proxy settings.
- Go to the SwitchyOmega options page.
- Navigate to the General tab.
- Here, you’ll find options to set keyboard shortcuts for quick profile switching.
Set Up Temporary Profiles
Temporary profiles are perfect for tasks that require unique proxy settings for a short period. For example, if you’re testing a website from multiple geographical locations, a temporary profile allows you to do this without cluttering your list of saved profiles.
- Click on the SwitchyOmega icon in your browser.
- Select Temporary Profile from the dropdown.
- Configure the settings for temporary use and apply.
Use the Bypass List
The Bypass List is a valuable feature for those who frequently access a mix of local and international websites. By adding trusted or local sites to the list, you can directly connect to them without the latency that sometimes comes with using a proxy.
- In your chosen profile, find the Bypass List section.
- Add the URLs or IP addresses you want to bypass the proxy.
Sync Profiles Across Devices
Syncing profiles across devices ensures a consistent and efficient browsing experience, whether switching from a desktop to a laptop or a mobile device.
This is particularly useful for professionals who must maintain the same proxy configurations across multiple workstations.
Go to the SwitchyOmega options page.
Navigate to the Import/Export tab.
Use the Export feature to save your settings, then Import them on another device.
Use Condition Types in Auto-Switch
Utilizing different condition types in Auto-Switch allows for more granular control over your proxy settings. For instance, you could set up rules that only trigger under particular conditions, such as accessing a specific type of content or during certain times of the day.
- In the Auto-Switch settings, you’ll see an option for Condition Type.
- You can choose from various conditions like Host Wildcard, URL Regex, etc.
7. How Proxy SwitchOmega Enhances Privacy and Security
SwitchyOmega is often celebrated for its convenience and user-friendly interface, but it’s also a powerful tool for enhancing your online privacy and security. After all, a خادم البروكسي is valuable, and ProxyOmega helps put them on steroids.
By effectively managing your proxy settings, SwitchyOmega provides several layers of protection beyond mere convenience.
Encrypted Connections
Encrypting your connection makes it difficult for third parties, such as hackers or government agencies, to intercept and view your data. This is particularly crucial when using public Wi-Fi networks, which are often less secure and more susceptible to attacks.
When you use a proxy or VPN service that offers encrypted connections, SwitchyOmega ensures that your web traffic is routed through these secure channels.
IP Address Masking
Hiding your IP address enhances your online anonymity, making it harder for websites and online services to track your browsing habits and personal information. This is especially useful for journalists, activists, or anyone concerned about online privacy.
SwitchyOmega lets you easily switch between proxy servers, effectively masking your IP address.
Geo-Spoofing
Geo-spoofing not only allows you to access content that may be restricted in your actual location but also adds an extra layer of privacy by making your online activities less traceable.
By using proxy servers located in different countries, you can make it appear as though you’re browsing from a different location.
8. Final Thoughts
SwitchyOmega is more than just a proxy management tool; it’s a comprehensive solution for enhancing your online experience. From its user-friendly interface to its robust security features, SwitchyOmega offers a level of customization and control that is unparalleled.
By mastering its various features and applying the tips, tricks, and troubleshooting solutions outlined in this guide, you’re not just using SwitchyOmega—you’re optimizing it for a safer, more efficient, and more private browsing experience.
0التعليقات