Have you ever felt like you needed a magnifying glass for your network traffic?
Meet Mitmproxy.
This open-source powerhouse lets you intercept, modify, and analyze HTTP/1, HTTP/2, and WebSocket traffic. It is perfect for web developers, network admins, and ideal security professionals.
This article covers everything you need to know about Mitmproxy (if you are a beginner). It provides an overview of the service, its pros and cons, installation steps, basic usage, and advanced features like SSL/TLS setup, Python automation, and Docker integration.

Disclaimer: This material has been developed strictly for informational purposes. It does not constitute endorsement of any activities (including illegal activities), products or services. You are solely responsible for complying with the applicable laws, including intellectual property laws, when using our services or relying on any information herein. We do not accept any liability for damage arising from the use of our services or information contained herein in any manner whatsoever, except where explicitly required by law.
Table of Contents
- Overview of Mitmproxy
- What it is.
- Pros and cons
- Mitmproxy use cases
- How to Install Mitmproxy (Step-by-Step Guide)
- Windows
- Linux
- macOS
- Getting Started with Mitmproxy
- Launch Mitmproxy
- Configure Your Browser or Device
- Verify Configuration
- How to Use Mitmproxy
- More Things You Can Do with Mitmproxy
- Use the Web Interface
- Use Mitmdump
- Setting Up SSL/TLS Certificates
- Automate Tasks with Python
- Running Mitmproxy in Docker
- FAQ Section
- Final Words.
1. Overview of Mitmproxy
Mitmproxy is an open-source powerful toolset for intercepting, modifying, and analyzing network traffic (specifically HTTP/1, HTTP/2, and WebSockets). It’s an SSL/TLS-capable intercepting proxy. It is perfect for debugging, testing, and security assessments. It comes in three flavors to suit all your needs:
- Mitmproxy: An interactive console that lets you explore traffic interception in detail.
- Mitmweb: An easy-to-use web interface that looks and feels like Chrome’s DevTools.
- Mitmdump: A command-line tool that works like tcpdump for scripting and automation.
What does Mitmproxy mean?
The first part of the word -> MitM (Man-in-the-Middle) is a cyber-security term that refers to a type of attack or technique. Here an attacker would secretly intercept and possibly alter the communication between two parties who think they are communicating directly with each other. The other side of the word “proxy” (or middleman) refers to the intermediary between the client and the server. It allows users to intercept, inspect, and modify network traffic. Mitmproxy uses this concept but in a controlled and ethical manner.
Mitmproxy Pros and Cons
Every tool has its highs and lows and this one is no exception. In this section, we’ll dive into the main advantages and possible pitfalls of using it. This will help you determine if it’s the perfect match for your needs.
| Pros | Cons |
| Interactive Traffic Interception and Analysis: Real-time capture, modification, and replay of HTTP/HTTPS traffic. | Steep Learning Curve: Requires knowledge of networking and certificates. |
| SSL/TLS Capabilities: Generates SSL/TLS certificates for secure interception. | Command-Line Driven: CLI reliance can be challenging for GUI users. |
| Dual Interfaces and Advanced Filtering: CLI and web interface (mitmweb) with powerful filtering options. | Resource Intensive: High computational demands for large traffic volumes. |
| Scripting, Automation, and Custom Addons: Python API for custom scripts and addons. | Compatibility Issues: Problems with certain apps and complex setups. |
| Cross-Platform Support: Available for Windows, Linux, and macOS. | Security Risks: Needs strict security measures to avoid attacks. |
| Free and Open Source: Accessible with community support. | Manual Configuration: Complex setup for Docker and cloud environments. |
What do we recommend it for? Mitmproxy Use Case Examples
- Debugging Applications. Use Mitmproxy to capture and analyze HTTP requests and responses. This helps pinpoint slow responses or oversized payloads to fix delays. Intercepting traffic to see what data is being sent and received, also helps debug data-related problems. Additionally, it helps simulate various server responses to see how your app handles errors.
- Penetration Testing. With Mitmproxy you can capture and tweak HTTP/HTTPS traffic to mimic attacks (e.g., SQL injection, XSS) and identify vulnerabilities. Plus, you can also record and tweak legitimate traffic to test for weaknesses like replay attacks and session fixation. In this area, Mitimproxy also helps intercept encrypted traffic to verify certificate handling, encryption standards, and overall HTTPS security.
- Privacy Measurements. Mitimproxy is useful for capturing and inspecting traffic to ensure no sensitive information is being leaked. You can also use it to verify that data handling and transmission comply with privacy regulations like GDPR. People also use it for third-party service analysis. Analyze traffic between your app and third-party services to ensure they’re not collecting unnecessary data.
2. How to install Mitmproxy (step-by-step guide)
a. Windows: Step-by-Step Installation Guide
- Download the Installer: Download the Windows installer from the official website.
- Run the Installer: Execute the downloaded file and follow the on-screen instructions to complete the installation.
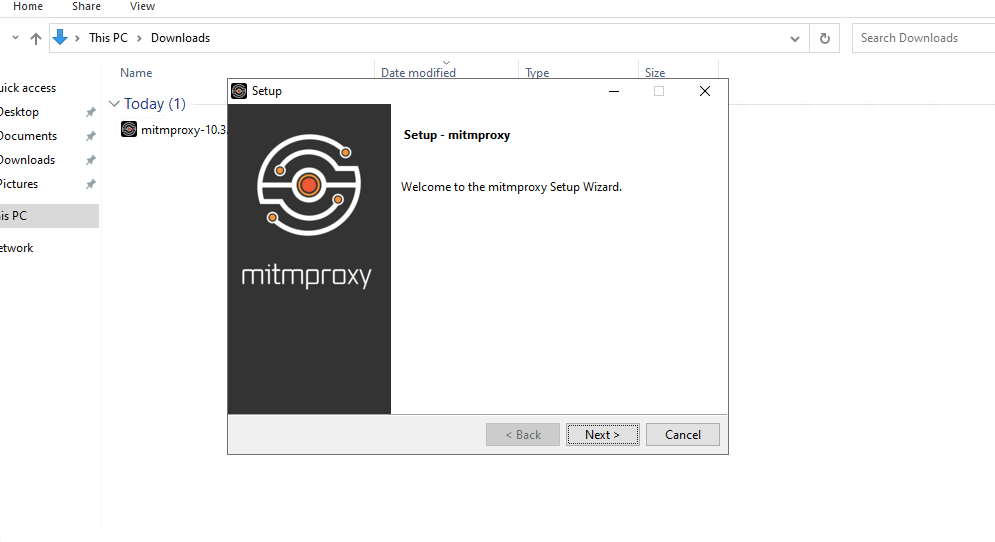
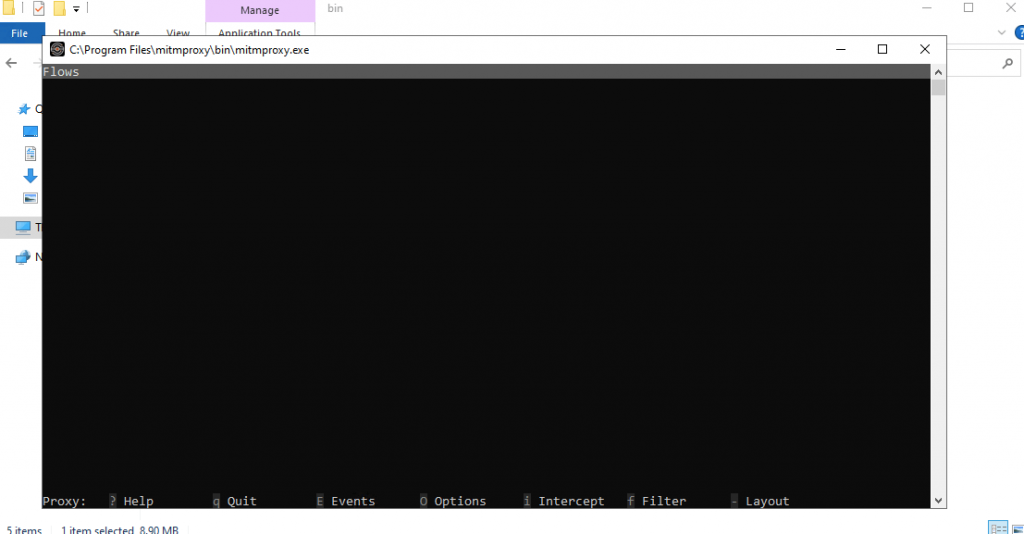
- Verify Installation: Open a command prompt and type mitmproxy, mitmweb, or mitmdump to verify the installation. If the tools launch correctly, that means the installation was successful. But still, no traffic flows are being captured.
b. Linux: Using Package Managers and Source Installation
To install Mitmproxy on Linux, you can either use package managers or install from source.
Using Package Managers:
You can download standalone binaries for your specific distribution (visit the official website to find these binaries) or use the package managers respective to each distribution. Both methods provide pre-compiled binaries that simplify the mitmproxy installation. Still, the package managers offer automated dependency management and updates.
Arch Linux:
|
1 |
sudo pacman -S mitmproxy |
Fedora:
|
1 |
sudo dnf install mitmproxy |
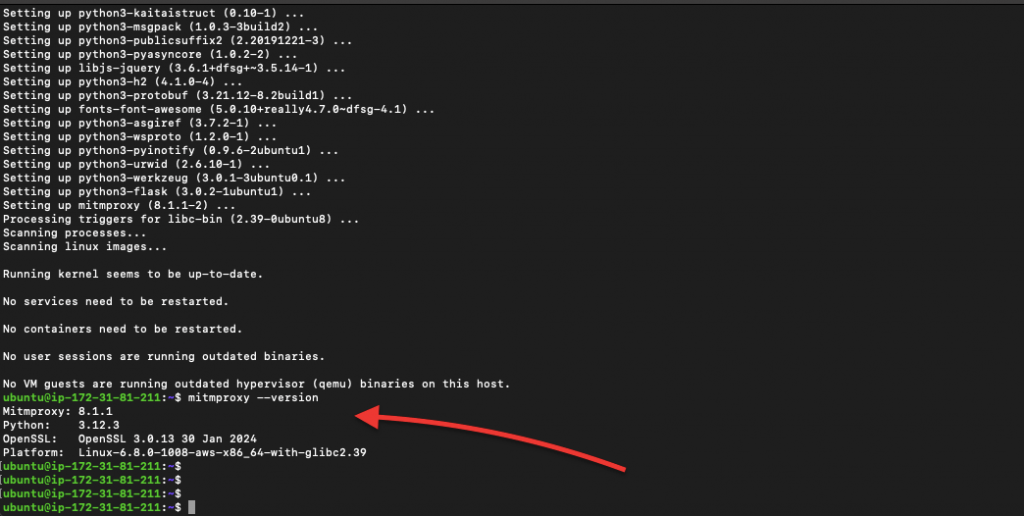
Debian/Ubuntu:
|
1 2 |
sudo apt update sudo apt install mitmproxy |
Source Installation:
If you prefer, you can also install it from the source. All instructions are below.
|
1 2 |
git clone https://github.com/mitmproxy/mitmproxy.git cd mitmproxy |
Install dependencies and build:
|
1 2 |
pip install -r requirements.txt python setup.py install |
Using pipx for Python Package Management:
Install pipx:
|
1 2 |
python -m pip install --user pipx python -m pipx ensurepath |
Install mitmproxy:
|
1 |
pipx install mitmproxy |
c. macOS: Installation via Homebrew
Pre-requisite: Install Homebrew: If you haven’t installed Homebrew, follow the instructions on Homebrew’s official website.
Install mitmproxy:
|
1 |
brew install mitmproxy |

Verify Installation:
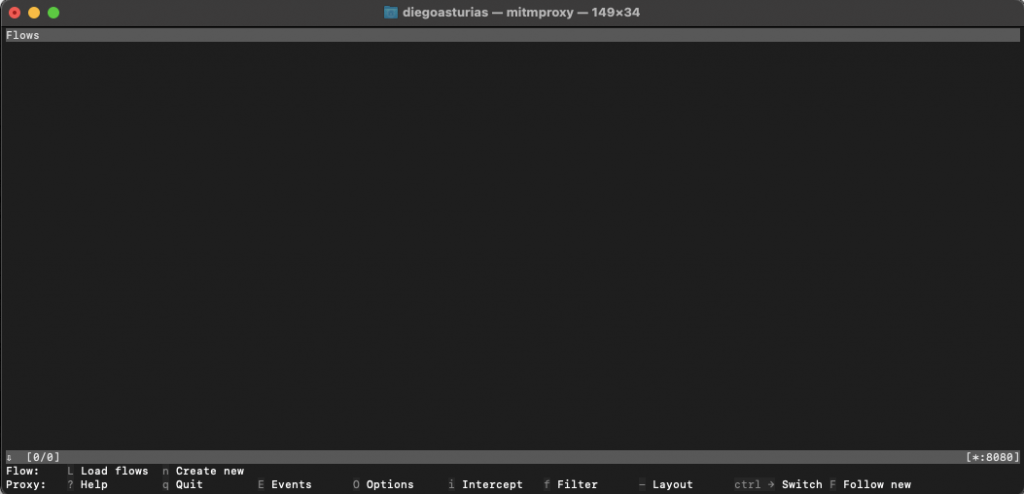
Open a terminal and type mitmproxy, mitmweb, or mitmdump to verify the installation.
Mitmproxy users, looking for scalability and performance?
How can Rapidseedbox Help?
High Traffic Volume Handling
Guaranteed Uptime
Global Reach
Enhanced Anonymity
———
3. Getting Started with Mitmproxy.
Once it is installed on your platform, it is time to use it. In this section, we will learn the basic configuration and setup, basic commands, and how to set it up on different devices and browsers.
Note: By default, Mitmproxy starts an HTTP proxy. It also listens http://localhost:8080.
a. Launch Mitmproxy:
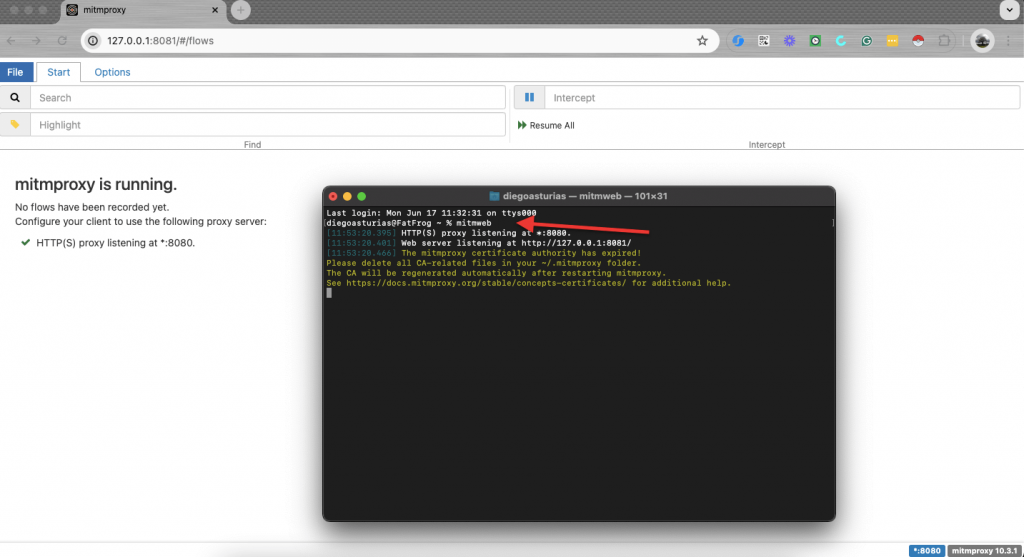
- (As shown in the previous section) Open a terminal and type “mitmproxy” to launch the command-line interface. The mitmproxy interface should look as the following screenshot:

- Type “mitmweb” to start the web interface. It will start automatically (as shown in the following screenshot).
- If it doesn’t start, open your browser and go to http://localhost:8081.
- Mitmdump: Type mitmdump to use the command-line tool for scripting.

Troubleshoot!
If you see the following line: “[12:10:38.265] The mitmproxy certificate authority has expired! do the following…
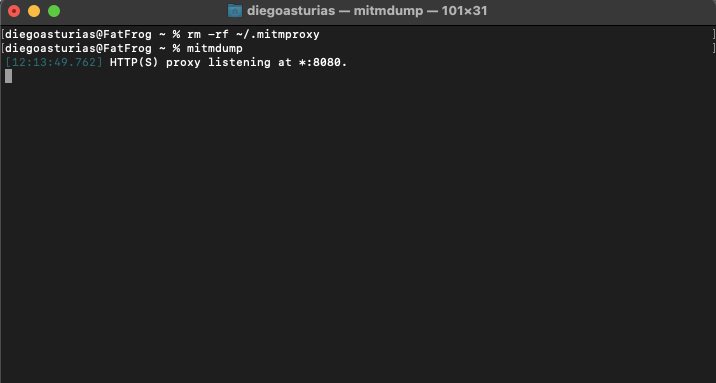
This error message indicates that the Mitmproxy certificate authority (CA) has expired. To fix this, go ahead and delete the CA-related files in your .mitmproxy folder so that a new CA can be generated. Once you delete the expired CA files, the tool will automatically regenerate a new CA upon restarting.
Here are the steps to resolve this issue:
Delete CA-related Files:
|
1 |
rm -rf ~/.mitmproxy |
Restart Mitmproxy:
|
1 |
mitmdump |
b. Configure your Browser or Device.
To use it, set up your browser or device to take all traffic through Mitmproxy. You can set up the proxy on Google Chrome, Mozilla Firefox, Microsoft Edge, or devices like iOS (iPhone / iPad) or Android. But bear in mind that proxy configurations change from browser to browser and device to device.
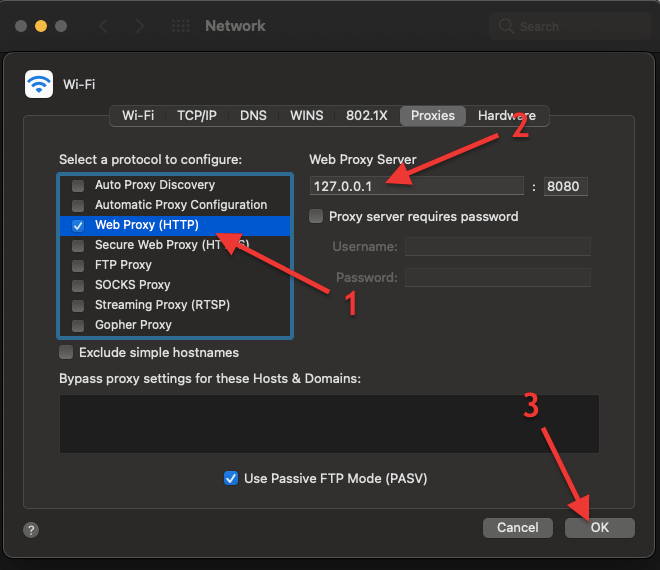
Set the HTTP Proxy:
- Open your browser or device network settings. Don’t know what is an HTTP Proxy? Read more here (HTTP Proxy) and learn the differences from SOCKS5 proxies.
- Find the proxy settings (this can usually be found under advanced settings or connection settings).
- Set the Web HTTP proxy (1) to http://localhost:8080, or 127.0.0.1:8080 (2), and then click on ok (3).
Installing the Mitmproxy CA.
- Open your browser and navigate to http://mitm.it. You will see a page directing you to install the Mitmproxy Certificate Authority (CA).
- Find your respective platform and download the certificate. If the download doesn’t happen… follow the instructions shown on that same http://mitm.it page.
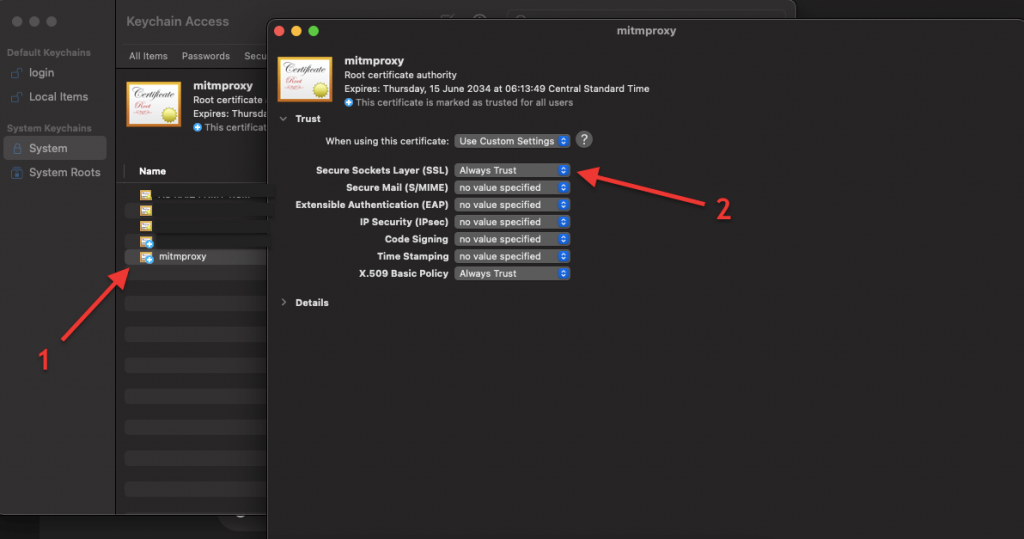
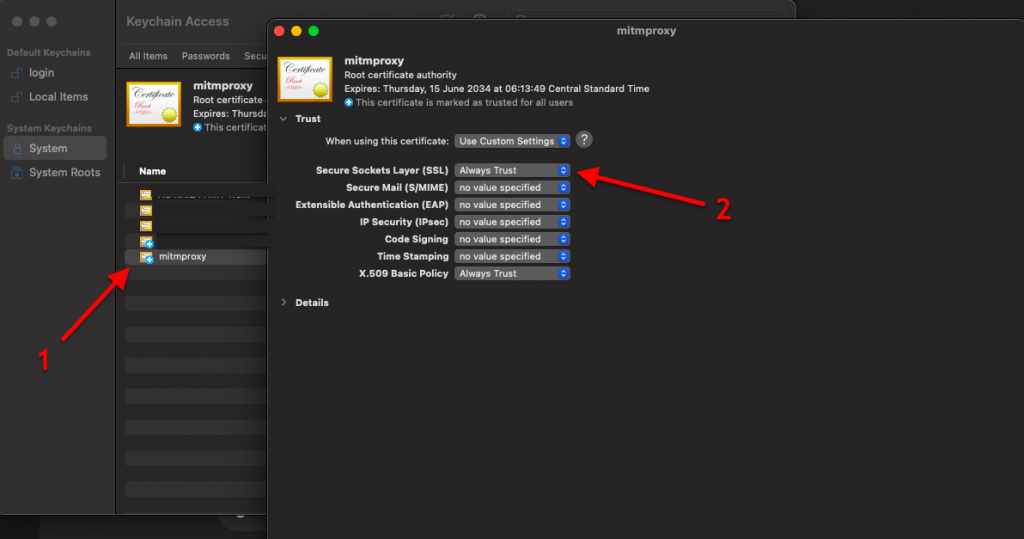
- You can verify that the mtimproxy CA certificate is installed by going checking your system’s certificates.
- For macOS, go to Keychain Access > Certificates. Make sure the SSL is set to “Always Trust”
Unable to route web traffic through Mitmproxy?
- If, when opening the web page (http://mitm.it) you see the following message “If you can see this, traffic is not passing through mitmproxy” it means that your web traffic is not being intercepted by mitmproxy.
- Most likely this is because you haven’t set the proxy server configuration (on your browser or device) correctly. Also, ensure that mitmproxy is set up correctly and is running. And then try again.

c. Verify Configuration.
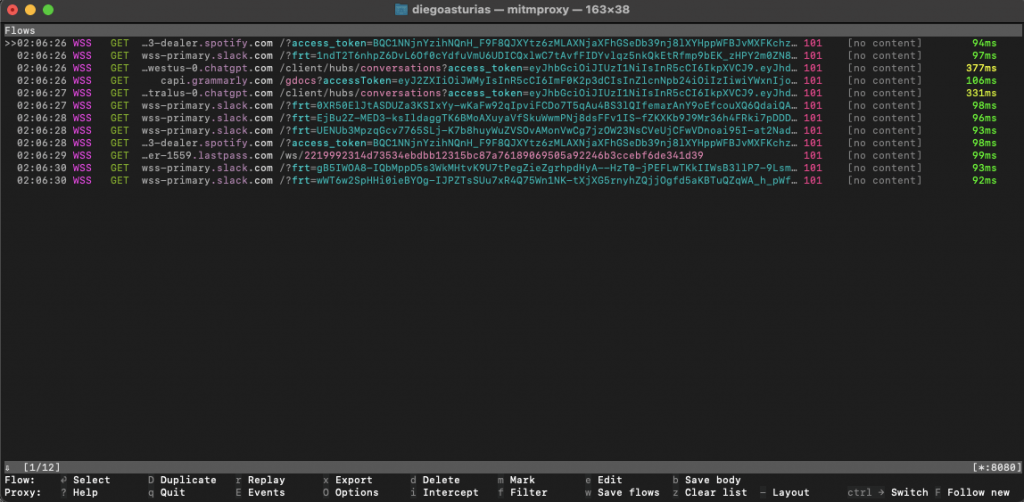
- Open the terminal and start the service with the following command: ‘mitmproxy’
- Once you start it (if properly configured), you’ll see the terminal receive HTTP and WSS flows.
4. How to Use Mitmproxy.
The interface shows the following information.
- Flows Section: The main part of the screen shows the list of intercepted HTTP and WebSocket flows. Each row represents a single HTTP/WebSocket request and response.
- Columns:
- Time: Shows the time the request was captured.
- Protocol: Indicates the protocol used (e.g., HTTP, WS for WebSocket).
- Method: HTTP method used (e.g., GET).
- Host and Path: The target host and path of the request.
- Status Code: The HTTP status code returned by the server.
- Content: Shows if the response has content or not.
- Duration: Time taken to process the request in milliseconds.
Detailed Flow Information
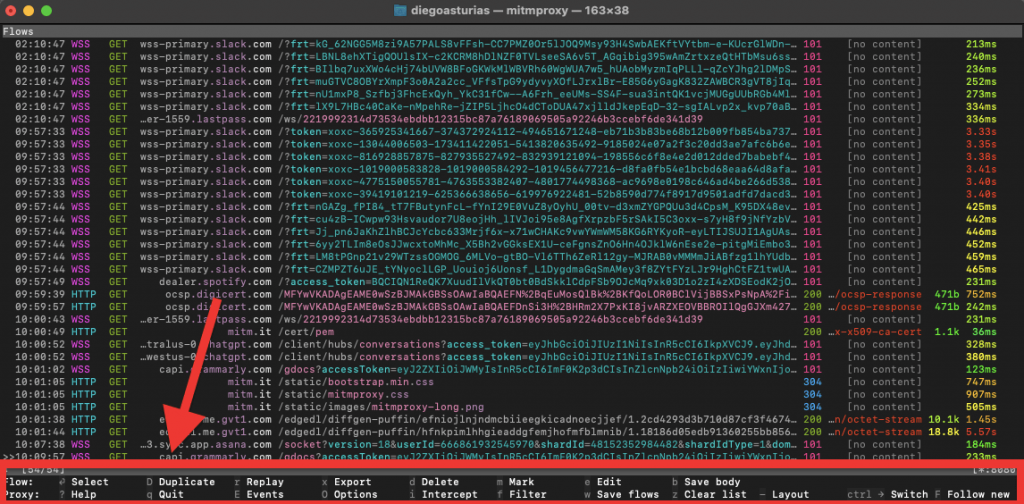
- Selected Flow: At the bottom, you see the number of selected flows and a small menu
- Flow: Indicates the number of flows selected.
- Proxy: Shows the active proxy configuration.
- Other Options: You can use keys like o for Options, e for Events, q to Quit, and various other commands to interact with the flows. (more on this below)
- Inspecting a Flow:
- Use the arrow keys to navigate through the list of flows. You will see a ‘>>’ symbol moving up and down the flows.
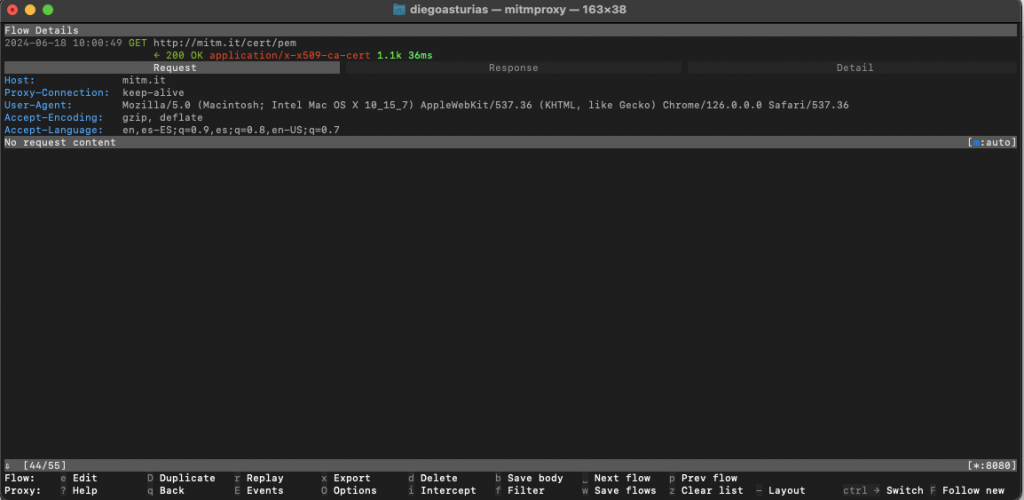
- Press Enter to inspect a specific flow in detail. This will allow you to see headers, content, and other information about the request and response.
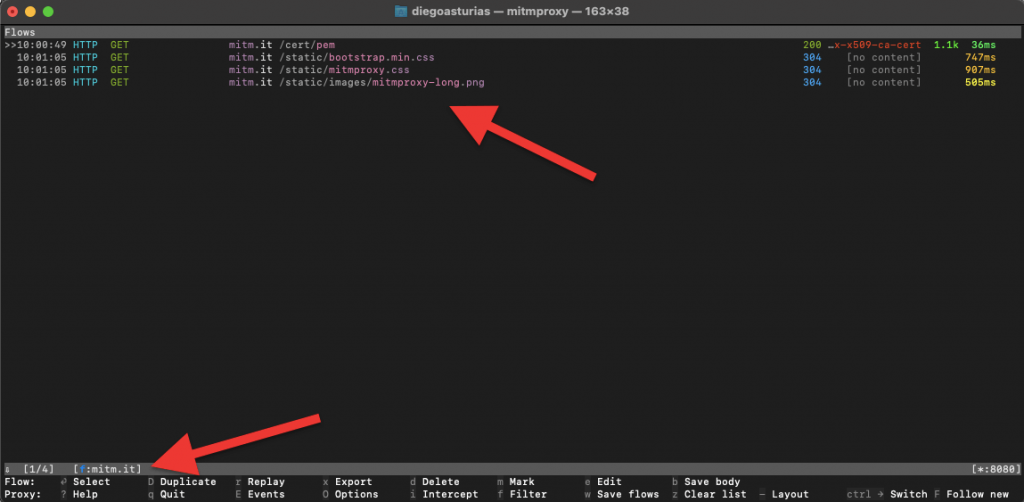
- For example, we selected the flow with host mitm.it. In this section, you will see all information about the header. Also, you can move around the tabs: Request, Response, and other Details.
- Filtering Flows: You can filter the flows by pressing f and typing in your filter criteria, such as specific hostnames or request types.
- For example, we typed “mitm.it” using a filter and now we can see only mitm.it hosts.
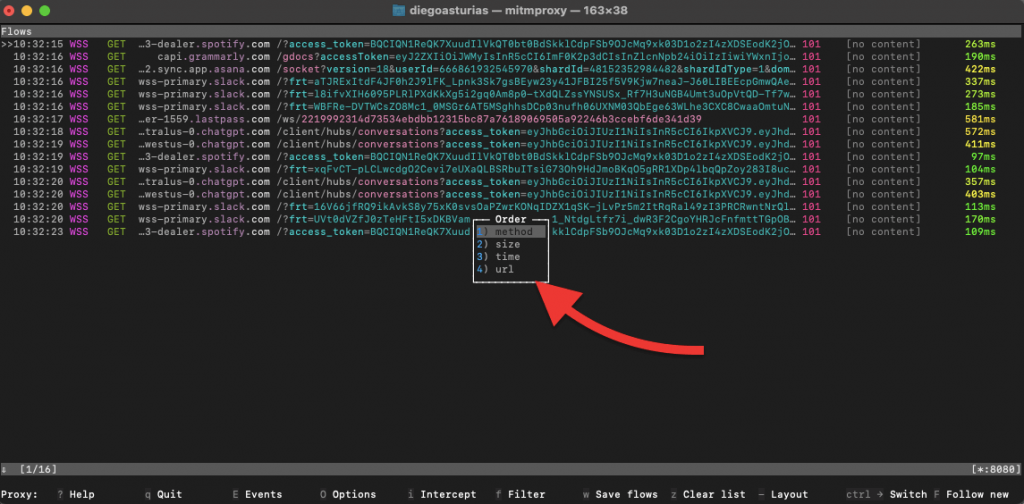
- Options and Configuration: Press o to open the options menu, where you can configure various settings for Mitmproxy. These options are method, size, time, and url.
Bottom Menu Options in Mitmproxy
- In the the interface, the bottom menu provides various options to interact with the captured flows and configure Mitmproxy settings.
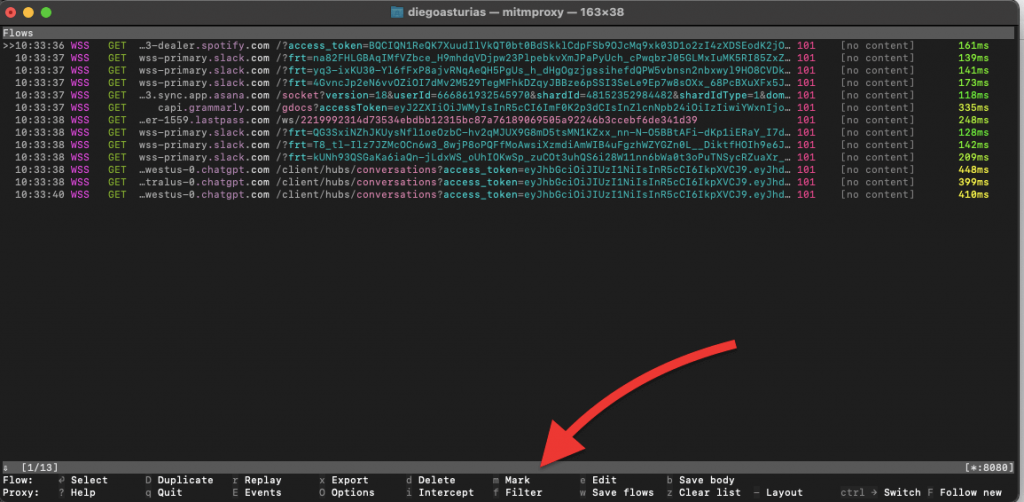
Here is a detailed explanation of all the options shown on the bottom menu:
- Flow: Select the currently highlighted flow for detailed inspection or manipulation.
- Select: Allows you to select multiple flows for batch operations.
- Help: Access help and documentation for using Mitmproxy.
- q Quit: Exit the session.
- r Replay: Replay the selected HTTP request.
- E Events: View the event log for Mitmproxy, which includes important messages and errors.
- Export: Export selected flows to a file for later analysis or sharing.
- Options: Open the options menu to configure the settings.
- d Delete: Delete the selected flow from the list.
- i Intercept: Intercept requests to modify or inspect them before forwarding them to the server.
- Mark: Mark flows to perform batch operations like deletion or export.
- Filter: Apply filters to view only specific flows based on criteria like host, method, or status code.
- e Edit: Edit the request or response of the selected flow.
- b Save body: Save the body of the selected flow to a file.
- z Clear list: Clear all flows from the list.
- Save Flows: Save all captured flows to a file.
- Change Layout: Switch between different layout modes in the interface.
- Ctrl+F Follow new: Automatically follow and highlight new flows as they are captured.
Want more help with Mitmproxy?
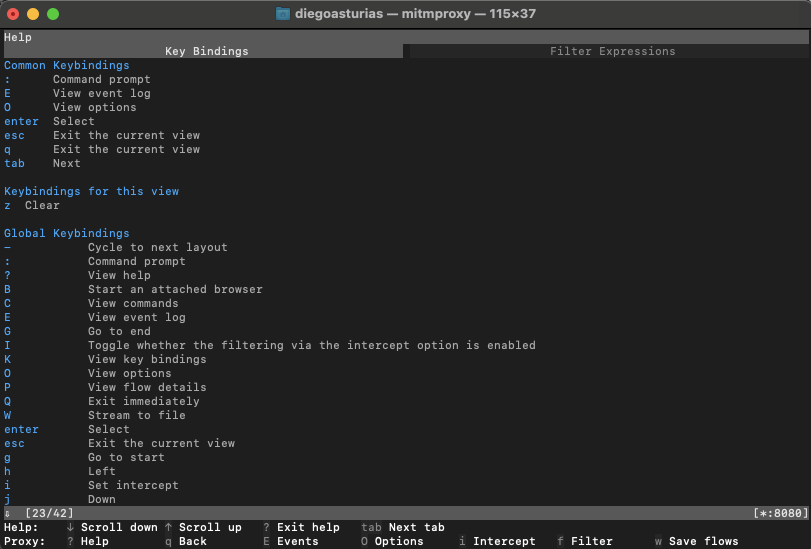
View help: Press ‘?’ within the mitmproxy interface for context-sensitive help.
What’s Next?
Now, you are equipped with the knowledge to start using Mitmproxy. And, so what is next?
- Start Capturing: As traffic flows through Mitmproxy, you’ll see HTTP (or WSS) requests and responses in real time. Use the interface to inspect and modify them on the fly.
- Analyze Traffic: Look for patterns, anomalies, or specific data within the captured traffic. The tool lets you dissect each request and response down to the finest details.
5. More things you can do with Mitmproxy
Mitmproxy is more than just a simple web traffic interceptor; you can do so much more with this fantastic tool. Below are five more cool things you can do with this tool.
a. Use the Web interface.
Use the built-in web-based interface with a GUI for easier traffic analysis and manipulation. How to start it?
- Start mitmweb: ‘mitmweb’
- Open the web interface: Go to http://localhost:8081 in your browser.
b. Use Mitmdump.
Mitmdump comes with the Mitmproxy installation. It is a non-interactive command-line tool designed for scripting and automation.
- Start mitmdump: mitmdump
- Save traffic to a file: mitmdump -w outfile
- Filter and replay traffic: mitmdump -nr infile -w outfile “~m post”
c. Setting Up SSL/TLS Certificates
Traffic Interception isn’t complete without handling encrypted traffic. Mitmproxy simplifies SSL/TLS certificate setup so you can peek into HTTPS traffic seamlessly. How to do this?
- The service creates a CA certificate that you’ll use to sign intercepted traffic.
- Navigate to http://mitm.it in your browser and follow the instructions to install the CA certificate on your device.
- With the CA certificate installed, Mitmproxy will decrypt HTTPS traffic, allowing you to inspect, modify, and analyze secure communications just like unencrypted HTTP traffic.
d. Automate Tasks with Python
Let’s take your traffic analysis to the next level. Mitmproxy’s Python API lets you automate tasks and customize traffic handling.
- Use Python to write custom addons that extend the tool’s functionality. For example, you can automatically modify requests or log specific traffic patterns.
- With the Python API, you have full control over intercepted traffic. Modify headers, alter request paths, or even block specific requests based on custom logic.
e. Running Mitmproxy in Docker
You’ll be happy to know that Mimtproxy is supported by Docker (If you prefer containerized environments). Mitmproxy in Docker integrates well into modern development workflows.
- Pull the Docker Image: Download the official image from DockerHub: docker pull mitmproxy/mitmproxy
- Run it in a Container: docker run –rm -it -p 8080:8080 mitmproxy/mitmproxy
6. FAQ Section.
1. How can I intercept HTTP/HTTPS requests using Mitmproxy?
To intercept HTTP/HTTPS requests, configure your browser or device to use Mitmproxy as its proxy. Start it in your terminal and it will begin capturing all traffic passing through it. You can then inspect and modify these requests on the fly. More information on the previous sections of the post.
2. Can Mitmproxy handle large amounts of network traffic?
Yes, Mitmproxy is designed to handle significant amounts of network traffic. However, for very high volumes, we recommend ensuring your hardware supports the load. The tool provides various options to optimize performance and manage traffic efficiently.
3. How does Mitmproxy manage SSL/TLS certificates?
Mitmproxy generates a Certificate Authority (CA) certificate which you need to install on your device. This allows Mitmproxy to intercept and decrypt HTTPS traffic. The CA certificate is used to sign other certificates on-the-fly. This makes the intercepted traffic appear trusted to your browser or application.
4. Is using Mitmproxy safe?
Mitmproxy is safe (if you use it correctly). As a best practice, ensure that the generated CA certificate is only used on trusted devices and environments. Always update Mitmproxy to the latest version to benefit from security patches and improvements. Most importantly, always remember, that intercepting traffic should only be done ethically and legally.
5. Can Mitmproxy be used with different hosting environments and servers?
Absolutely. Mitmproxy is compatible with various hosting environments and servers. You can set it up on local servers, cloud environments, and even within Docker containers.
6. How do I run Mitmproxy in a Docker container?
To run Mitmproxy in Docker, pull the official Mitmproxy image from DockerHub using the command “docker pull mitmproxy/mitmproxy.” Then, start a container with docker run –rm -it -p 8080:8080 mitmproxy/mitmproxy. This setup allows you to intercept traffic in a containerized environment. This is perfect for integrating with modern DevOps workflows.
7. How can I use the Mitmproxy API for custom traffic manipulation?
Mitmproxy provides a powerful Python API that allows you to write custom scripts for traffic manipulation. With this API, you can automate tasks, modify requests and responses, and implement complex logic. To get started, write your script and run Mitmproxy with the -s flag followed by your script’s path.
8. Can Mitmproxy be used for web scraping?
Yes, Mitmproxy is a perfect tool for web scraping. It allows you to capture and modify web traffic, making it easier to extract data from web pages. By analyzing HTTP requests and responses, you can automate data collection more effectively.
9. What is the process for TLS/SSL configuration in Mitmproxy?
To configure TLS/SSL in Mitmproxy, you’ll need to start a CA certificate on your device. This enables Mitmproxy to decrypt HTTPS traffic. Configure your client to trust the CA certificate, ensuring secure and seamless interception of encrypted traffic.
10. What are some alternatives or similar tools to Mitmproxy?
If you’re exploring alternatives (or similar tools) to Mitmproxy, consider the following:
- Fiddler for its user-friendly interface and powerful web session debugging capabilities
- Charles Proxy for its SSL proxying and bandwidth throttling features
- Burp Suite for comprehensive web application security testing.
- OWASP ZAP provides open-source security testing tools
- Wireshark offers detailed network protocol analysis
- Proxyman delivers a modern interface for web traffic debugging
- HTTP Toolkit simplifies intercepting and debugging HTTP(S) traffic with guided setup.
7. Final Words.
We have ‘superficially’ explored Mitmproxy’s features and capabilities. This article guide really covers only the tip of the iceberg of what this amazing tool can do.
In this guide, we covered installation steps for different operating systems, basic setup, and usage. Additionally, we delved into advanced functionalities like SSL/TLS interception, automation with Python, and Docker integration.
We hope, that with this knowledge, you make the most of Mitmproxy for your network traffic analysis and manipulation.
0Comments